Is your WooCommerce store starting to feel a little… invisible?
You have put together the best products, but they are not getting the attention you expected or deserve. In today’s fast-paced online market, it’s a real challenge to make your key offers and best items pop out to potential customers.
What if you could give them a small, visual nudge?
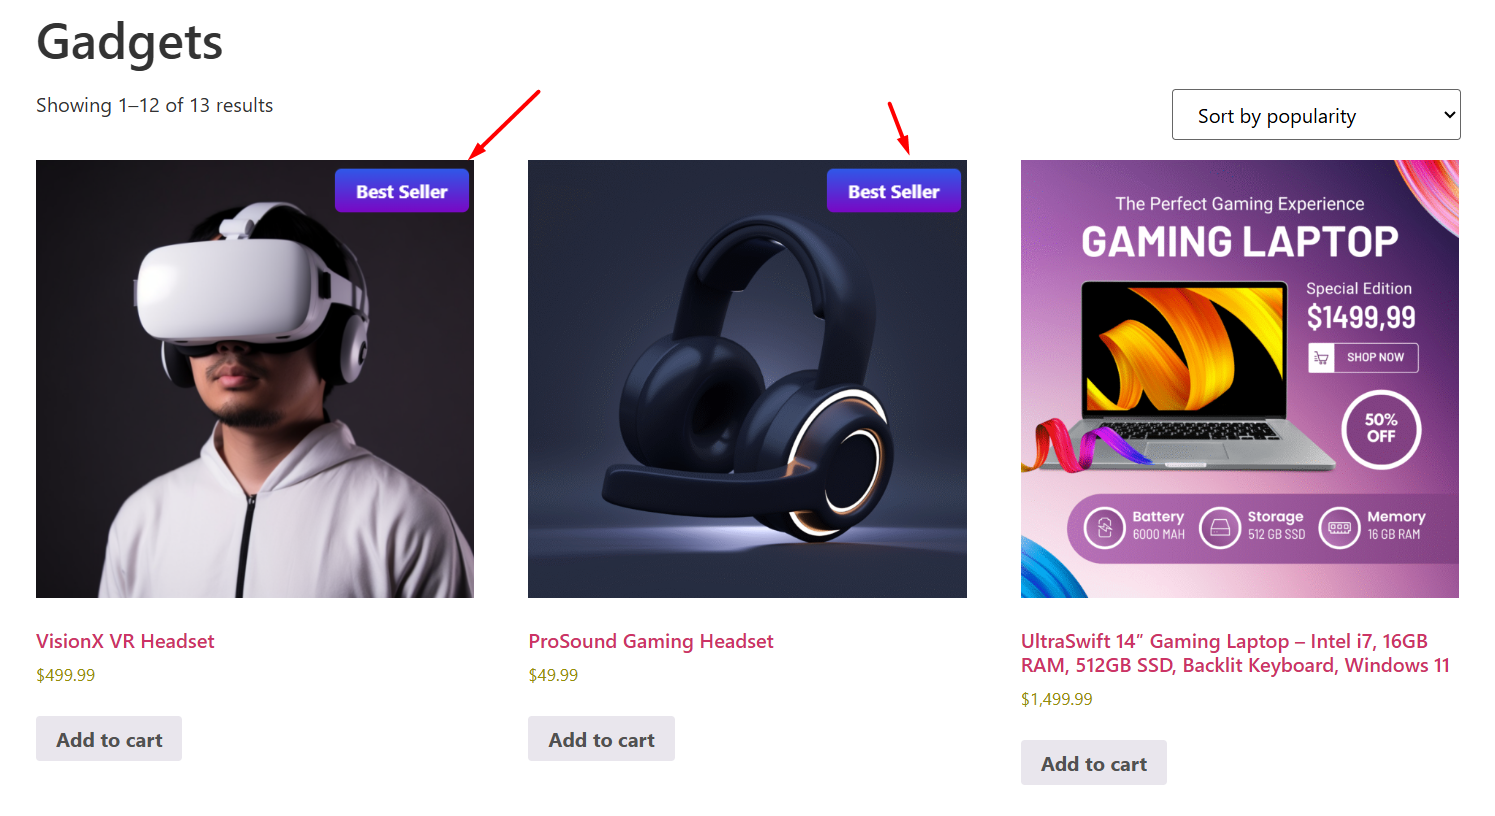
That’s where product badges come into play. Think of them as the little tags that you hung on products in the store– “On Sale”, “Best Seller”, “New Arrivals”. That’s how your product badges for WooCommerce work, too.
They are a simple yet incredibly effective tool for highlighting why an item is special, creating a sense of urgency, and ultimately leading your customers to click “Add to Cart”.
And this isn’t simply a guess.
Did you know, strategically placing product badges can yield a staggering 55% increase in conversion rates?
That’s more than half! This is one of the easiest and best strategies to boost sales without having to completely redesign your website.
In this guide, we’ll show you exactly how to harness this power for your own store.
What Are Product Badges?
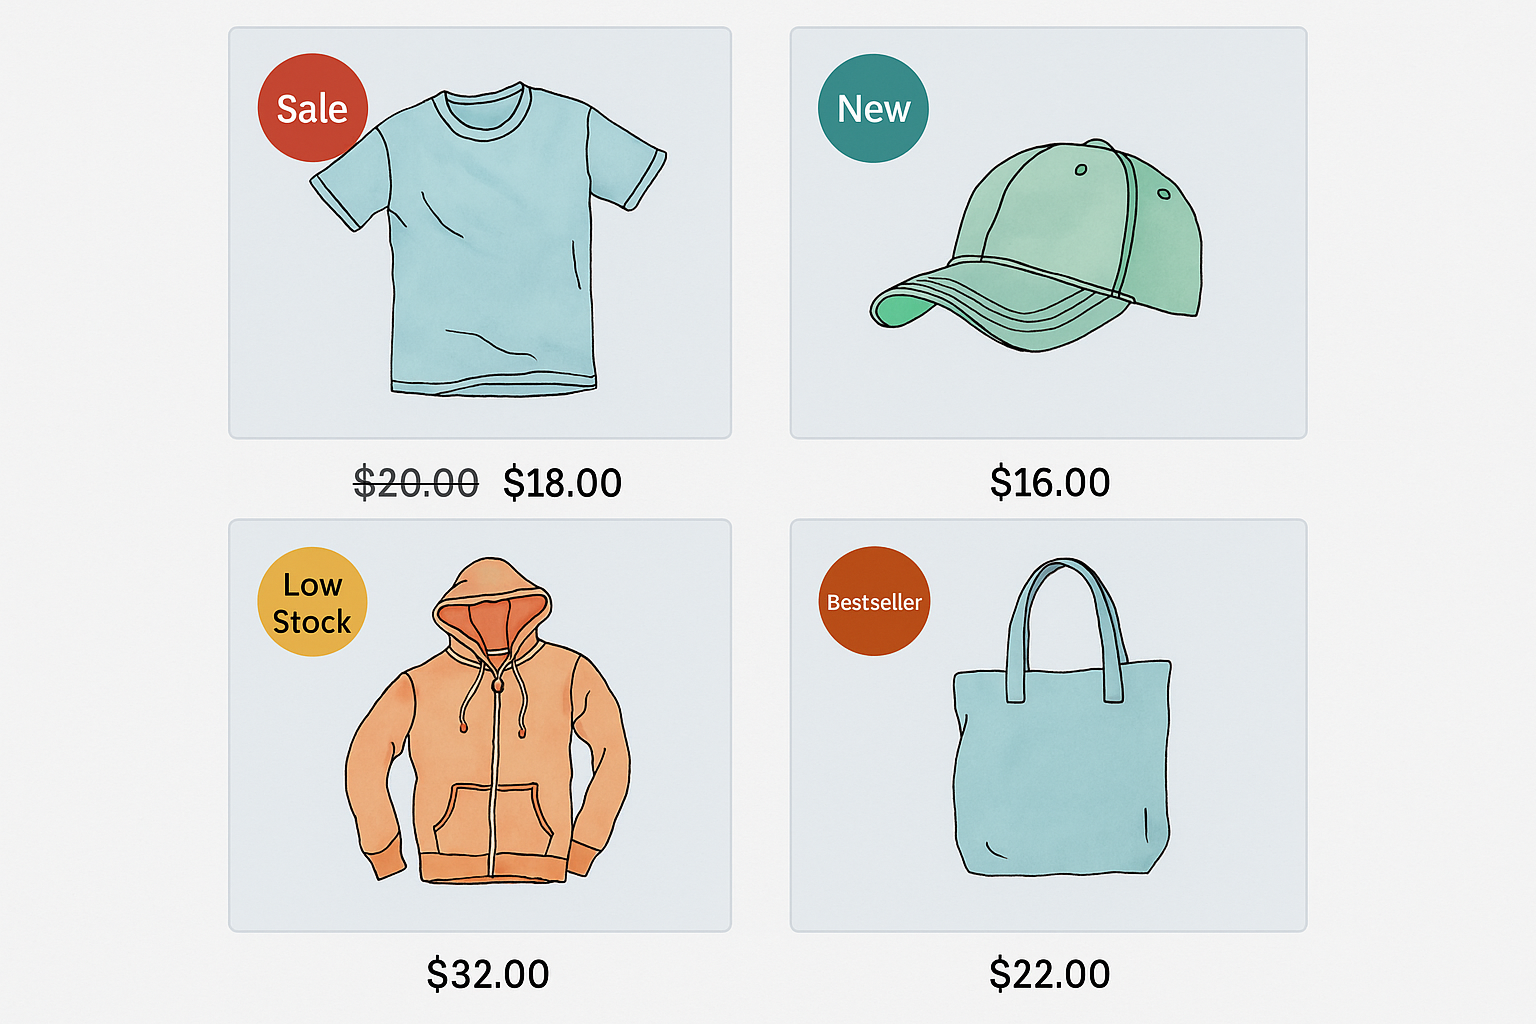
Product badges are small visual markers you place on product images or product cards to call attention to a specific trait or offer. Think of them as tiny stickers on a photograph.
They quickly tell shoppers something useful at a glance. For example, that a product is on sale, new, or low in stock.
So again, if you ask me, “What are product badges?” The short answer is: they are compact, high-visibility cues that help products cut through busy listings.
Badges differ from labels and tags.
- A badge is usually a graphical overlay on the product image or thumbnail.
- A label can be plain text shown near the title or price (for example “Free shipping”), and it may be part of the page layout rather than the image.
- A tag is a backend taxonomy term used for filtering and SEO (for example “organic” or “summer-collection”) and is not primarily a visual attention device.
Common Badge Examples You Can Use Right Away:
- Sale — shows discount or percent off.
- New — highlights newly added latest items.
- Only 3 left (low stock) — creates urgency through FOMO (Fear of Missing Out).
Where Do Badges Appear?
Most often on product listing pages, collection grids, search results, and on the product image in the shop or category page. They can also appear in widget listings, related product blocks, and even in the cart in some themes.
Badges can be simple text, an SVG or PNG graphic, or a CSS-created shape. You can keep them static or make them dynamic so they show automatically by rule (for example, when stock < 5).
Product Badges Vs Product Labels — The Exact Difference
They look similar but serve different jobs. Let’s find out what they are and when to choose the right one.
At a glance
- Badges = visual stickers on images. Fast to scan. Great for urgency and promotions.
- Labels = inline text near title/price. Better for extra info or policies.
- Rule of thumb: product badges are for short, attention-grabbing signals; labels are for context and details.
When to Use Which (Quick Guide)
| Use case | Pick a badge when… | Pick a label when… |
| Promote a sale | you need immediate attention on listing pages | you want to explain the discount terms |
| Show stock status | you want urgency (“Only 3 left”) | you need to explain restock timing |
| Communicate trust | you want a visual cue (“Bestseller”) | you need textual proof (“Certified organic”) |
| Mobile view | works well if small and clear | better if it needs more words |
Use both smartly rather than stuffing your Shop page with. Too many visual stickers overwhelm shoppers and reduce trust.
Why Product Badges Matter for eCommerce
Product badges do one simple thing well: they make important information obvious at a glance.
In a busy shop grid, a small “Sale”, “New”, or “Only 3 left” sticker helps shoppers decide faster. That speed matters. Faster decisions mean more clicks, more add-to-carts, and more completed orders.
Here’s why badges help your store:
- Grab attention quickly. On category pages, shoppers scan images first. They form an opinion within 50 milliseconds. That’s why a clear badge stops the eye and pulls users into the product page.
- Create urgency and scarcity. Low-stock or countdown badges push hesitant buyers to act sooner.
- Highlight offers and trust signals. Badges for “Free shipping”, “Bestseller”, or “Top rated” build trust and reduce friction.
- Improve filtering and discovery. Badges make it easier for shoppers to scan for things they care about (sale items, new arrivals, eco-friendly products).
- Reduce cognitive load. Instead of reading every title, users get the important facts instantly.
Possible Impact (Hypothetical Ranges from Various Case Studies and Vendor Reports — Results Vary By Store):
- Click-through-rate on product tiles: +10% to +35%
- Add-to-cart rate: +8% to +25%
- Conversion rate (product → purchase): +5% to +50%
- Average order value (when badges promote bundles or free shipping): +5% to +15%
Treat those numbers as directional. Some sites see big lifts, others much smaller gains.
The difference usually comes down to badge design, placement, audience, and whether the badge message is genuinely useful.
Real Examples That Drove Results (Mini Case Studies)
- Problem: Products were getting lost in a huge marketplace.
Badge used: Amazon’s Choice / Best Seller overlays on product listings.
Result: Winning those badges moved meaningful traffic and conversions — Amazon’s Choice products saw about +25% conversion on average, while Best Seller badges increased glance views (traffic) by roughly +45% in Profitero’s analysis. - Problem: Shoppers abandoned checkout because they worried about site security.
Badge used: Recognized security/trust badge (Norton).
Result: A simple trust-badge test increased conversion by 12.2%, transactions by 14.3%, and overall revenue by 16.6% for the tested site. That shows how a single, credible visual cue can move the needle. - Problem: Retailers needed to highlight relevant products automatically during promos.
Badge used: Dynamic badging / social-proof overlays (rule-based badges).
Result: Vendors using dynamic badging reported steady uplifts. Results include ~10%+ increases in add-to-bag and low-single-digit to mid-single-digit conversion uplifts in Taggstar customer reports. The exact gain depends on the retailer and campaign but the pattern is consistent: timely, relevant badges help.
Takeaway: Badges work, but results vary by badge type, trust level, and how well the badge matches shopper intent. Run simple A/B tests on your own store to find out the real impact.
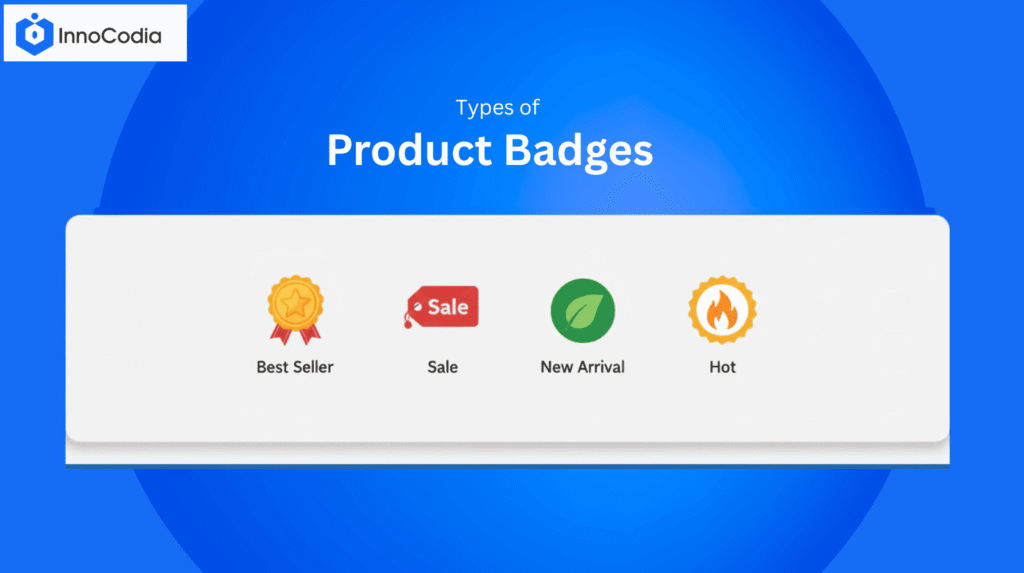
Types of Product Badges (Taxonomy + Use Cases)
Online shops use several common badge types. Each one solves a different problem.
For example, grab attention, build trust, create urgency, or explain an offer. Below are the main types of product badges and when to use them.
1. Sale / Discount
- What: Shows a percent off or “on sale” message.
- Best for: Promotions, seasonal sales, clearance, etc. Works well on listing pages to pull clicks.
- Examples: Sale · -30% · Save 30%
- Tip: Show the real discount (percent or amount) for clarity.
2. New / Just Arrived
- What: Marks recently added products.
- Best for: New collections, product launches, and merchandising fresh stock.
- Examples: New · Just In · New Arrival
- Tip: Use a time rule (e.g., show for first 14–30 days) so “new” stays meaningful.
3. Bestseller / Popular
- What: Signals social proof or strong sales.
- Best for: Driving trust for undecided shoppers and highlighting proven items. They can boost conversions by a whopping 25%.
- Examples: Bestseller · Top Seller · Popular
- Tip: Update automatically from sales data so the badge stays accurate.
4. Low Stock / Only X Left
- What: Shows limited inventory to create urgency.
- Best for: Scarcity-driven purchases and limited-run items.
- Examples: Only 3 left · Low stock · Hurry
- Tip: Combine with shipping ETA if restock is imminent to avoid false urgency.
5. Limited Edition / Exclusive
- What: Highlights special or one-off products.
- Best for: Drops, collaborations, collector items.
- Examples: Limited · Exclusive · Edition
- Tip: Add a serial or batch number on product pages to reinforce exclusivity.
6. Flash Sale / Countdown
- What: Time-limited offers with a countdown timer.
- Best for: Short promotions or daily deals. Drives fast decisions.
- Examples: Flash Sale · Ends in 02:14:03 · Today only
- Tip: Use animation sparingly; clocks should be accurate and not reset arbitrarily.
7. Free Shipping / Free Gift Product Badges
- What: Highlights free shipping thresholds or bundled gifts.
- Best for: Increasing average order value (AOV) and signaling value.
- Examples: Free shipping · Free gift · Free S&H
- Tip: If you require a minimum spend, be sure to mention that visually and in text.
8. Bundled / Pack Deal
- What: Marks product bundles or multi-buy discounts.
- Best for: Cross-sells and increasing units per order.
- Examples: Bundle · Pack deal · Buy 2 save
- Tip: Show the per-item price or savings on hover or the product page.
9. Attribute / Certification Badges (eco, handmade, vegan)
- What: Communicates quality, values, or compliance.
- Best for: Niche audiences who care about certifications or product traits.
- Examples: Eco · Handmade · Vegan
- Tip: Where possible, link the badge to a short explanation or verification.
Design & UX Best Practices for Badges (Placement, Size, Color)
Good badges are small but thoughtful. They must be visible, readable on phones, and never hide the product.
Use these practical product badge design best practices when you design badges for WooCommerce.
Placement & Size
- Top corners work best. Put badges in the top-left or top-right so they’re noticed without covering key product details. Test both corners to find out which one works better with your product photos.
- Mobile-first sizing. Design badges so they are clearly legible on small thumbnails. If a badge looks cramped on a phone, it’s too large or the text is too long. Follow a mobile-first mindset and preview on real devices. You can use CSS to set custom product badge size for thumbnails.
- Avoid covering faces or the core product. If your badge blocks the most important visual element, move it or add padding so shoppers still see the product.
Contrast, Legibility & Copy
- High contrast is essential. Light text on a dark badge or dark text on a pale badge is easiest to read. Use simple, bold type and short copy (1–3 words).
- Keep copy tiny and useful: “Sale”, “-30%”, “Only 2 left”. Don’t cram full sentences into thumbnails. Short claims perform better on scans.
Product Badge Color Psychology
- Use colors that match the message: red/orange for urgency (sales), green for success or eco messages, black or deep navy for luxury. Test within your brand palette so badges feel like part of the store, not foreign.
Accessibility
- Provide a text alternative for functional images and don’t rely on color alone to convey meaning. Screen readers need an accessible name or alt text for badges that convey action or urgency. Use ARIA (Accessible Rich Internet Applications) patterns for interactive badges if they trigger actions or tooltips.
- If a badge is purely decorative, mark it aria-hidden=”true” so screen readers skip it. If the badge conveys purchase-relevant info (like “Only 3 left”), include that text in the product description or aria-label.
Animation & Motion
- Use subtle motion only. A gentle pulse or a countdown that updates in real time can draw attention. Avoid flashing or large, looping animations that distract or cause accessibility issues.
Do / Don’t Examples
| Do | Don’t |
| Short, high-contrast text on a small badge | Long sentences that need zoom to read |
| Top-corner placement with padding | Badge covering the product’s face or logo |
| Use SVG for scalable icons and CSS for simple shapes | Use large PNGs that slow page load for every thumbnail |
| Add aria-label/alt text for meaningful badges | Assume color alone communicates urgency |
PNG vs SVG vs CSS
- SVG: Best for icons and vector shapes. Scales cleanly and keeps file size small for simple graphics. Use SVG when you need crisp badges on any screen.
- PNG: Use PNG for photographic or richly-textured badges that need raster detail. Avoid for many repeated thumbnails because PNGs can make pages heavy.
- CSS: Great for text-only badges and simple shapes. No extra image request and easy to style responsively. Use CSS when the copy changes frequently or you want the fastest load.
Keep badges simple, test their performance, and iterate. A tiny change in wording, color, or position often makes a big difference.
How to Add Product Badges in WooCommerce?
WooCommerce does come with one default product badge, which is for products on Sale.
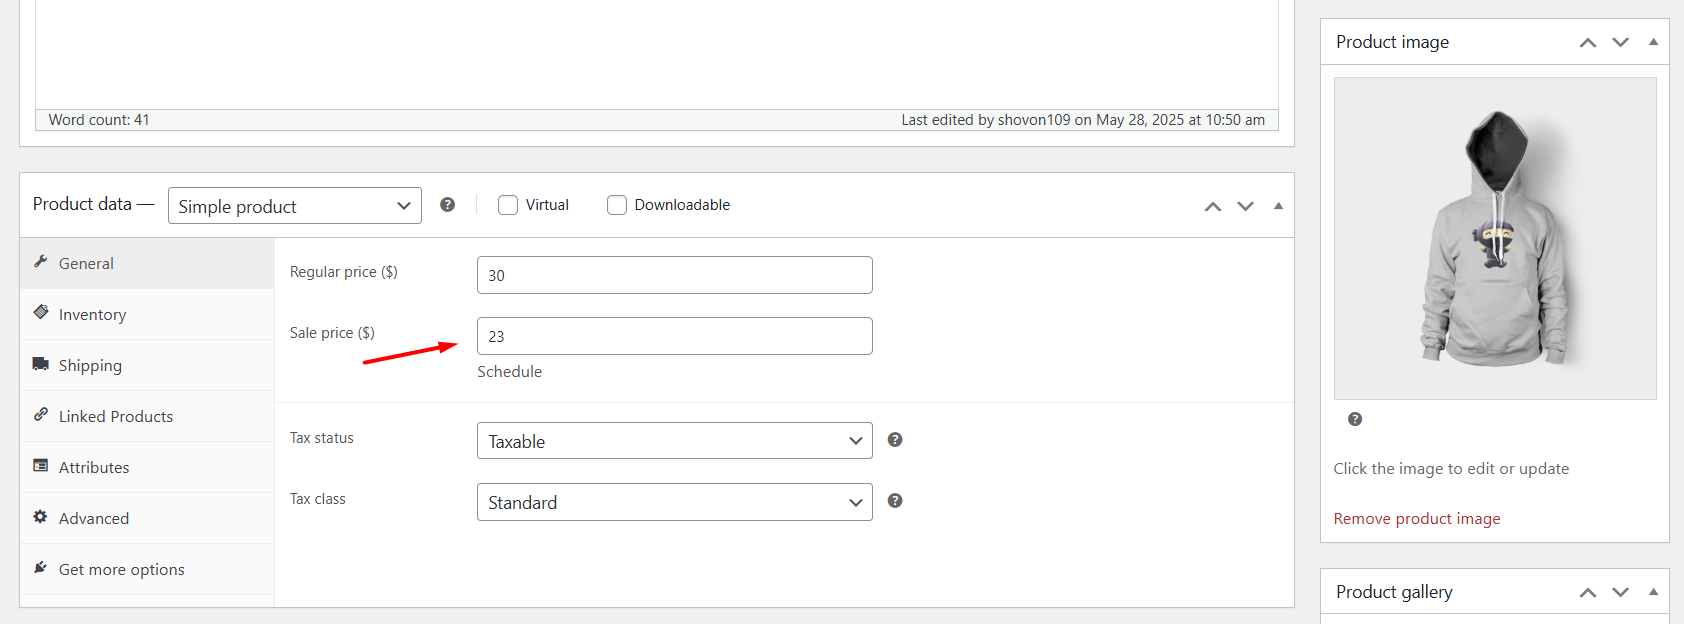
When you set a Sale price on a product, WooCommerce displays the Sale badge on the front.
However, that’s not enough to boost your sales, right? Fortunately, there are more ways.
Here are four fast ways to add badges to your store. Each method works; pick the one that fits your comfort level with code and how much control you want.
1. A Dedicated Plugin (Recommended). A dedicated plugin truly serves the purpose of boosting conversion and sales through product badges. A WooCommerce badge plugin offers robust features to add personalized and custom product badges for your WooCommerce products. These plugins provide a user-friendly dashboard to design badges and set up dynamic rules (e.g., “On Sale” or “Low Stock”) without any coding. It’s the best option for full control and flexibility.
2. Your Theme’s Built-in Feature. Some WooCommerce themes include basic badge functionality out of the box. This is great for simple needs, but it often lacks customization and dynamic features. Example: Astra theme’s Misc module or Shoptimizer’s CommerceKit.
3. Manual CSS. If you only need a simple, static badge on a few products, you can add a small CSS code snippet to your theme. This is lightweight but requires manual work for each product and is not suitable for dynamic badges that change automatically.
4. Custom Code: If you are up for hiring a developer and giving a hand with coding, you can apply code to your theme file to create custom badges. This method is highly flexible but comes with notable risks (breaking your site, losing changes during updates), and we discourage this method.
Let’s walk you through how to set up product badges in WooCommerce using the best method – a dedicated plugin.
Step 1: Install a WooCommerce Product Badges Plugin
For this article, we will use a product badge plugin that is laser-targeted to create custom product badges for WooCommerce and is also incredibly easy to use.
It’s called Better Badge – Custom Product Badges for WooCommerce.
To install this product badges plugin for WordPress, log in to your admin panel and follow these steps.
- Go to Plugins > Add Plugin.
- Search for the plugin.
- Click Install and then Activate it.
- If you are using the Pro version of the plugin, click Upload Plugin from the same page and upload the zip file you received from the developers and activate it.
Step 2: Disable WooCommerce’s Default Badge
It’s important to disable Woo’s default badge to avoid conflicts and display product badges accurately.
- From the WordPress admin panel, go to Better Badge.
- Click on the Settings option.
- Toggle to turn off the WooCommerce Default Badge.
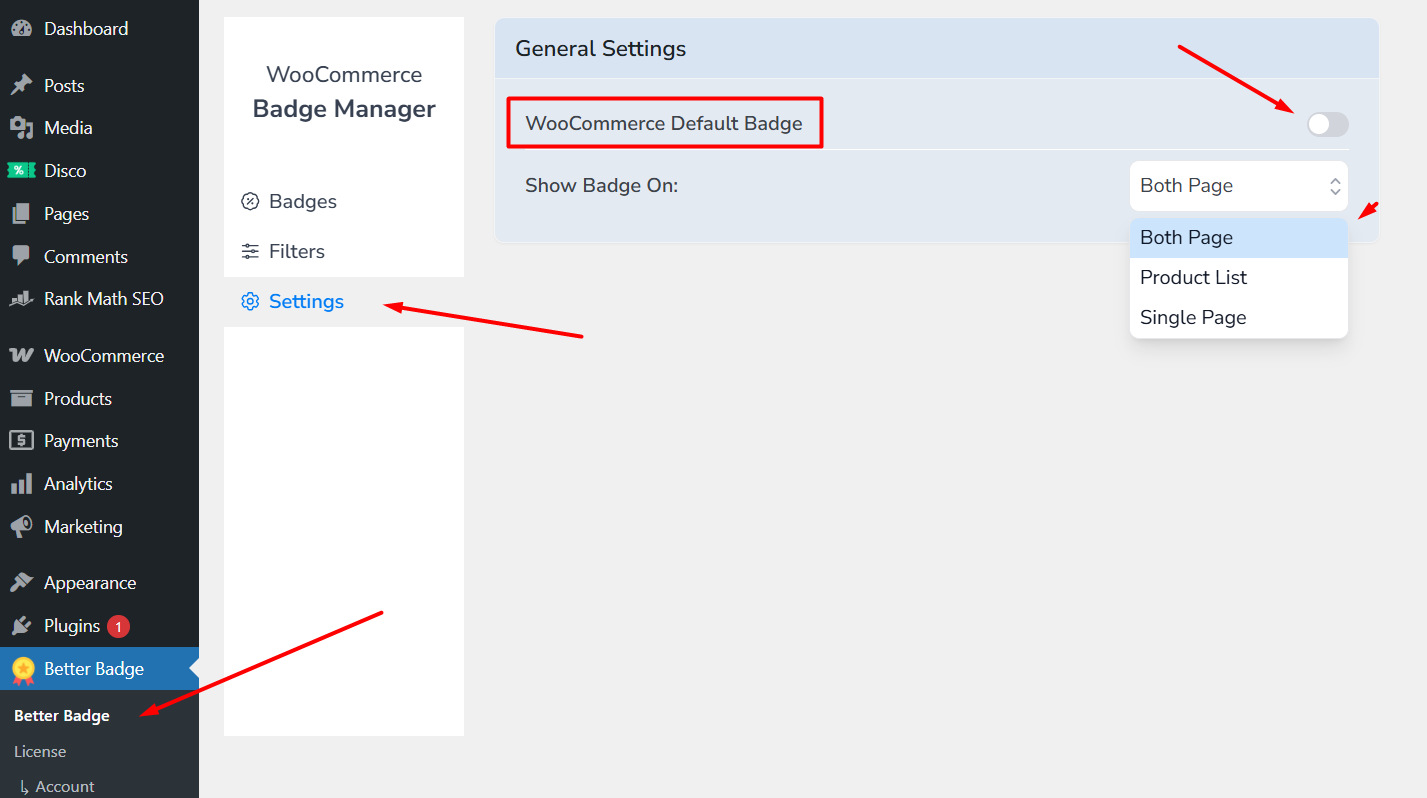
- Additionally, you can set where you want to display your newly created custom badges.
Step 3: Create a Product Badge
Let’s say you want to set product badges for your newly launched products. Here’s how to do it.
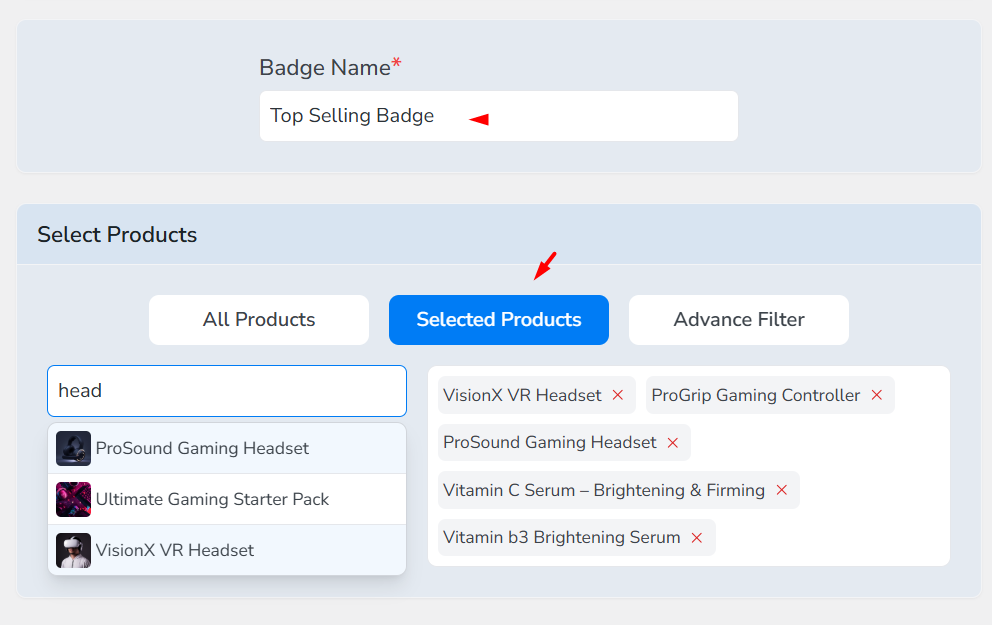
- Go to the Badges tab and click Add New/New Badge.
- Give your badge a name.
- Click Selected Products to set your products that will display the badge.
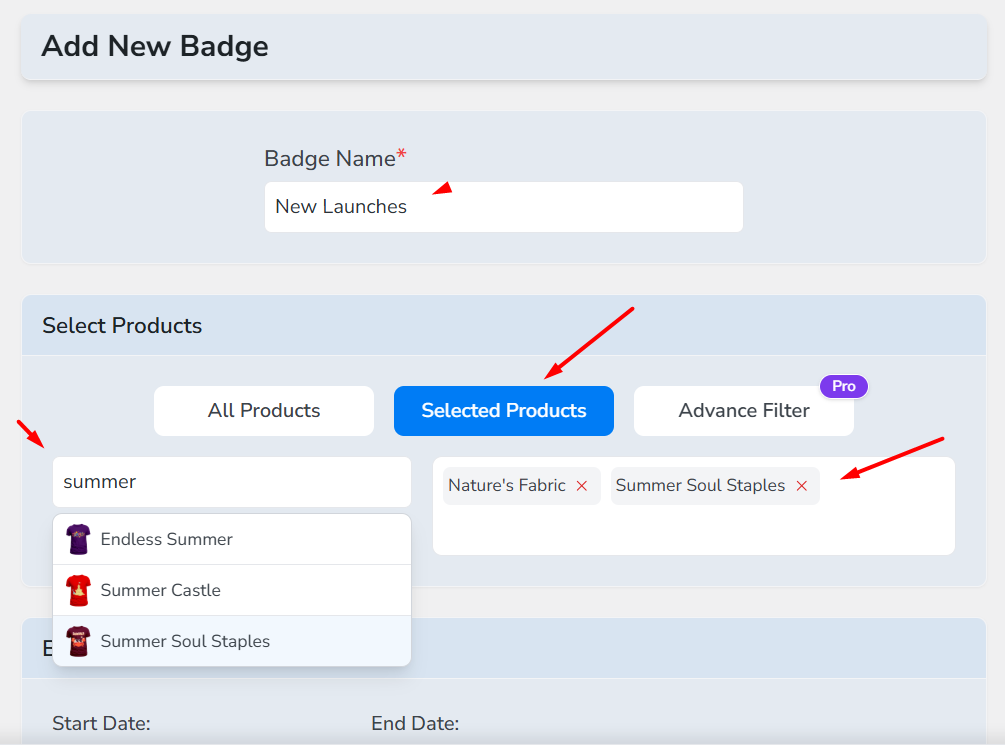
- Search and select the products.
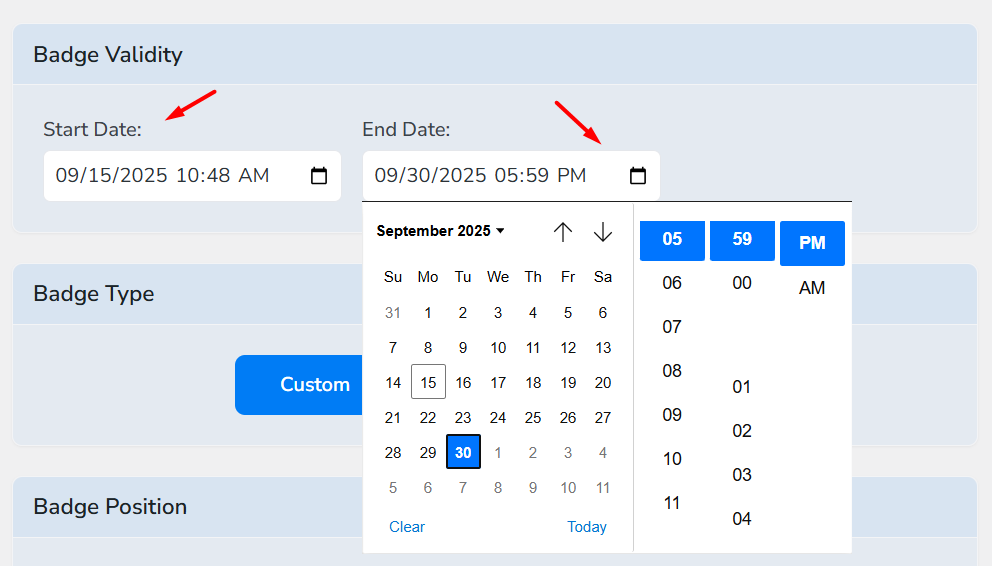
- Set the badge validity period from the following schedulers.
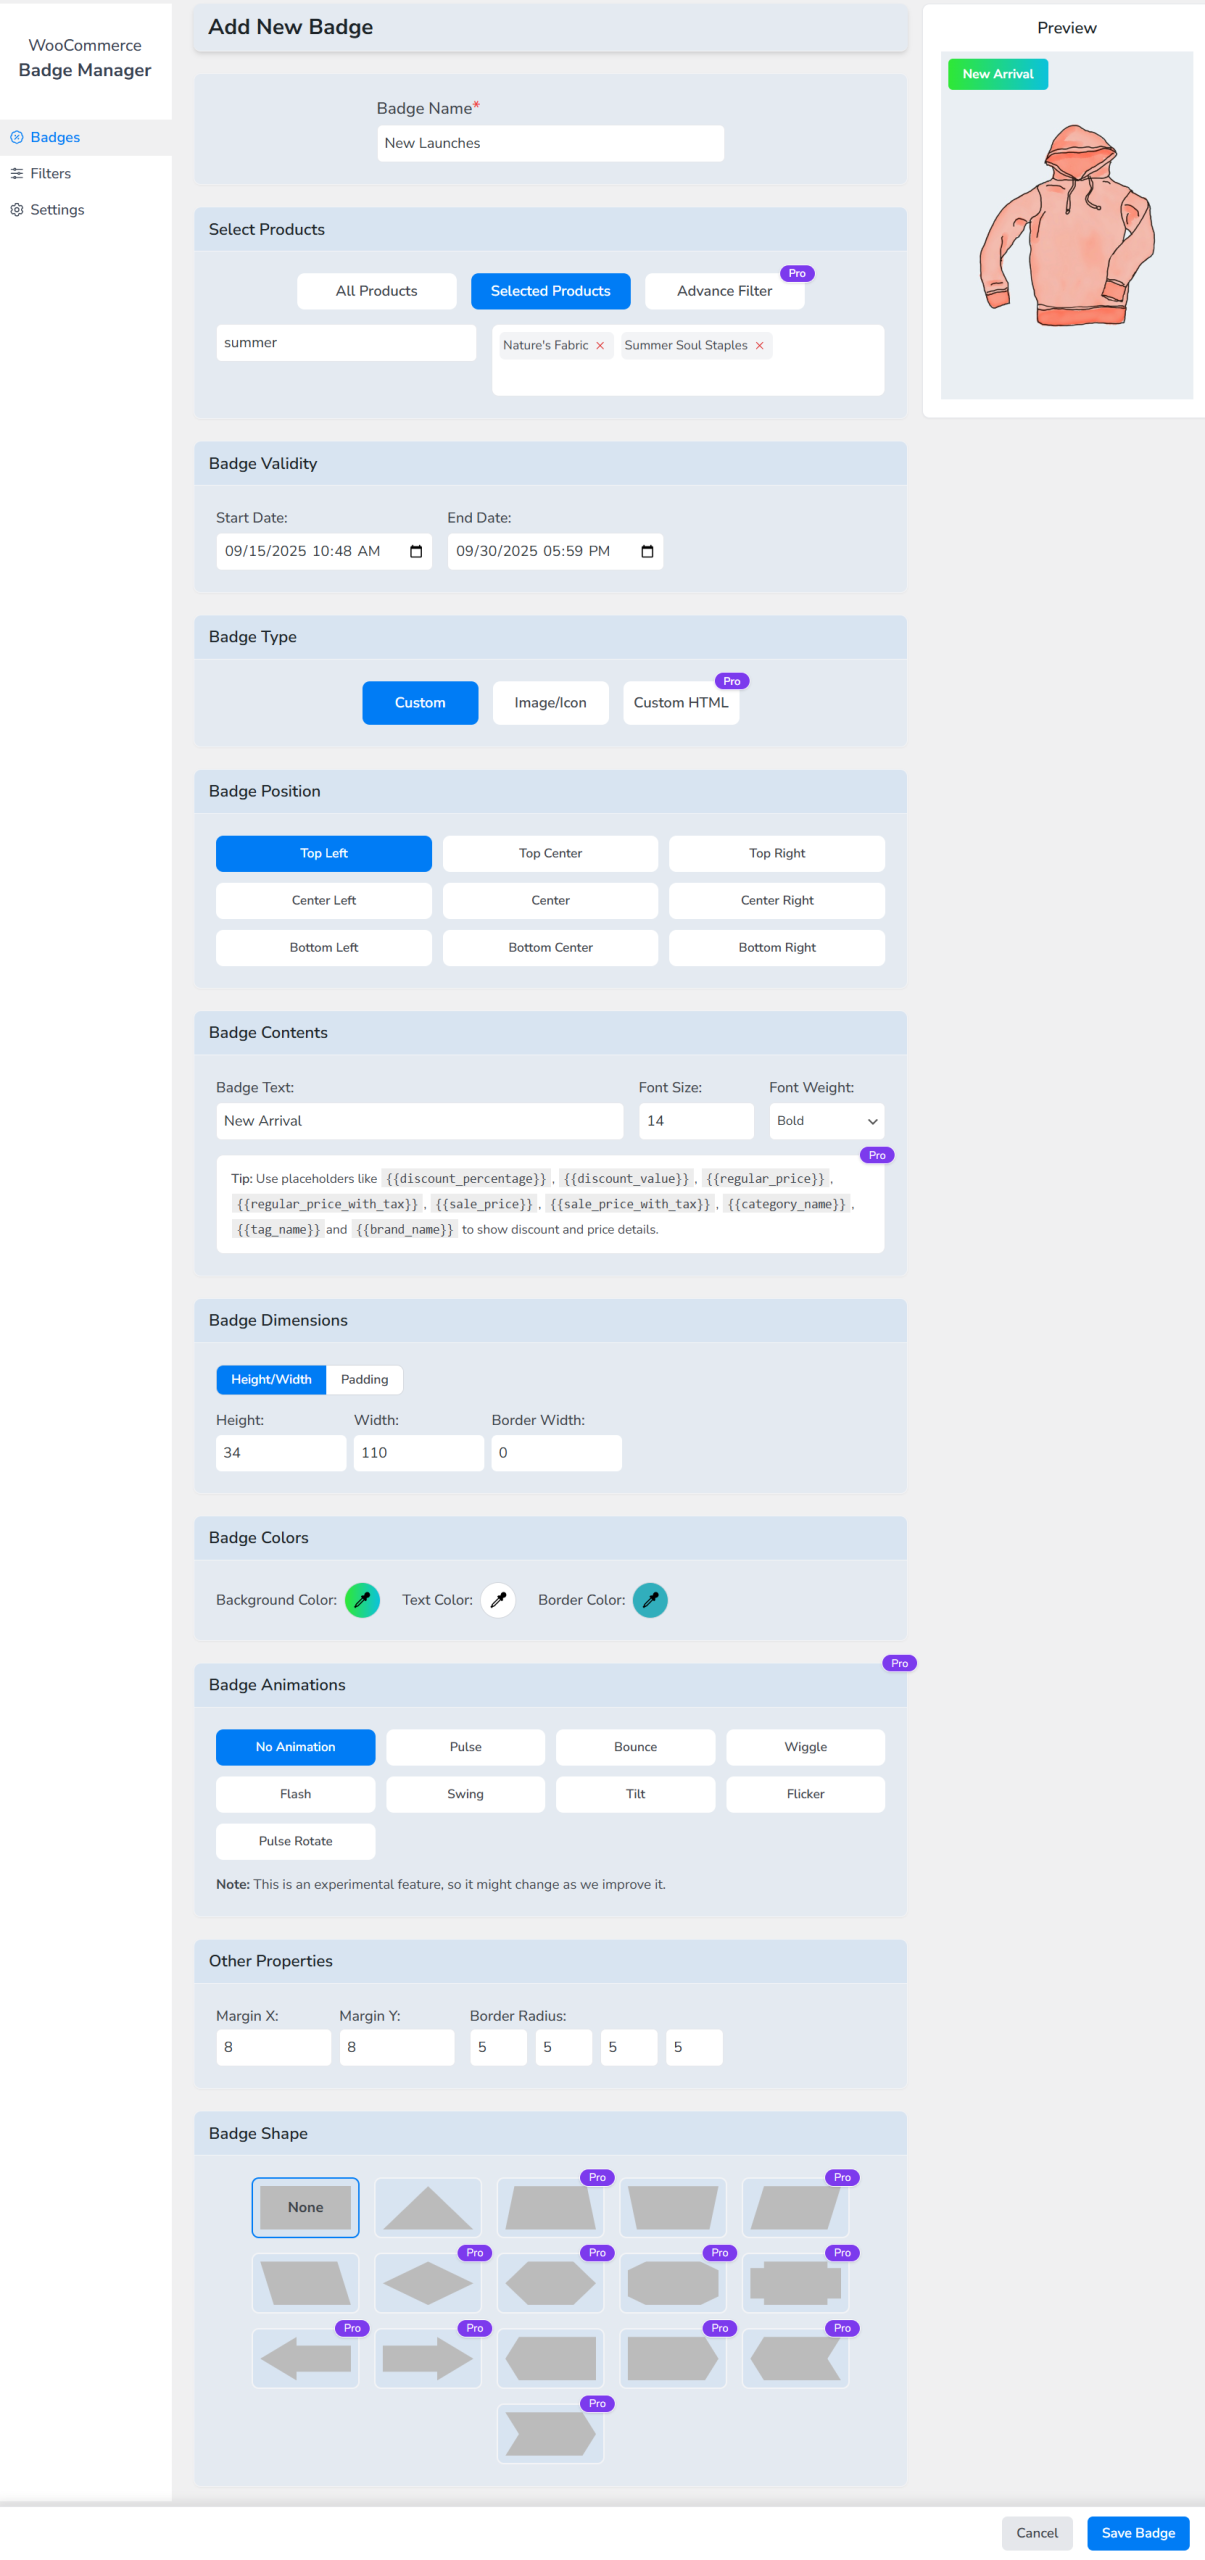
- Select and set your badge position and text. The plugin gives you a preview of how it may look.
Step 4: Save and Test New Product Badges
- Additionally, you can change the color, position, and shape of the product badges.
- Finally, click the Save Badge button to publish the badge.
- Jump to your storefront, and the selected products should display the badge as per your settings.

- It will also display on individual product pages as we set for both pages in the settings earlier.
This is how to add a new badge to WooCommerce products. You can extensively customize your badges using the pro version of the plugin, as well as create dynamic product badges for WooCommerce, which we will cover in the following sections.
How to Create a Personalized Custom Badge in 7 Minutes: (Step-By-Step)
Let’s say you want to create a product badge for your top-selling products. As we’ve mentioned earlier, a best seller badge can boost your impressions by 45% and conversions by 25%.
Therefore, you would want to make it eye-catching and attention-grabbing. The pro version of the Better Badge plugin allows you to just do that.
Let us walk you through the steps on how to create custom product badges in WooCommerce.
Step 1: Create a New Badge
- Go to Better Badge and click New Badge.
- Name your badge and select your best-selling products.
- Set a validity period if required.
Step 2: Select The Badge Type
The plugin offers 3 badge types –
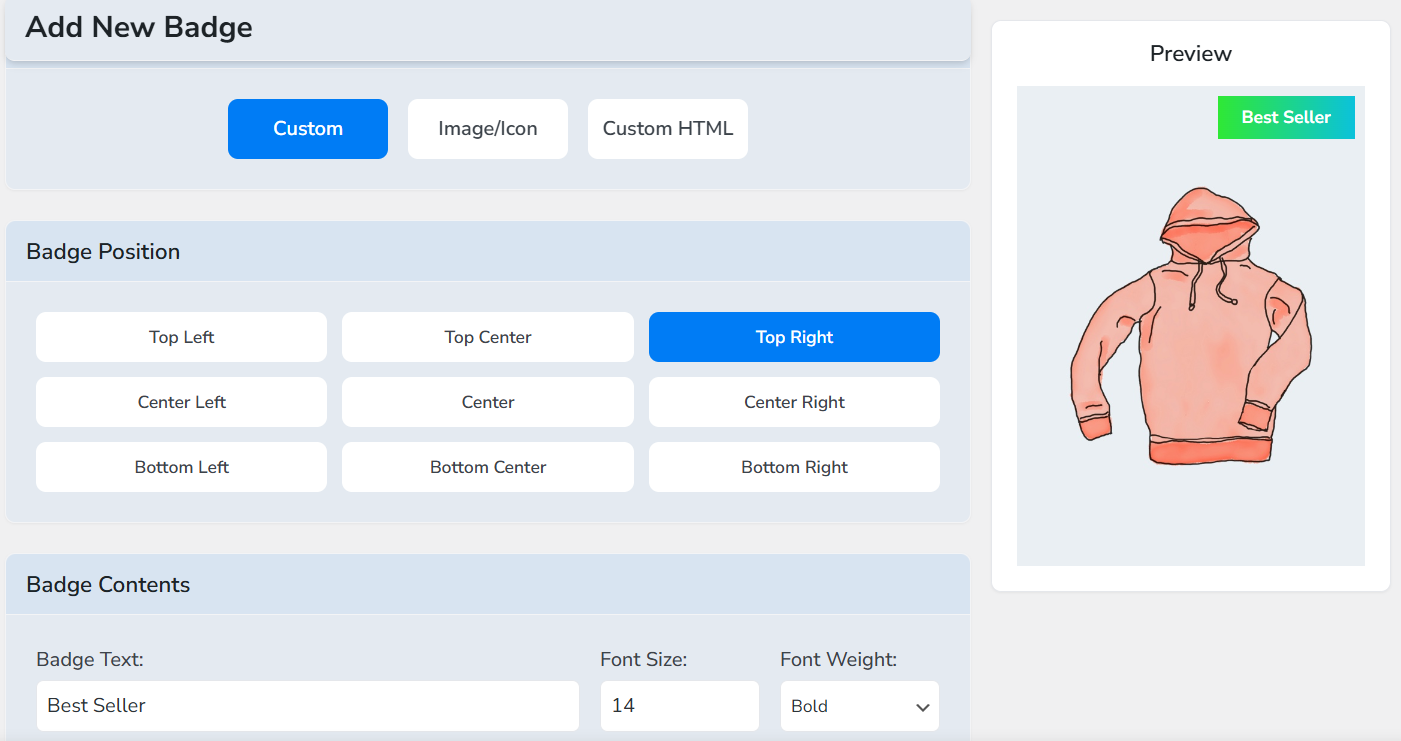
- Custom: In this type, you can set up custom text-based badges. You can customize text font size, weight, badge background color, dimensions, margin, animation, and shapes. Additionally, you can use placeholders for creating dynamic text badges.
- Image: You can select from the provided badge images or upload your own custom badge images to display at your store for your selected products. The plugin allows you to set badge position, dimension, and animation.
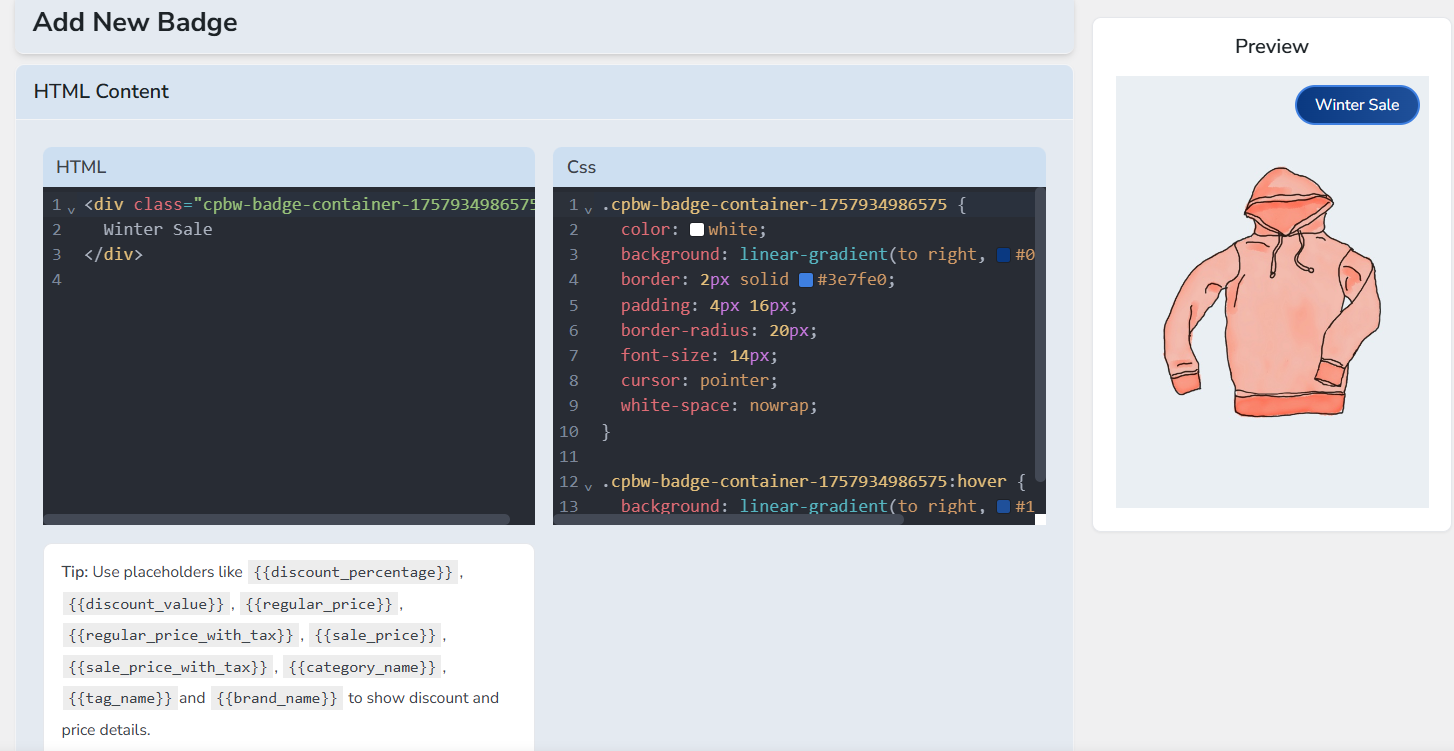
- Custom HTML: If you are familiar with HTML and CSS, you can go full custom and create your personalized product badges just the way you need.
Step 3: Set Up a Text-Based Badge
- Select the Custom option from the Badge Type section.
- Set your preferred position for the badge.
- Input the badge text and set the appropriate font size and weight.
Step 4: Customize Your Badge
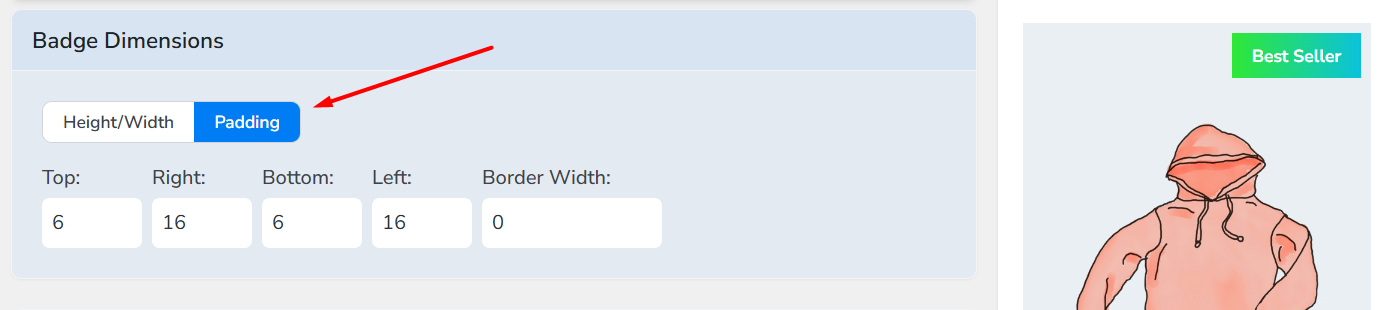
Customizing Badge Dimensions:
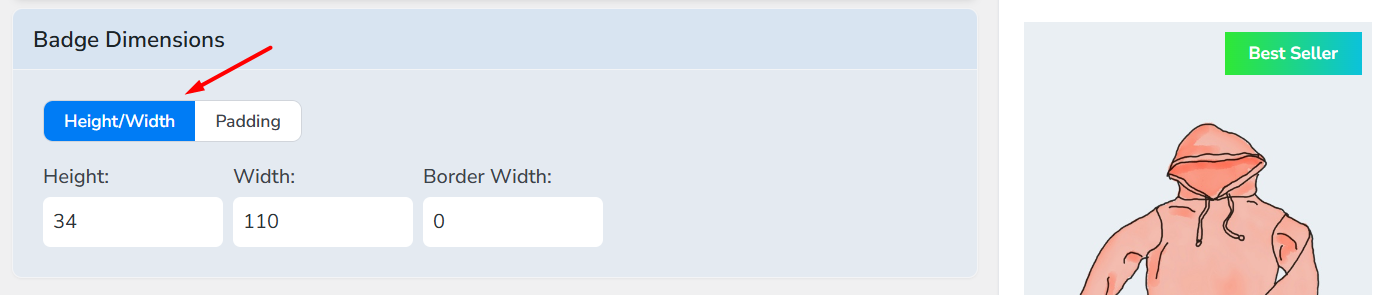
- You can set badge height and width from the Badge Dimension section.
- Alternatively, you can set dimensions by padding parameters.
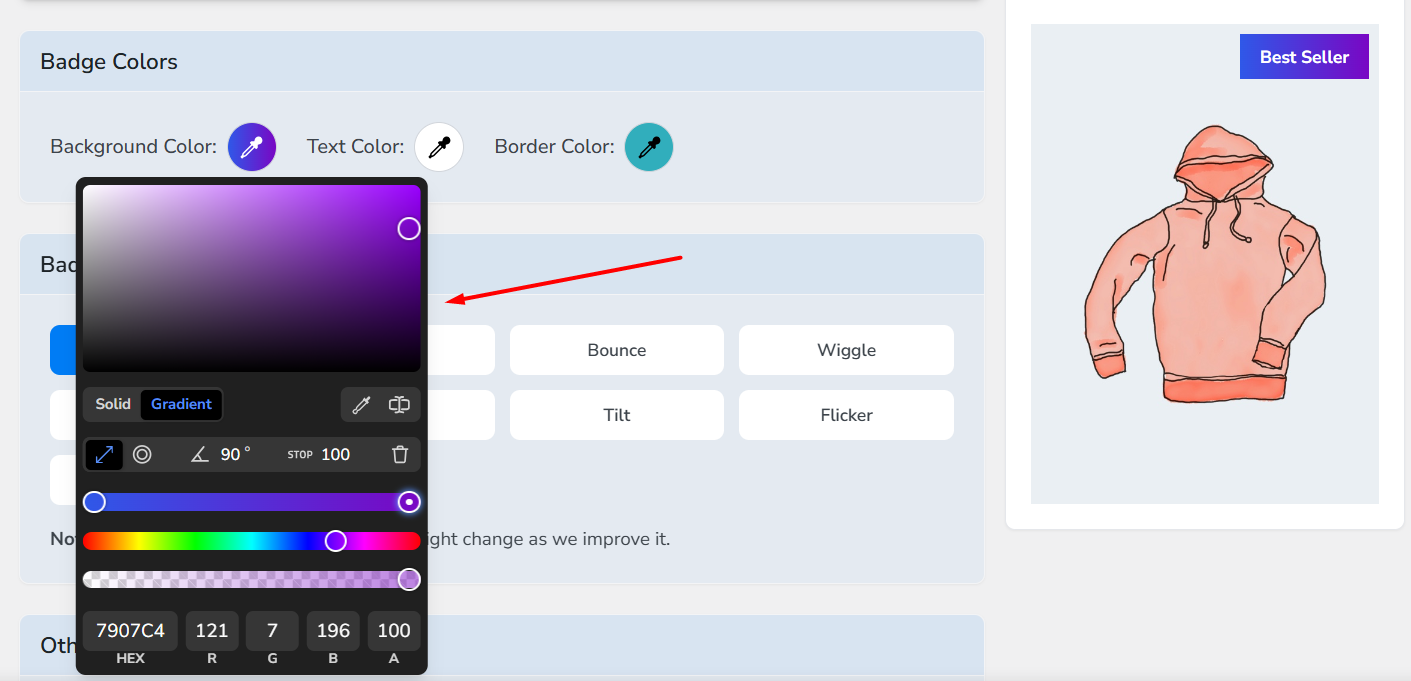
Customizing Badge Color:
- You can change badge background color, text color, and border colors from the Badge Color section.

- The plugin offers a powerful color editing tool that allows you to set gradient colors with linear angles and radial options, as well as solid colors. Additionally, you can directly set your color through RGB, CMYK, HSL, HSV, and Hex codes.
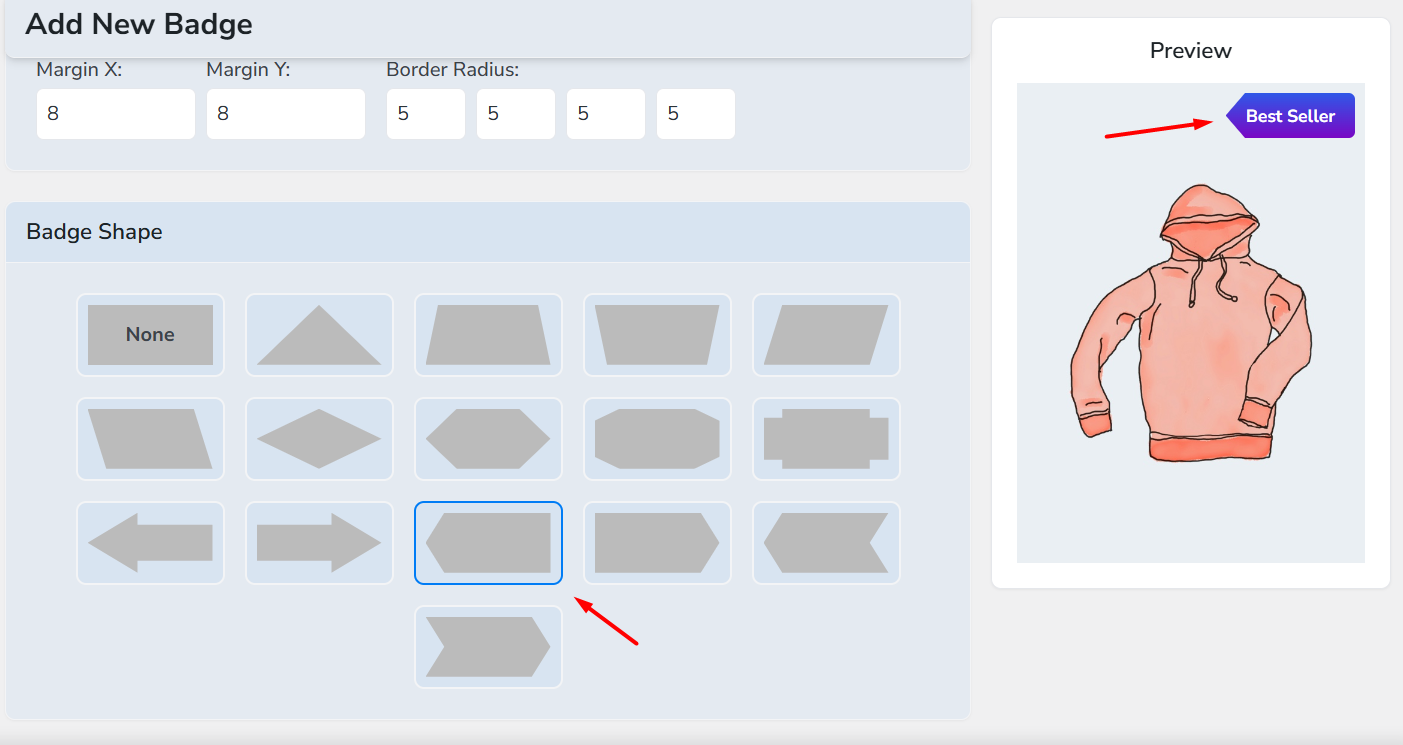
Setting Badge Margin & Border Radius and Shapes:
- You can move your badge position through margins and also set the border radius from the Other Properties section.

- The Better Badge plugin offers several shapes for product badges. These shapes immediately change the design of the badge accordingly. Use only if appropriate.
Set Animation to Badges:
The Better Badge plugin offers a range of animations you can apply to your badges. These can make the badges more attention-grabbing and appealing and may result in more conversions.
- Try and select the right animation for your purpose from the Badge Animations section.
Step 5: Save and Test
- Save the badge and jump to the storefront.
- Check out the Shop and individual page for your custom badge.
How to Create Dynamic & Conditional Badges?
The Better Badge WooCommerce plugin also allows you to create dynamic and conditional product badges. Let us quickly review the settings for both.
How to Create Dynamic Product Badges for WooCommerce
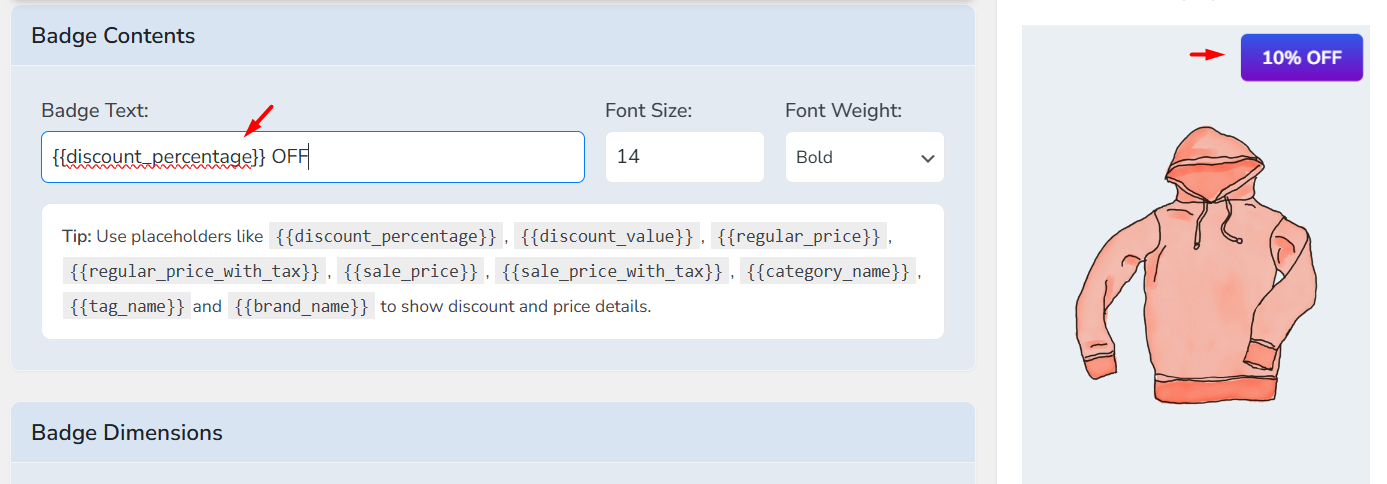
- To create dynamic badges, such as displaying discount percentage or stock quantity rules, use the placeholders under the Badge Contents section.
- For example, insert the {{discount_percentage}} placeholder to display the discount percentage you are offering. Note that you need to apply automated discounts through a discount plugin for this to work.
How to Create Conditional Product Badges in WooCommerce
The Better Badge plugin also allows you to display badges by a wide range of condition filters.
Let’s say, instead of selecting products one by one, you want to select by an entire category. Here’s how to do this through filters.
- Go to the Filters tab and click New Filter.
- Give your filter a name.
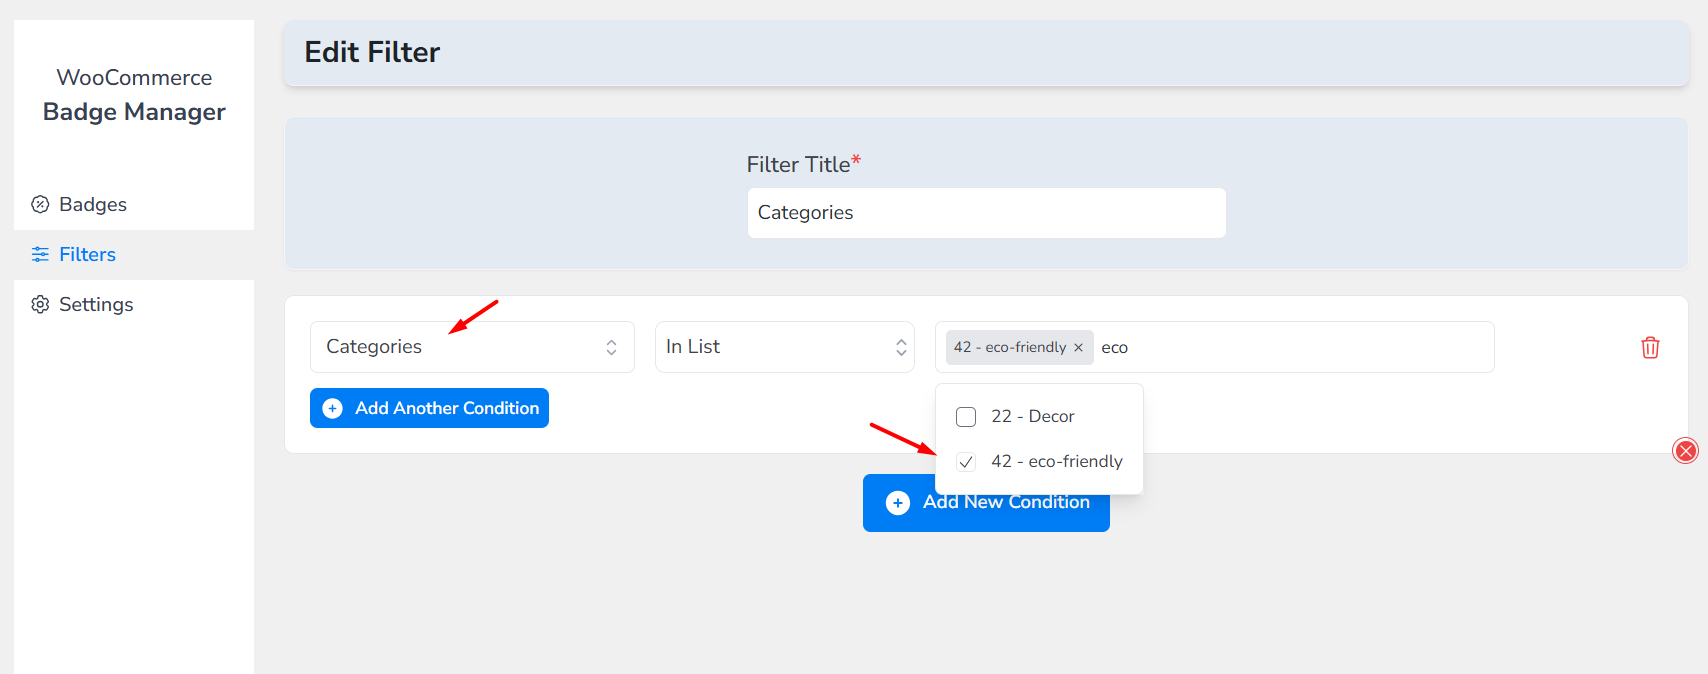
- Select the type of filter (Categories) from the dropdown and set/select the value.
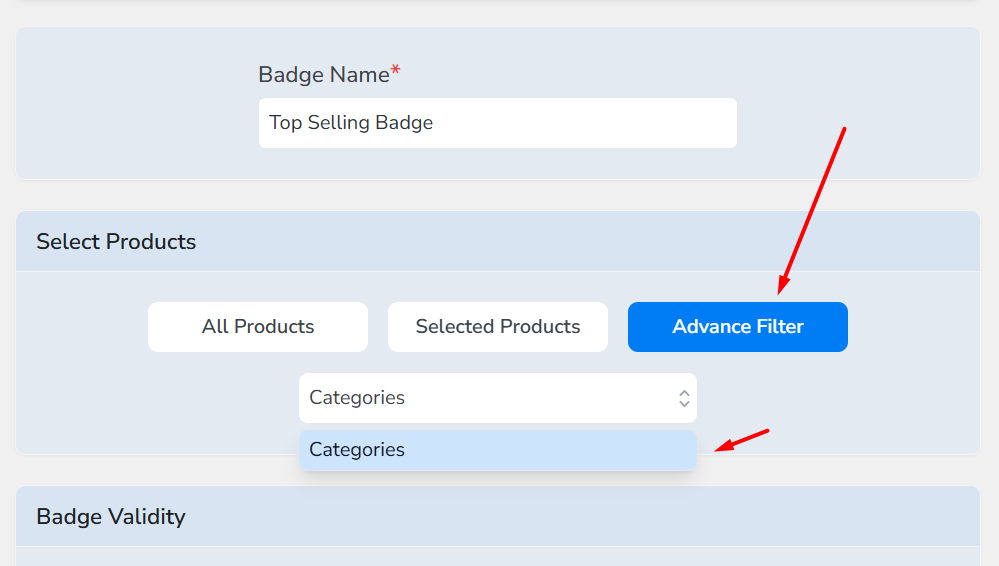
- Inside a badge creation window, under Select Products, choose Advanced Filter.
- Select your created filter from the dropdown. Now your target category products will display the custom badge.
Best Product Badge Plugin for WooCommerce in 2025
There’s no short of product badge plugin for WooCommerce. Whether in the WordPress plugin repository, the official WooCommerce marketplace, or third-party premium spaces, there are plenty of options available for you.
Which one is right for you depends on your specific requirements. However, you need to choose a plugin that has all advanced and dynamic features, works smoothly with your theme, and doesn’t slow down your site.
A good product badge plugin should let you create unlimited badges, set flexible rules (like category, stock status, or custom attributes), and position them exactly where you want on desktop and mobile. It should also support image or text badges, scheduling for campaigns, and work with page builders
Most importantly, look for a plugin that’s actively maintained and has solid reviews so you know it will keep working with future WooCommerce updates.
Here’s our top product badges plugin comparison.
Better Badge — Custom Product Badges for WooCommerce
Better Badge makes it fast to add eye-catching badges to your WooCommerce store. Out of the box, you get a wide range of ready badges (sale, bestseller, low stock, new arrival, and more) and a simple editor to change shape, size, color, placement, and text so badges match your brand.
The plugin is designed to work with single products, entire categories, specific product sets, or all products if necessary. It also includes scheduling and dynamic options so you can automate campaigns, show stock-based messages, and display multiple labels per product without writing code.
Key Features
- Large pre-made badge collection (sale, bestseller, seasonal, trust badges, etc.)
- Unlimited badge creation and fully customizable designs (shape, color, size, rotation)
- Text and image badge support, including custom image uploads (Pro: image upload)
- Multiple badge types and shapes; dynamic placeholders ({{discount_percentage}}, {{stock_quantity}}, {{sale_price}}, etc.)
- Live preview styling and easy UI for quick edits
- Schedule badges with start/end date and expiry time
- Conditional Filters: category/product rules, stock & sale rules, attribute-based labels, product type conditions, and more
- Multiple labels per product and in-title label positioning
- Pro features: dynamic discount badges, multi-currency support, HTML badges, animation effects, advanced CSS templates, advanced filter
Free / Pro (Price Tier)
- Core plugin: Free on WordPress.org (install from the repository)
- Pro: Paid version available with extra features (dynamic discounts, multi-currency, HTML badges, animations, advanced filters).
- Yearly Plans: $49 (1 site), $99 (5 sites), $199 (10 sites) – includes 1 year updates & support.
- Lifetime Plans: $99 (1 site), $199 (5 sites), $399 (10 sites) – one-time payment, lifetime updates & support.
Ease of Use (1–5)
5 / 5 — The plugin has an easy-to-use interface with live preview styling, templates, and really quick badge creation, which makes setup fast for non-technical users.
Integrations (Page Builders, Caching, WP Multisite)
- Page builders / builders tested: Elementor, Bricks Builder, Beaver Builder, Divi, Brizy, Gutenberg (Block Editor), Breakdance, Oxygen, Spectra, and others listed.
- Themes tested: Astra, Avada, BeTheme, Blocksy, Bridge, Flatsome, GeneratePress, Hello Elementor, Kadence, Neve, OceanWP, Porto, XStore, and many more (25+ themes tested).
- WooCommerce & plugin ecosystem: Compatible with many popular plugins, including WooCommerce Subscriptions, WPML, Dokan, WCFM, MultiVendorX, WooCommerce Memberships, YITH Wishlist, Advanced Woo Search, ACF, and others (30+ plugins tested).
- Caching / multisite: Works perfectly alongside caching plugins like Litespeed.
Best For (Shop Size/Use Case)
- Small to large WooCommerce stores that want: lots of built-in badge templates, strong visual customization, and rule-based automation.
- Merchants who prefer a no-code UI with live preview to create sale, stock, and seasonal badges quickly.
- Stores running promotions, seasonal campaigns, or multi-language setups (WPML listed) and those using popular page builders.
YITH WooCommerce Badge Management
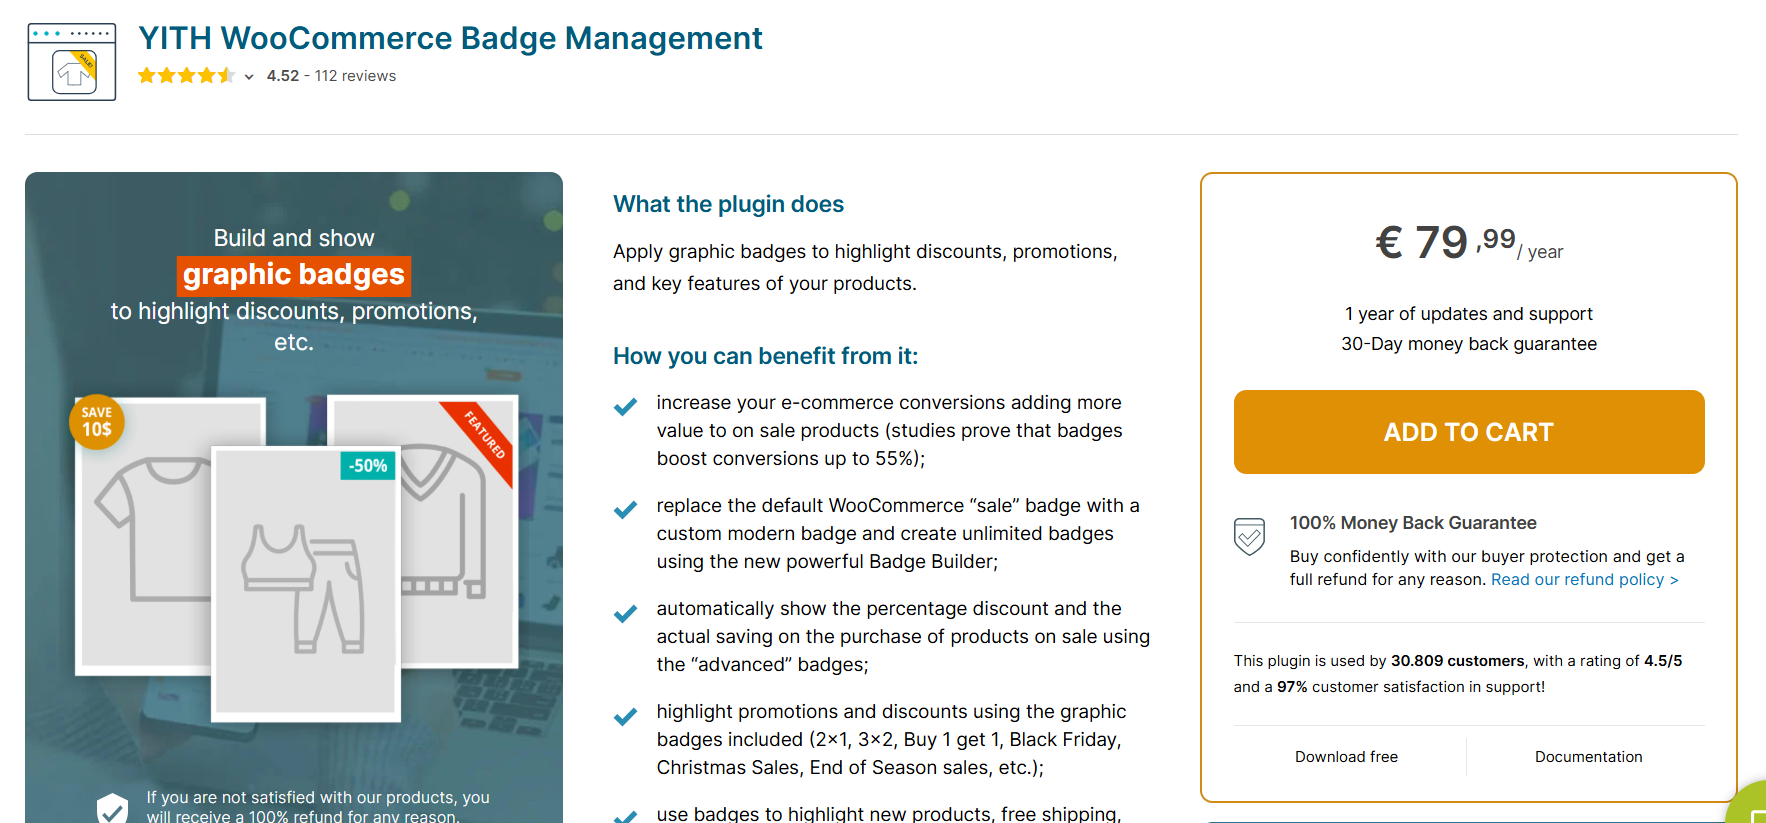
YITH Badge Management helps you create and show graphic badges to highlight discounts, promotions, and product features. It comes with a badge builder and a library of ready-made images so you can make modern, eye-catching badges without writing code.
The plugin supports automatic rules (new, on-sale, low stock, category/tag, shipping class, and more), scheduling for timed campaigns, and per-variation badges. It also works with WPML, so you can translate badge text for multilingual shops.
Key Features
- Badge builder: create simple text badges, CSS badges or image badges with live preview and drag-and-drop positioning
- Advanced discount badges: automatically show discount % and savings for on-sale products
- Ready badge library: 60+ themed badges (Black Friday, Christmas, Cyber Monday, etc.) plus options to upload custom images (premium)
- Unlimited badges and badge rules: assign by product, category, tag, shipping class, variation, stock status, featured, new arrivals, etc.
- Scheduling: set start and end dates for promotional badges
- Role & user targeting: show badges to all users or to specific user roles (integration with YITH Memberships)
- Variation support: assign badges to specific product variations (for example, a single size/color)
- WPML compatibility for translated badges
- Quick edit & shop manager controls, mobile visibility controls, hide/replace default WooCommerce sale badge
- 1 year of updates and support; 30-day refund policy
Free / Pro (Price Tier)
- Free: Basic badge creation, simple text/CSS badges, basic assignment rules, hide/replace default sale badge.
- Premium: €79.99 / year — The pro version adds advanced badge images, custom image upload, advanced discount badges, scheduling, per-variation badges, extra display and positioning controls, integrations with other YITH premium plugins, and more.
Ease of use (1–5)
4 / 5 — The visual badge builder, live preview, and ready library make the plugin approachable for non-technical users. Advanced options and many display rules add power while keeping common tasks simple.
Integrations (Page Builders, Caching, WP Multisite)
- Deep integration with the YITH plugin family (Dynamic Pricing & Discounts, Membership, Multi Vendor, Bookings, etc.) to automate badge assignment with other promotions.
- WPML compatible for multilingual badges.
- They claim broad compatibility with popular WordPress and WooCommerce plugins; specific YITH integrations are documented and supported.
- (No explicit page-builder or multisite list provided in their plugin details.)
Best For (Shop Size / Use Case)
- Merchants who want a full visual badge builder with scheduled campaigns and advanced discount badges.
- Stores running seasonal promotions (Black Friday, Christmas), multi-language sites (WPML), or shops that need per-variation or shipping-class badges.
- Shops using other YITH plugins that want tight interoperability between discounts, memberships, and badge display.
Product Labels for WooCommerce (Sale Badges) By Acowebs
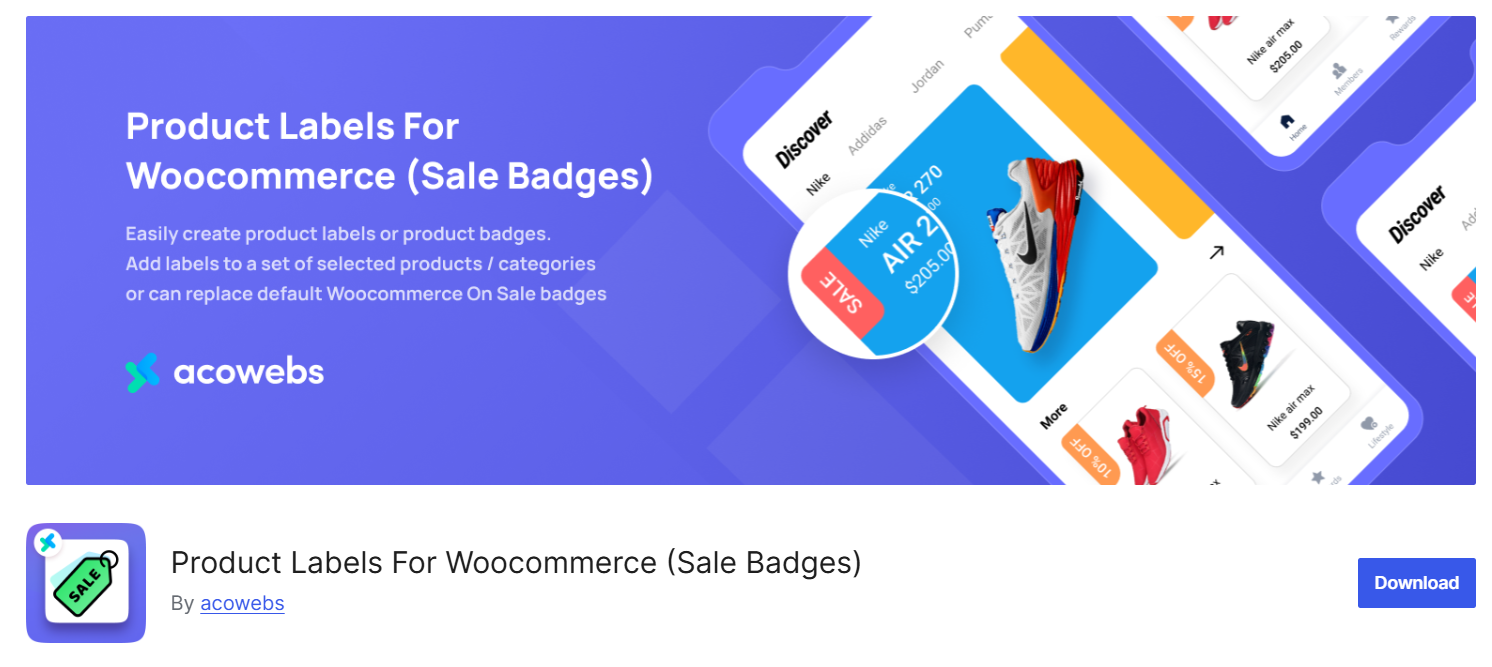
Product Labels for WooCommerce makes it easy to add sale badges and custom labels to your products. The plugin gives a simple UI where you can create badges, preview them live, and assign them to specific products, categories, or to all on-sale items. It is built to help stores highlight promotions, stock status, and important product features without coding.
The free version covers most common needs: text/CSS badges, live preview, basic positioning, and scheduling. If you need a bigger badge library, image badges, timers, or advanced CSS options, the Pro version unlocks hundreds of ready-made badges and more styling controls.
Key features (short bullets)
- Easy-to-use badge editor with live preview (position, color, font size, opacity, padding)
- Create badges for selected products, categories, or all “on sale” items
- Option to hide/replace default WooCommerce “On Sale” badge
- Show discount percentage as badge text (auto-calculated)
- Set expiry date & time for badges (scheduling)
- Out-of-stock and on-sale badge rules, plus show/hide controls
- Mobile visibility controls and quick show/hide options
- Pro adds: 700+ predefined badges, image badges and uploads, sale timers, advanced CSS badges, seasonal and event-themed badges (Black Friday, Diwali, Eid, etc.)
Free / Pro (price tier)
- Free: The free version offers core features (text/CSS badges, scheduling, simple assignment rules, live preview)
- Pro: Paid upgrade with extended badge library, image uploads, sale timers, advanced styling, and more.
- Single Site: $43/year or $99 lifetime
- Up to 5 Sites: $99/year or $199 lifetime
Ease of Use (1–5)
3 / 5 — The plugin is built around a visual editor and demo pages. Live preview and ready styles make it approachable for non-technical users. Advanced CSS and image options are available for power users. However, we encountered some conflicting and preview issues when we tested this plugin.
Integrations (Page Builders, Caching, WP Multisite)
- No explicit integration list provided in the plugin description.
- The plugin includes demos, docs, and video walkthroughs to assist setup. Check Acowebs documentation for specific page builder, caching, or multisite compatibility.
Best For (Shop Size / Use Case)
- Small to medium stores that need quick, attractive sale badges and scheduled promotions.
- Merchants running seasonal campaigns (Black Friday, Cyber Monday, festivals) who want a large library of ready-made badges.
- Stores that want an easy visual editor and the ability to show discount percentages or timers without coding.
Common Problems & How to Fix Them (Troubleshooting)
Badges are small but sometimes tricky. If your WooCommerce product badges are missing or acting weird, try these quick checks and fixes.
1. Badge Not Showing at All
- Check plugin settings first: visibility rules, scheduling, user-role restrictions, or language rules (WPML). Make sure the badge is active and assigned to the product or category.
- Inspect the page HTML (right-click > Inspect). If the badge HTML is present but invisible, it’s a CSS issue. If it’s not in the DOM, the plugin rules aren’t matching.
2. Cache Is Hiding Changes
- Clear any cache: WordPress cache plugin, object cache (Redis/ memcached), server cache, and CDN (Cloudflare). After clearing, hard-reload the page (Ctrl/Cmd + Shift + R).
3. Theme Conflicts or Missing Hooks
- Switch to a default theme (Storefront or Twenty Twenty-Five) briefly. If badges appear, the theme is missing the expected WooCommerce hook or overrides the product loop. Contact the theme author or add a small hook in your child theme.
4. Badge Overlaps or Is Behind the Product Image
- Common fix: increase z-index and ensure absolute positioning. Add to your theme CSS (child theme):
.woocommerce .product .badge {
position: absolute;
top: 8px;
right: 8px;
z-index: 9999 !important;
}
5. Image Size and Performance Issues
- Use SVG or optimized PNGs for image badges. Regenerate thumbnails if images look stretched (use a plugin like Regenerate Thumbnails).
6. Plugin Compatibility
- Deactivate other plugins one by one to find conflicts. Look especially at plugins that modify product loops, caches, or image markup.
7. Quick PHP Check (Advanced)
If you or a developer needs to force a badge for testing, add in a child theme functions.php:
add_action(‘woocommerce_before_shop_loop_item_title’, function(){
echo ‘<span class=”badge badge-test”>Test Badge</span>’;
}, 10);
Use this only for debugging. Remove after testing.
Final tip: Follow a repeatable debug flow — check settings → inspect DOM → clear caches → test with default theme → deactivate plugins. If you still see issues, collect screenshots and DOM snippets and contact the plugin support team.
CRO Experiments and Testing Ideas for Badges
Badges can help, but the only way to know for your store is to test. Below are six simple experiments and the KPIs to track, plus a short how-to for running them with modern A/B tools.
6 Quick Tests to Run
- Badge vs no badge — show a “Sale” badge to half your visitors and none to others.
- Copy test — “Only 3 left” vs “Low stock” vs “Hurry” to see which wording drives urgency.
- Color test — red vs green vs brand color for the same badge.
- Position test — top-left vs top-right vs in-title label.
- Animated vs static — subtle pulse/countdown vs plain badge.
- Combined vs single — one badge (Sale) vs two badges (Sale + Free shipping) to check clutter vs clarity.
KPIs to Measure
- CTR from category pages (badge → product page clicks)
- Add-to-cart (ATC) rate on product pages
- Conversion rate (product view → purchase)
- Revenue per visitor (RPV) or average order value for value tests
How to Run Tests
- Form a hypothesis (e.g., “Red Sale badge will raise CTR by 10%”).
- Pick the page and element to change (category grid, product thumbnail).
- Create variants (A = current, B = new badge).
- Split traffic evenly and run until you reach statistical confidence.
- Analyze results by the KPIs above and roll out the winner.
Most modern tools make this easy: visual editors and WYSIWYG variant builders will let you change badge text, color or position without coding. Platforms like Optimizely, VWO and Convert support front-end experiments and server-side flags for deeper tests.
Use their docs to set up experiments, then verify results with your analytics platform and run the test long enough to cover normal traffic cycles (weekends, promotions).
Run one test at a time in the same area, keep sample sizes sensible, and prefer incremental wins. Small, repeatable improvements beat one big guess.
Cross-Platform Alternatives (Shopify & BigCommerce)
If you run a multi-channel store, you’ll want your product badges to look consistent across platforms. The best product badges plugin for eCommerce should be flexible, rule-based, and easy to manage so you don’t waste time duplicating work.
Here are the top picks for Shopify and BigCommerce:
- Shopify — TA Product Labels & Badges (top pick)
- Why it’s great: Large badge library, rule builder for collections/stock/discounts, visual placement editor, mobile-friendly.
- Quick tip: Start with collection-based rules so you don’t overload every product.
- Shopify — Other Good Choices
- DECO Product Labels & Badges – clean design, supports custom image badges.
- Sami Product Labels & Badges – good for seasonal campaigns with countdowns.
- BigCommerce — Supr Product Badges & Labels (recommended)
- Why it’s great: Works with most themes, has strong targeting by category or brand, outputs clean code that doesn’t break layouts.
- BigCommerce — Other Options
- Product Labels & Badges by ZendApps – flexible scheduling and custom styles.
- Smart Badge – simple, lightweight option for quick campaigns.
Frequently Asked Questions (FAQs)
Q: What is a product badge?
Ans: A product badge is a small visual label shown on product images or near product listings. It highlights quick facts like “Sale”, “New”, or “Only 3 left” so shoppers can scan the page and spot important items fast.
Q: What are the different types of product badges?
Ans: Common types include: sale/discount badges, new-arrival badges, bestseller/trust badges, low-stock or “only X left” badges, limited-edition badges, countdown/flash-sale badges, free-shipping badges, bundle/pack badges, and attribute/certification badges (eco, vegan, handmade).
Q: What is the primary purpose of a product badge?
Ans: The main goal is to draw attention and speed up decisions. Badges highlight offers, create urgency, show trust signals, and make important product features visible without reading full descriptions.
Q: How do product badges work?
Ans: Badges are added either manually or automatically. Plugins or theme rules check product data (sale price, stock, tag, category), then show the right badge. For example, if stock < 5 a “Only 3 left” badge appears automatically.
Q: How do product badges work?
Ans: Badges are added either manually or automatically. Plugins or theme rules check product data (sale price, stock, tag, category), then show the right badge. For example, if stock < 5 a “Only 3 left” badge appears automatically.
Q: What is the difference between badges and labels?
Ans: They’re often used the same way, but generally: a badge is a graphical overlay on a product image; a label is inline text near the title or price. Use badges for quick visual signals, labels for explanatory text.
Q: What is the best product badges plugin for WooCommerce?
Ans: “Best” depends on needs. Look for: easy badge creation, conditional rules (automated), scheduling, mobile previews, and a free tier you can test. The most user-friendly and feature-rich option on the market now is the Better Badge plugin.
Q: How do I add a ‘New’ badge to my WooCommerce products?
Ans: Install a badge plugin, create a badge called “New”, set a schedule, and configure badge content. The plugin will show the badge automatically, no manual edits per product.
Q: Can too many badges hurt conversions?
Ans: Yes. Too many badges make pages look noisy and reduce trust. Use one or two badges per product, max, and highlight the most important message (sale, bestseller, or low stock).
Q: Will product badges slow down my website?
Ans: Not necessarily. Use CSS or SVG badges when possible. Image badges add requests and weight. A well-coded plugin keeps badges lightweight; avoid many large PNGs on listing pages.
Q: Can I schedule badges for promotions?
Ans: Yes. Good plugins let you set start and end dates so a Black Friday badge shows only during the promo window.
Conclusion
So, there you have it. Using product badges is not just a small design trick; it’s a powerful strategy to communicate value, build trust, and seriously boost your sales.
The best part? You don’t need to be a tech expert to see these results.
Getting started is simple. The quickest way to add this powerful tool to your store is to install a dedicated plugin. Plugins like Better Badge let you create stunning, custom badges in minutes.
So, what are you waiting for, go ahead and start badging now!