Offering a lucrative discount on some demanding products to your customers, yet not getting sales?
What if they are not noticing the discounts at all? Probably scrolling past those products, not knowing what great offer they contain.
So, what’s going to make them stop and look at your sale items?
A powerful visual cue: the sale badge. These little tags are more than just decoration; they create a sense of urgency, highlight great deals, and can significantly boost your click-through rates and conversions.
If you have a WooCommerce store, then you are in the right place. Whether you’re a store owner who prefers simple, plugin-based solutions or a developer comfortable with custom code, this is your ultimate guide to mastering the WooCommerce sale badge.
We’ll walk you through every step, from the simplest tweaks to advanced customizations, giving you full control over how you showcase your sales.
Let’s get started.
What is a WooCommerce Sale Badge?
A Sale badge is a special tag on product images to let users know the product is on Sale or has a discount. This badge can be text, image, or even an animated GIF.
Generally, these badges take up a small space at the top right or left of the product featured images. The primary purpose of the Sale badge is to grab the attention of customers to let them know there’s a special offering on the product.
Why Sale Badges Matter
A WooCommerce sale badge is much more than a small design element. In eCommerce, visual cues play a huge role in how shoppers behave.
When people see a badge that says “Sale” or shows a discount percentage, it instantly signals urgency and value. This simple highlight can nudge customers to click, explore, and eventually buy.
From a psychological view, sale badges tap into two powerful triggers: urgency and social proof.
Urgency makes shoppers feel they could miss out if they don’t act quickly, while social proof reassures them that others are also taking advantage of the deal. Both of these factors are proven to increase engagement and conversions.
Here’s how using badges can directly improve your store performance:
- Boost click-through rate (CTR): Products with badges stand out in a grid or search results, drawing more clicks.
- Improve product discovery: Shoppers instantly know which items are discounted without reading long descriptions.
- Lift conversion rates: Highlighting a deal visually can reduce hesitation and push visitors to complete their purchase.
When used right, sale badges are not just decorative, they’re a proven way to increase sales.
How to Add WooCommerce Sale Badge in WooCommerce — 3 Practical Methods
There are basically 3 ways you can add a WooCommerce sale badge to your products that are on Sale.
- Built-in Method
- Using a Dedicated WooCommerce Sale Badge Plugin
- Using Custom Code in Your Theme File
Let’s walk you through all the methods of how to add a sale badge in WooCommerce step by step.
1. How to Add a Sale Tag in WooCommerce Using Core Features
By default, WooCommerce displays a Sale badge when you set a Sale price on a product. Therefore, you are not actually creating any badges; WooCommerce automatically applies a built-in badge when the Sale price is set on a product.
However, the color, placement, and shape of the default badge vary based on your selected theme. Here’s how to add product badges in WooCommerce using the core method.
- Go to your target product page’s edit window.
- Scroll down to the Product Data section.
- Under the General tab, input and set a Sale price on the product.
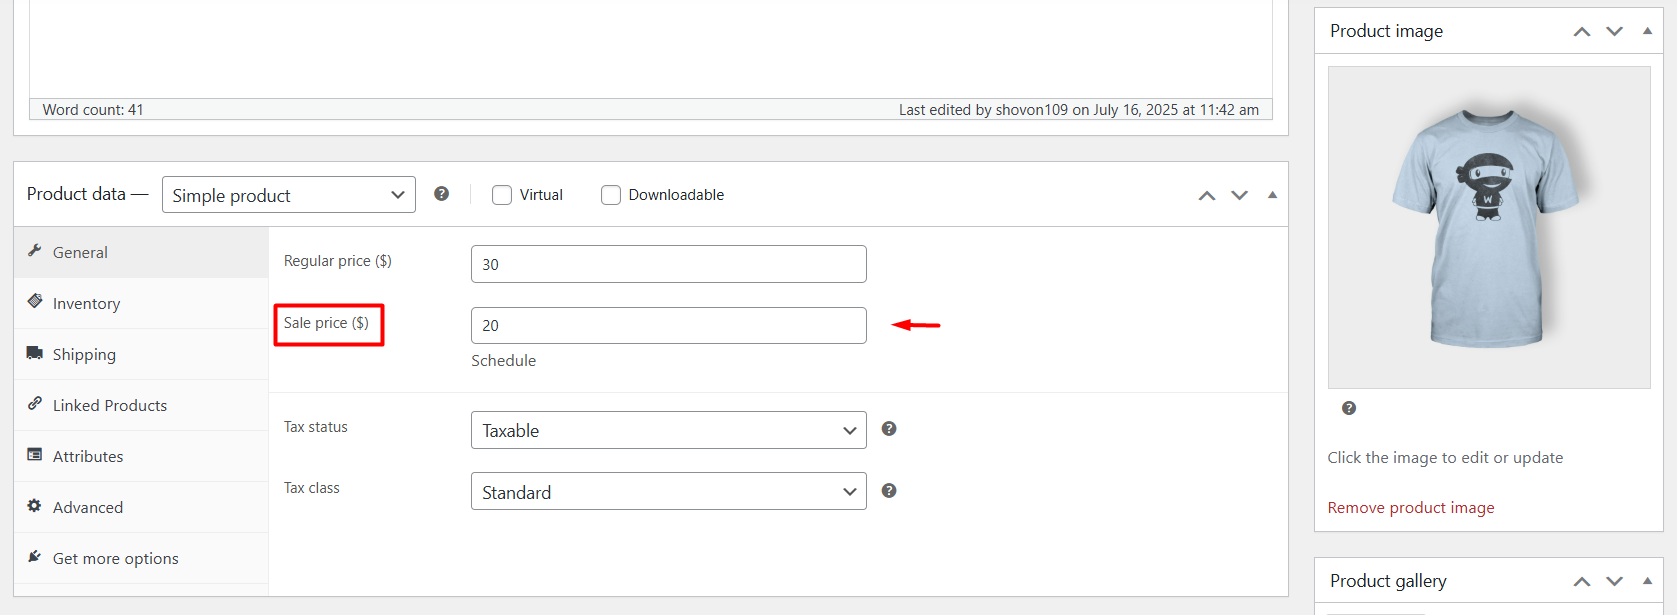
- Update the product, and it will automatically display the WooCommerce sale badge in all listings (Shop page, Category page, Individual page).
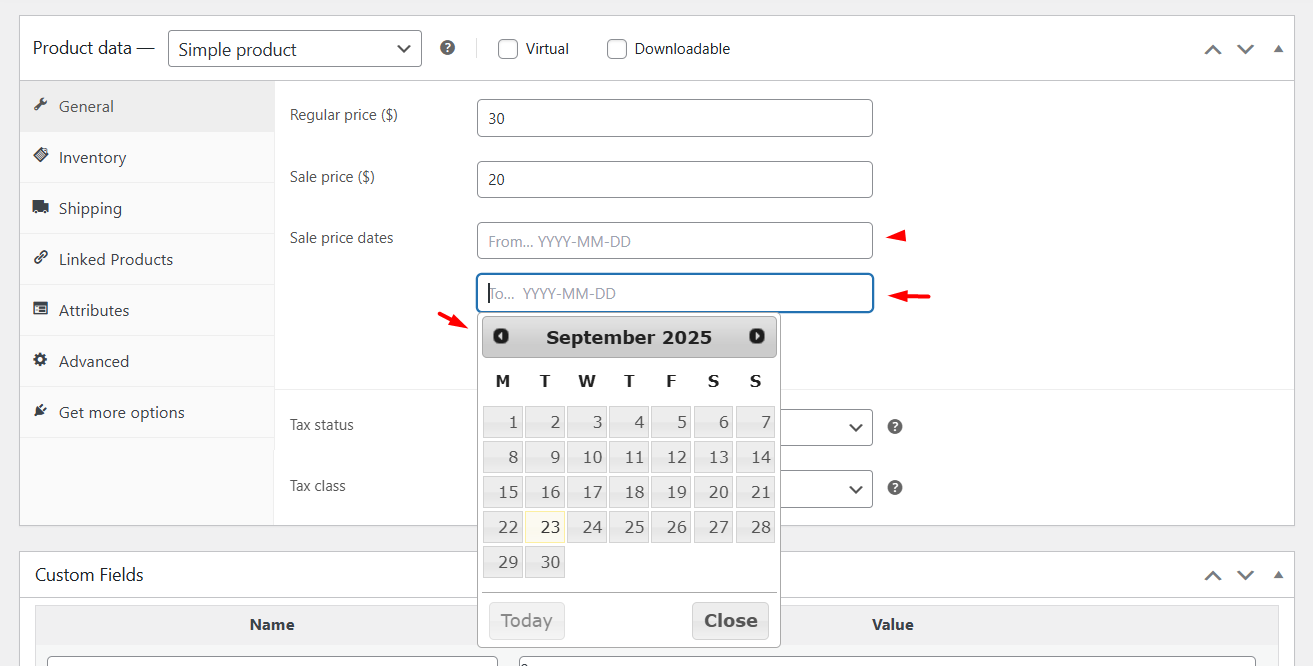
- Additionally, WooCommerce allows you to schedule a start and end date for the sale price to be valid. Thus, you also schedule how long the sale badge will be displayed.
That’s pretty much the process of how WooCommerce adds a sale badge to a product. You can’t really control how the default WooCommerce sale badge will look or in what position it will be displayed.
Again, the position, color, and shape of the badge entirely depend on your theme. Some themes display an olive green circle badge, while some simply display a white square box with a black border.
To customize the default WooCommerce badge to some extent, you can apply custom CSS codes, which we will cover in the later sections of the article.
2. How to Create a Sale Badge Using a Dedicated WooCommerce Sale Badge Plugin
Plugins truly give you the flexibility you require to capture the attention of your customers, increase click-through rates, and boost your conversion rates through product badges.
We have reviewed and personally tested the best WooCommerce badge plugins in the market, and the one WooCommerce custom product badges plugin we picked for this article is called Better Badges.
This is by far the most user-friendly, easy-to-use plugin for creating eye-catching WooCommerce custom product badges. In addition to simple text badges, you can also add image and html badges.
The plugin allows you to apply different shapes, gradient background colors, and a collection of exciting animations to your badges. Let’s first quickly take a look at how to create a WooCommerce sale badge using the plugin.
- Install the free version of the plugin from the repository.
- To hide, remove, or disable the default WooCommerce sale badge, toggle the WooCommerce Default Badge option from Better Badge > Settings.

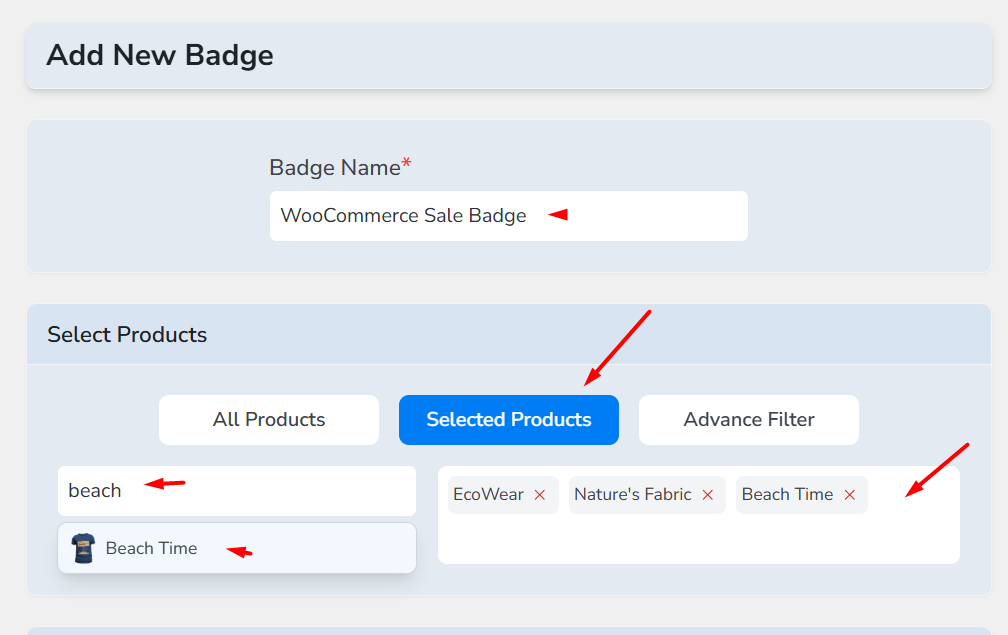
- Click Add New or New Badge to get started creating a WooCommerce sale badge.
- Give your custom badge a name and specify the products by clicking the Selected Products button.
- Set the validity period for WooCommerce to display the badge on the front.
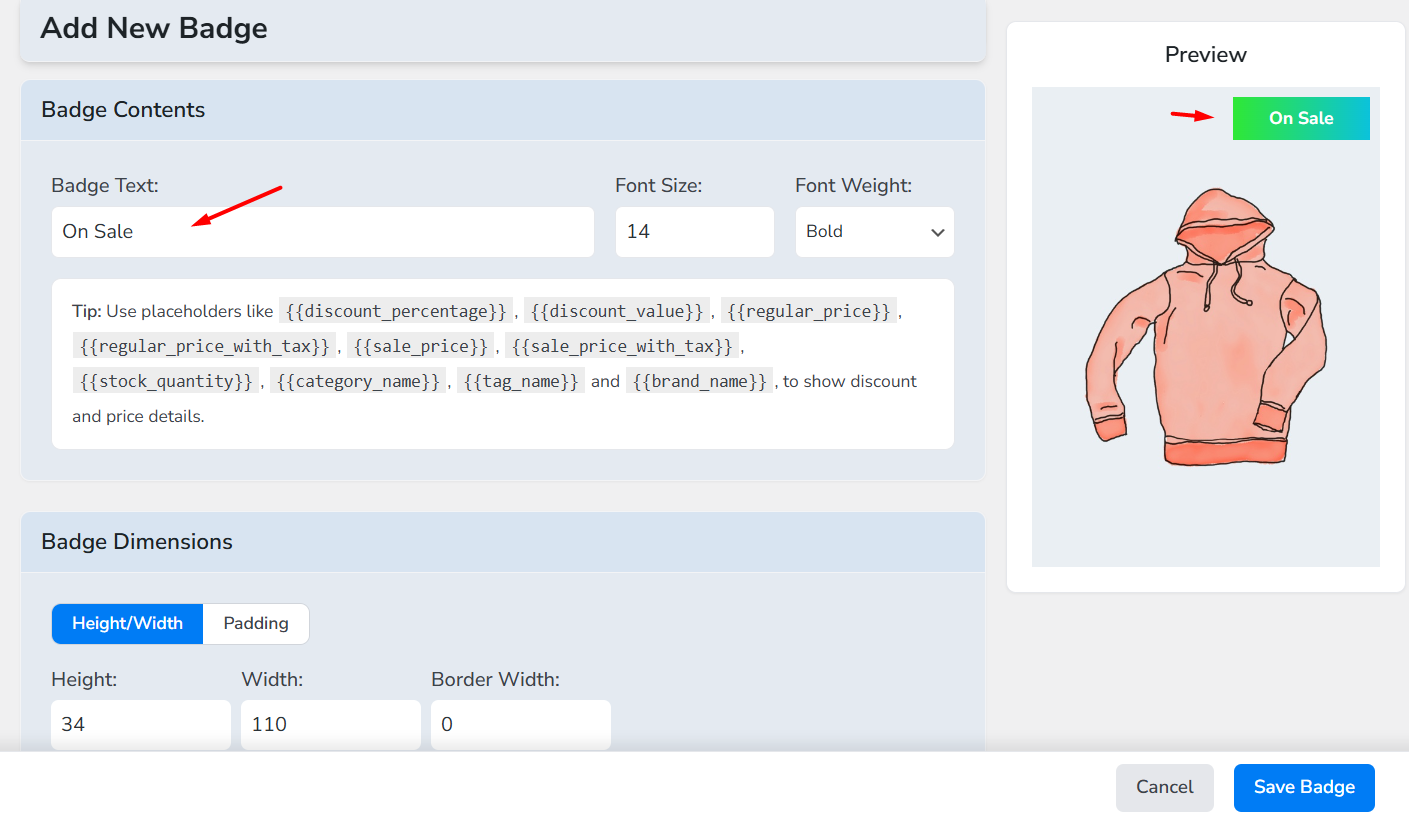
- Select the badge type and position. For this demo, we will pick the Custom badge type and the Top Right position.
- Finally, insert the badge text, set font size and weight, and save the badge.
- Head over to your storefront to see the new badge in action.
This is how to add product badges in WooCommerce using the plugin. The Better Badge plugin also allows you to extensively customize the WooCommerce sale badge, which we will find out later in the article.
3. How to Add WooCommerce Sale Badge Using Custom Code?
We highly discourage this method if you are not tech-savvy or experienced with coding. We must warn you, inserting custom code into your theme file can entirely break your WooCommerce site if done wrong.
Here are the steps on how to add a sale tag in WooCommerce using custom codes.
- Go to Appearance > Theme File Editor > functions.php or use the Code Snippets plugin (safer for non-devs).
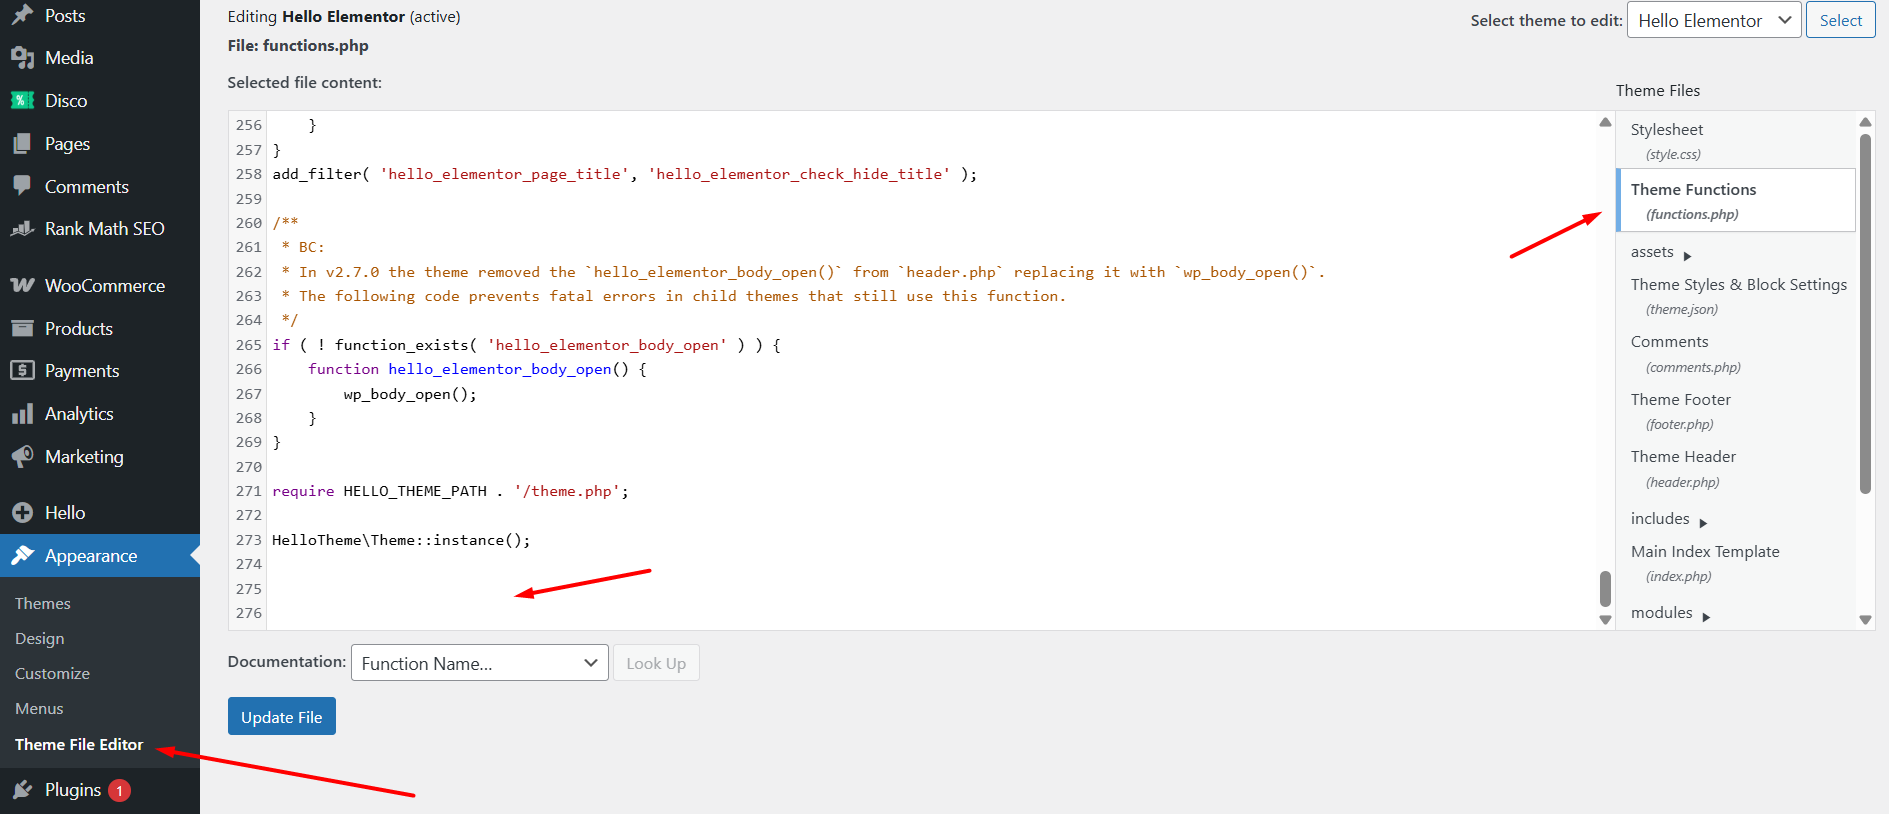
- Paste your code at the bottom of the page.
- Save changes.
- Visit a product list or single product page that’s on sale to test your new badge.
Sample Code You Can Use
- This code displays the sale percentage for WooCommerce simple products and the best variation discount for variable products.
add_filter( 'woocommerce_sale_flash', 'my_custom_onsale_percentage', 20, 3 );

function my_custom_onsale_percentage( $html, $post, $product ) {

    // Only proceed if product is on sale

    if ( ! $product || ! $product->is_on_sale() ) {

        return $html;

    }

    // Simple & external products

    if ( $product->is_type( 'simple' ) || $product->is_type( 'external' ) ) {

        $regular = (float) $product->get_regular_price();

        $sale    = (float) $product->get_sale_price();

        if ( $regular > 0 && $sale > 0 && $regular > $sale ) {

            $percent = round( ( ( $regular - $sale ) / $regular ) * 100 );

            return '<span class="onsale">' . esc_html( $percent ) . '% OFF</span>';

        }

        return $html;

    }

    // Variable products - show the maximum percent-off among variations

    if ( $product->is_type( 'variable' ) ) {

        $prices = $product->get_variation_prices( true ); // include hidden variations

        $regulars = isset( $prices['regular_price'] ) ? $prices['regular_price'] : array();

        $sales    = isset( $prices['price'] ) ? $prices['price'] : array();

        $max_percent = 0;

        foreach ( $regulars as $variation_id => $regular_price ) {

            $reg = (float) $regular_price;

            $sale_price = isset( $sales[ $variation_id ] ) ? (float) $sales[ $variation_id ] : 0;

            if ( $reg > 0 && $sale_price > 0 && $reg > $sale_price ) {

                $p = round( ( ( $reg - $sale_price ) / $reg ) * 100 );

                if ( $p > $max_percent ) {

                    $max_percent = $p;

                }

            }

        }

        if ( $max_percent > 0 ) {

            // If multiple discounts, "Up to X% OFF" is clearer on catalog grids

            $label = $max_percent > 0 ? 'Up to ' . $max_percent . '% OFF' : $max_percent . '% OFF';

            return '<span class="onsale">' . esc_html( $label ) . '</span>';

        }

        return $html;

    }

    // Fallback to default

    return $html;

}
Quick Safety Checklist (Do These First)
- Make a full backup (files + DB).
- Use a child theme or a site-specific plugin (never edit the parent theme).
- Test on a staging site.
- Clear any caches after making changes (object, page, CDN).
- If you get a white screen, use FTP to remove the code or disable the plugin. Enable WP_DEBUG on staging to see errors.
How to Customize WooCommerce Sale Badge?
So, we have explored 3 methods to create sale badges in WooCommerce. Now, let’s find out how to customize and change the sale badge style in WooCommerce using each method.
How to Customize WooCommerce’s Default Sale Badge Style?
You can apply some WooCommerce sale badge CSS to customize the look of the core sale badge. Here’s how to do it.
- Go to Appearance > Customize.
- Click the Additional CSS option.
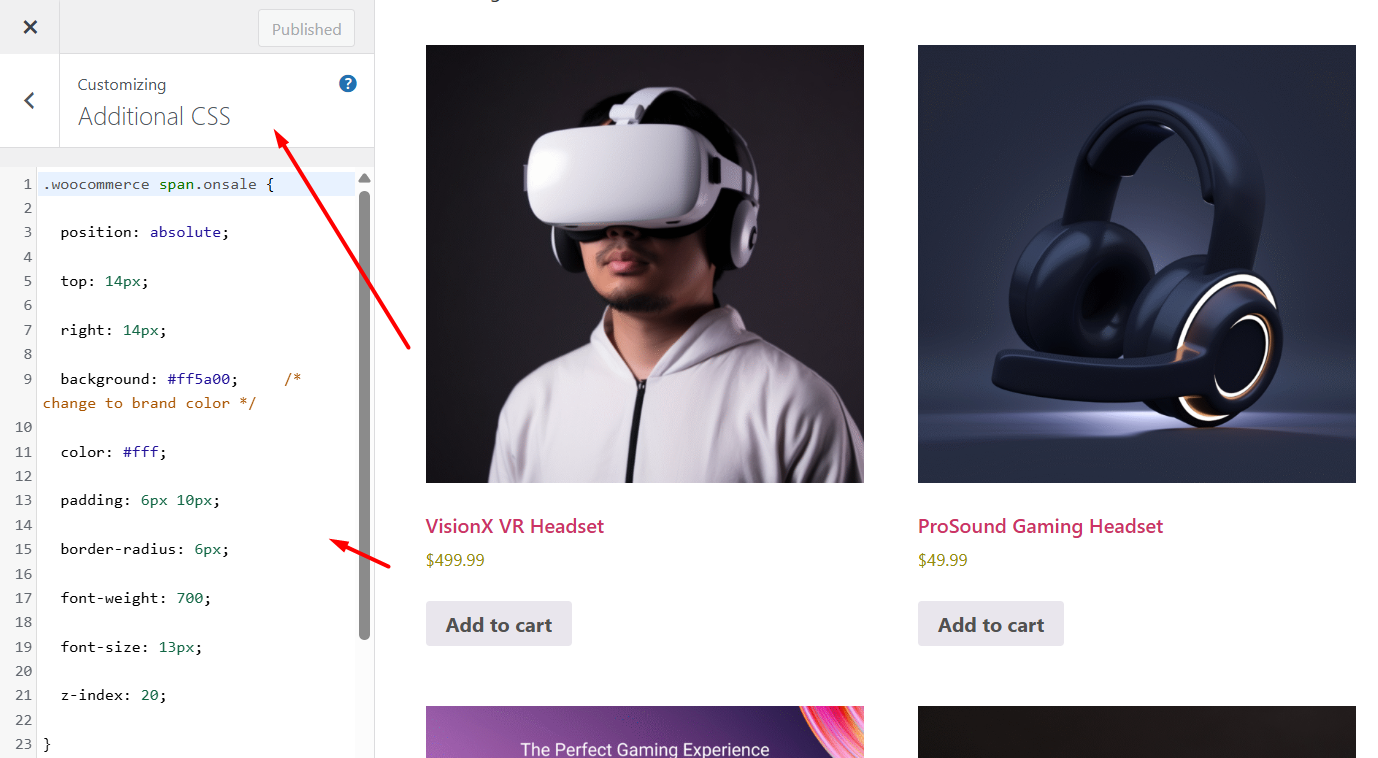
- Insert your CSS code to modify the default badge.
Example Code:
.woocommerce span.onsale {

  position: absolute;

  top: 14px;

  right: 14px;

  background: #ff5a00;     /* change to brand color */

  color: #fff;

  padding: 6px 10px;

  border-radius: 6px;

  font-weight: 700;

  font-size: 13px;

  z-index: 20;

}

.woocommerce ul.products li.product,

.woocommerce .product {

  position: relative; /* ensure badge positions correctly */

}
Warning: The CSS codes may or may not support or work on your theme. You need to thoroughly inspect the default on sale class and figure out what works.
How to Customize the Default WooCommerce Sale Badge Using a Plugin?
This is by far the most flexible option to customize a sale badge. A custom badge plugin, such as Better Badge, allows you to extensively customize and personalize the look and shape of your sale badge.
We will use the pro version of the plugin to demonstrate all customization features.
Changing Color & Position of The Sale Badge
Go back to the WooCommerce sale badge you created and edit it. To change the position –
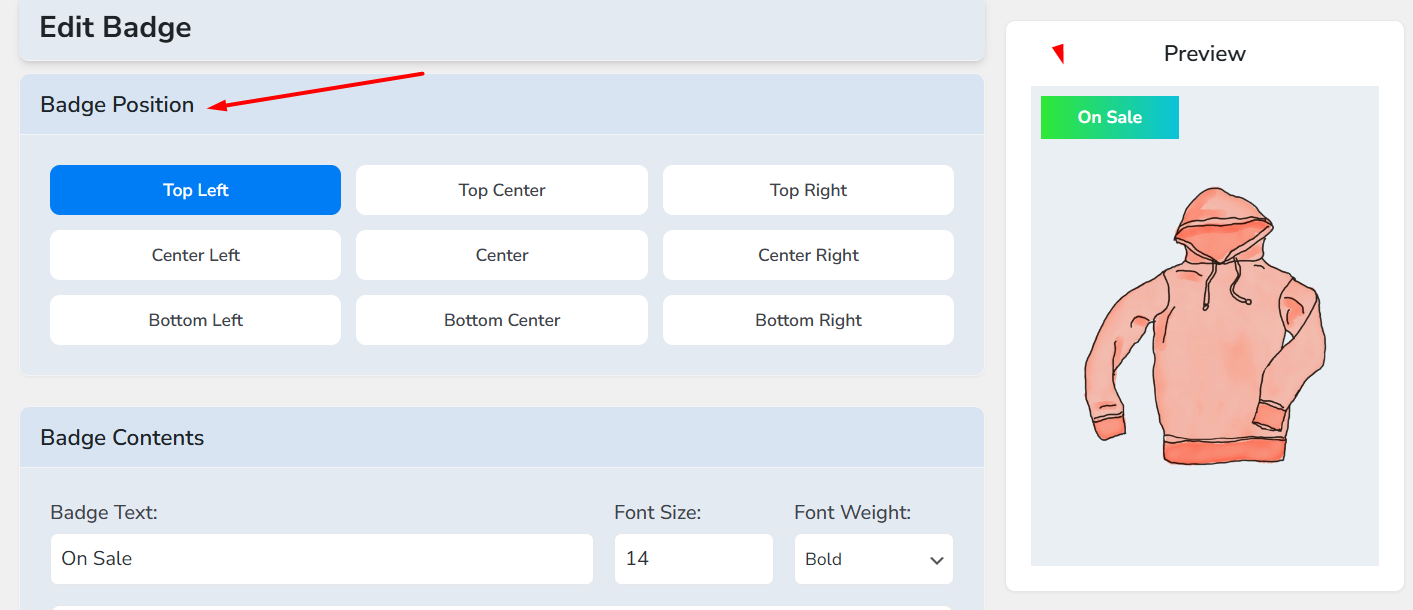
- Scroll to the Badge Position section.
- Select from the wide range of available positions and check the preview window to make decisions without jumping back and forth.
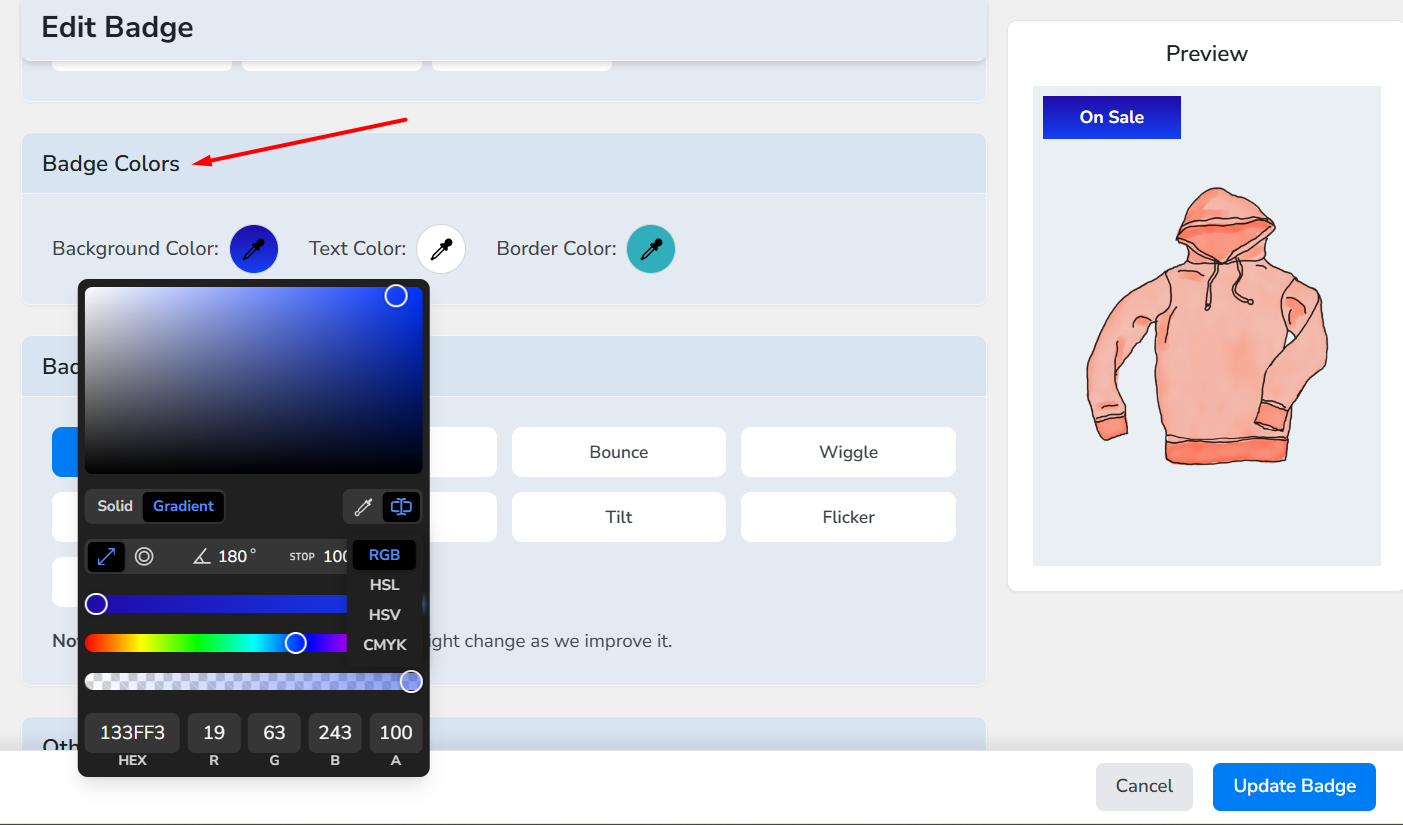
To change the color of the badge –
- Go to the Badge Colors section.
- You can change the badge background, font, and border color.
- The plugin offers a robust color selector from which you can set gradient colors.
- You can also set color through RGB, CMYK, HSL, HSV, and Hex codes.
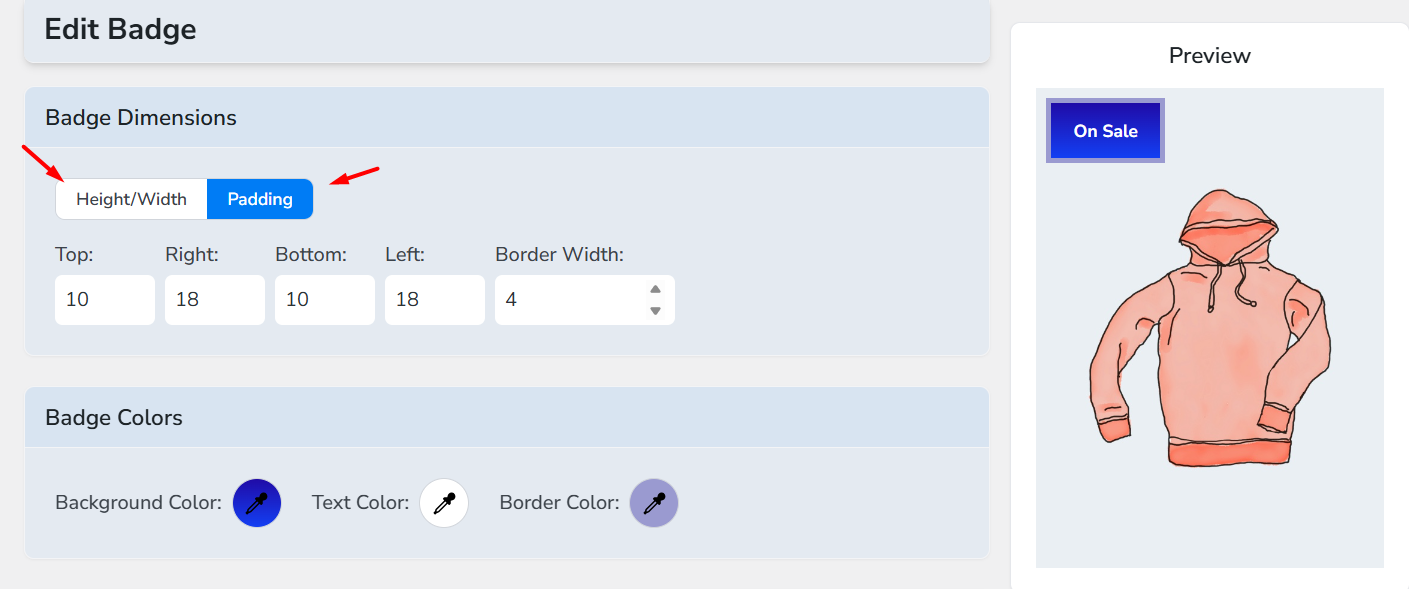
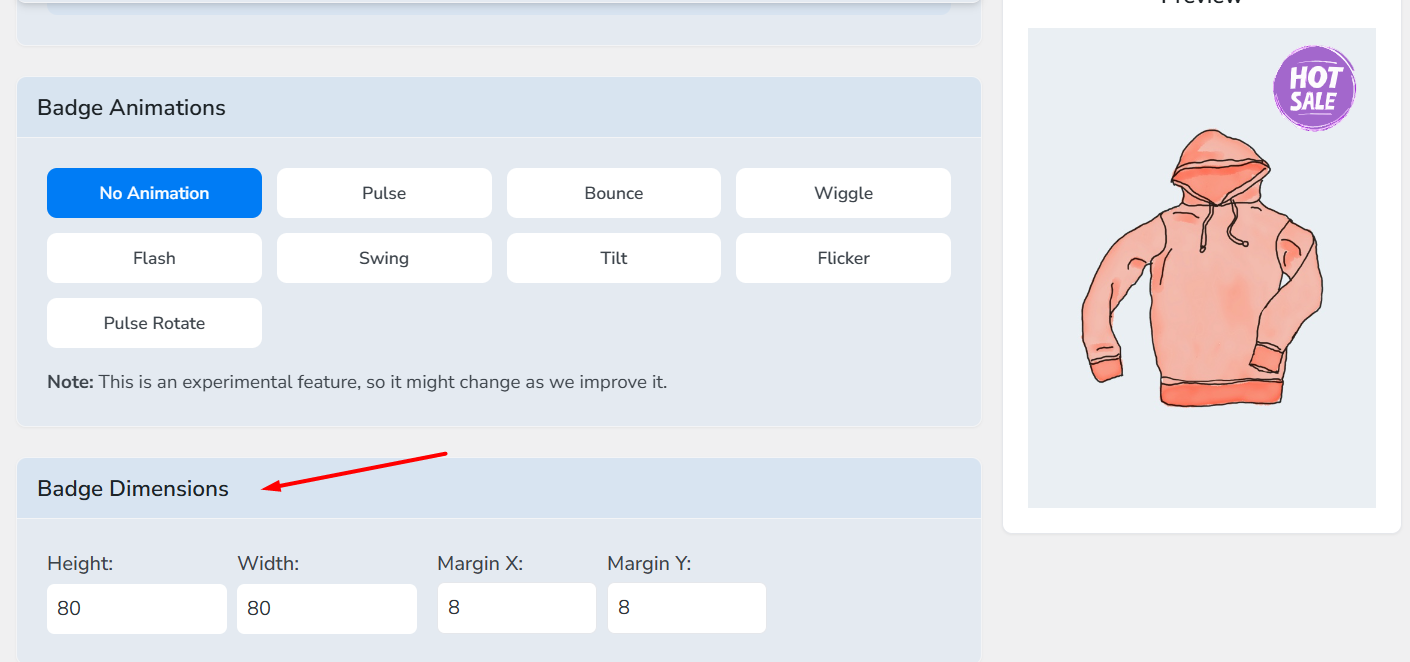
Set Badge Dimensions, Shape & Radius
To set dimensions –
- Jump to the Badge Dimensions section.
- Set appropriate badge height, width, and border pixels.
- Alternatively, you can set the dimension by padding parameters.
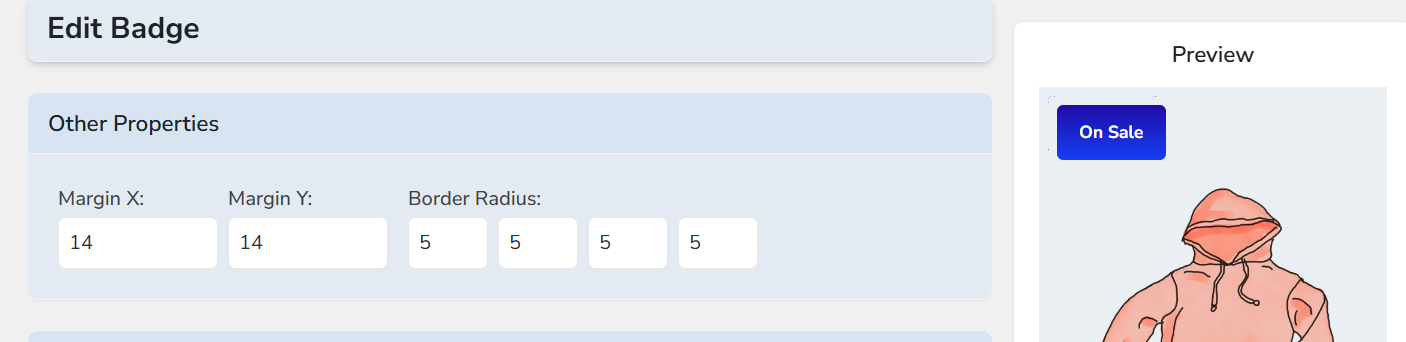
To set border radius –
- Go to Other Properties.
- Set the border radius.
- You can also set a custom badge position through Margin fields.
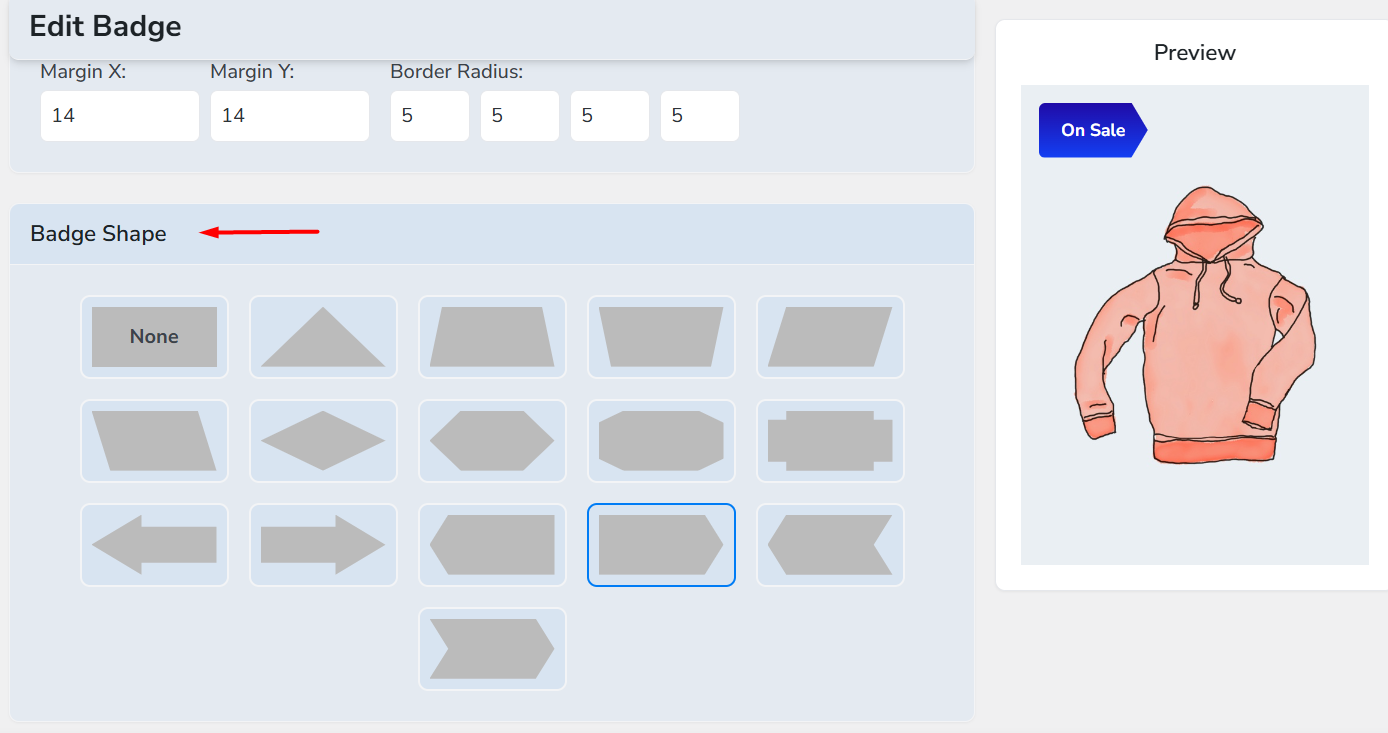
To change the shape of your WooCommerce sale badge –
- Scroll down to the Badge Shape section.
- Test and find the best shape for your button from the available collection.
Set Sale Badge Animation
This is an exclusive feature of the Better Badge plugin. You can animate your product badges and add a visual nudge for your customers.
- Navigate to the Badge Animations section.
- Test and select your animation from the collection.
How to Set an Image Sale Badge in WooCommerce?
One of the notable features of Better Badge is its ability to set images as badges. Here’s how you can do it.
- Go to Badge Type and select the Image/Icon option.
- Scroll down to the Select Image section. The plugin comes with some image badges pre-installed.
- You can also upload your own custom image badge using the upload settings.
- Change the badge size and set custom position from the Badge Dimension settings. The built-in badge positions also work for image badges.
How to Create a Dynamic Sale Badge in WooCommerce?
The plugin enables you to set placeholders for dynamically displaying messages on badges. For example, you can display the sale percentage in WooCommerce using placeholders.
- Go to Badge Content.
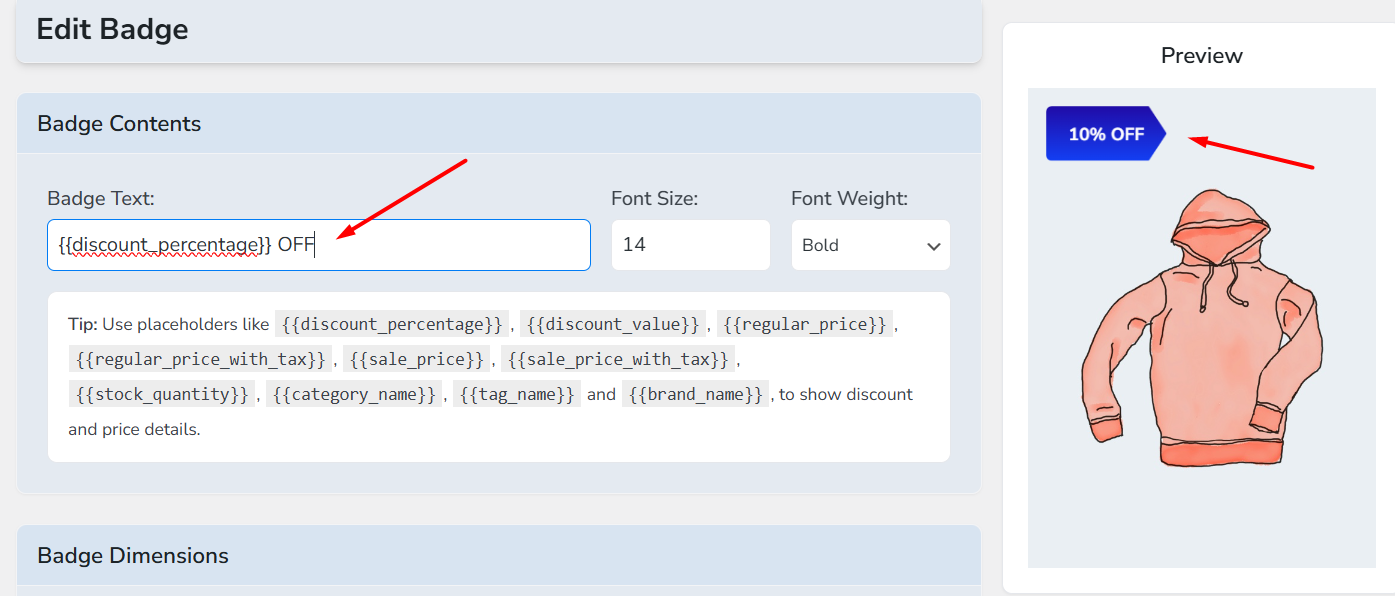
- Copy and paste one of the placeholders (e.g., discount percentage).
- Save your badge, and product pages will automatically display the accurate discount percentage you are offering on individual products.
How to Customize WooCommerce Sale Badge Using Custom Codes?
We have already showcased creating a discount percentage custom badge using codes. If you are familiar with or an expert in coding or have a developer, you basically have endless opportunities to customize a badge.
However, as we mentioned earlier, inserting custom code carries significant risks that can compromise your entire site. Here’s another example code –
// Remove default WooCommerce sale badge

remove_action( 'woocommerce_before_shop_loop_item_title', 'woocommerce_show_product_loop_sale_flash', 10 );

remove_action( 'woocommerce_before_single_product_summary', 'woocommerce_show_product_sale_flash', 10 );

// Add custom WooCommerce star-shaped sale badge

add_action( 'woocommerce_before_shop_loop_item_title', 'custom_star_sale_badge', 10 );

add_action( 'woocommerce_before_single_product_summary', 'custom_star_sale_badge', 10 );

function custom_star_sale_badge() {

    global $product;

    if ( $product->is_on_sale() ) {

        echo '<span style="

            display:flex;

            align-items:center;

            justify-content:center;

            background:#0073e6;

            color:#fff;

            font-weight:bold;

            font-size:13px;

            line-height:1.2;

            width:90px;

            height:90px;

            position:absolute;

            top:14px;

            left:14px;

            z-index:20;

            clip-path: polygon(50% 0%, 61% 35%, 98% 35%,

                               68% 57%, 79% 91%, 50% 70%,

                               21% 91%, 32% 57%, 2% 35%,

                               39% 35%);

            text-align:center;

            text-shadow: 1px 1px 2px rgba(0,0,0,0.6);

        ">Sale</span>';

    }

}- Insert the code in the functions.php file.
- Save and test from the front.
Designing for Impact: How Your Sale Badge Affects UX, Speed, and SEO
When you add sale badges to product images, they help people notice discounts. However, if they’re implemented poorly, they can slow the page, hide important information, or confuse assistive technology.
Below we will explore some of the risks and give clear, low-effort fixes you can do today.
1) Performance — Keep Badges Light and Stable
- Prefer pure CSS badges (background color + text or an SVG) instead of heavy inline JavaScript. CSS-only badges cost almost nothing and are fast to paint. Use CSS animations only when needed.
- Prevent layout shifts (CLS): always reserve space for the badge or absolutely position it inside a parent with “position: relative;” so the page layout does not jump when the badge appears. CLS is a Core Web Vitals metric and unexpected shifts hurt UX and SEO. Aim to keep CLS low (<0.1 is “good”).
- If you use image badges: use the browser loading=”lazy” attribute for offscreen images and set width and height (or CSS aspect-ratio) so the browser can reserve space and avoid shifts. Browser-level lazy loading reduces network cost without custom JS.
- Keep DOM small: don’t inject big HTML blocks per product. One <span class=”onsale”> or an inline SVG per item is enough. If you need many animated badges on a grid, consider disabling animation on smaller devices to save CPU usage.
2) SEO and Structured Data — Badges Don’t Replace Schema
- A visual badge is only a UX cue — it does not replace proper structured data for price and offers. If you want Google to show price/discount info in search results, implement Product/Offer schema and ensure “offers.price” reflects the sale price and, when appropriate, “priceValidUntil” is used for limited-time offers. Google Search Central explains how Product structured data works and what to include.
- Do not hide pricing text behind images or badges. Search engines and users must be able to read the price/value in HTML. Keep the sale price present in the DOM in machine-readable form (e.g., <span class=”price”>), and then use the badge only as a visual highlight.
3) Accessibility — Make Badges Meaningful, Not Confusing
- Don’t rely on color alone. People with low vision or color-blindness may miss a red dot or a small color change. Add readable text (e.g., “25% OFF” or “Sale”) and a text alternative where appropriate. WCAG requires sufficient contrast for text. So, aim for at least the WCAG 2.1 contrast thresholds (generally 4.5:1 for normal text).
- Icons or decorative images: If a badge is purely decorative and you also have text that conveys the same info, mark the image as decorative (alt=””) or set aria-hidden=”true” on the decorative element so screen readers aren’t given duplicate content. If the badge conveys important info (discount amount), make sure the information is present in accessible text as well. Use aria-hidden carefully, don’t hide focusable or interactive content from assistive tech.
- Keyboard and screen reader users: Ensure badges don’t block the product link or become a separate, confusing tab stop. A good pattern: badge is visually over the image but not a separate focus target, and the product title/link remains the main interactive element.
- Non-visual cues: If you want to emphasize a sale for screen-reader users, add a short visually-hidden message next to the price (e.g., <span class=”sr-only”>On sale: was $X, now $Y</span>) so the discount is announced without duplicating information visually.
4) UX & conversion — visible but not intrusive
- Test badge visibility on small screens and dense product grids. Badges that are too big can hide product thumbnails; too small and they’re missed. A/B test shapes, positions, copy (e.g., “Sale” vs “25% OFF” vs “Limited”) to see what lifts clicks — small changes can change CTR.
- Avoid covering critical product details (brand logos, key visuals). If a badge must overlap, move it to a corner with padding so the product is still readable.
Conclusion
A clear, well-implemented WooCommerce sale badge is a small change that can make a real difference: it grabs attention, communicates value, and nudges shoppers to click.
Keep badges lightweight, accessible, and tied to correct price/schema data, and prefer simple CSS or a trusted plugin so you don’t harm performance. Finally, test and measure, small badge tweaks often translate to noticeable lifts in visibility and conversions.