You put a product on sale. The old price gets crossed out, the new price appears, and the discount is technically right there.
But shoppers don’t always stop to read the price.
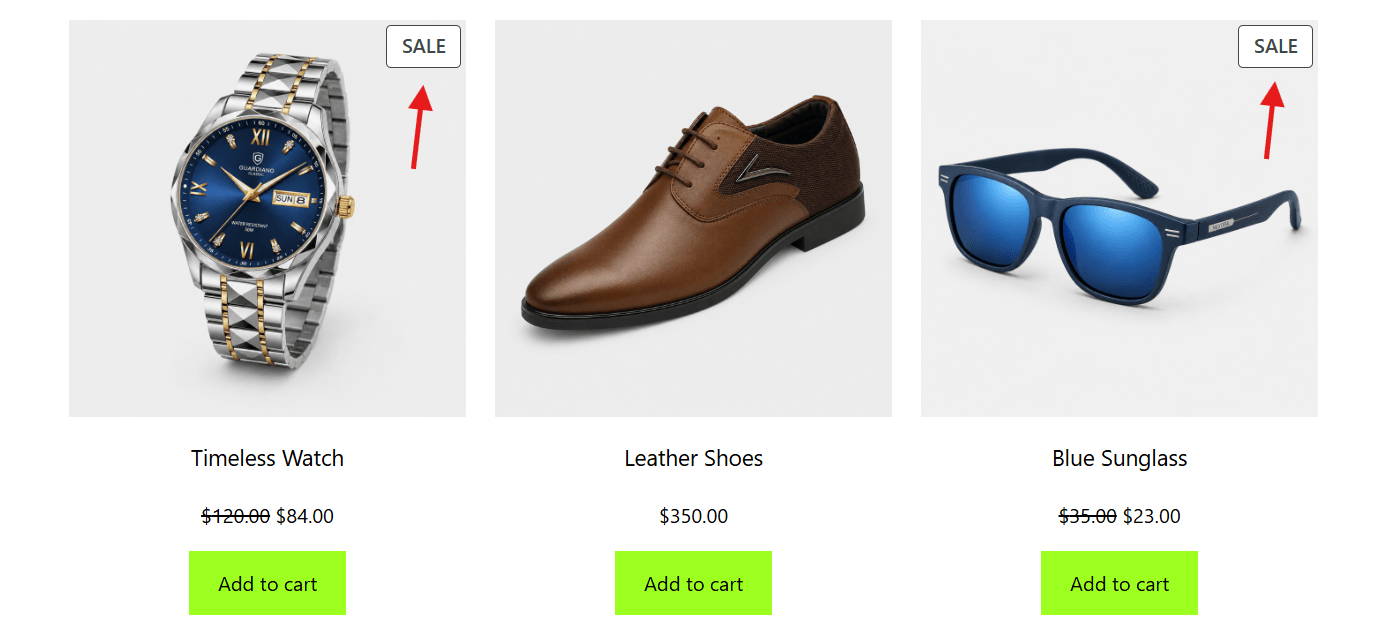
A sale badge gives them a quick visual cue that says, this product is on sale.
And here’s the useful part: you don’t necessarily need a plugin to add a WooCommerce sale badge. WooCommerce can display a basic Sale badge automatically when a product has an active sale price.
The real question is how much control you need.
Do you just want the default Sale label? Do you want something more specific, like 30% OFF or BLACK FRIDAY? Or do you want complete control over the badge with your own code?
In this guide, I’ll show you how to add a WooCommerce sale badge using all three methods, using the same example throughout: a watch with a regular price of $120 and a sale price of $84.
That way, you can see exactly what each method can and can’t do before choosing one.
What Is a WooCommerce Sale Badge?
A WooCommerce sale badge is a small label displayed on a product, usually over the product image, to draw attention to a discount and make the offer easier to spot while shoppers browse.
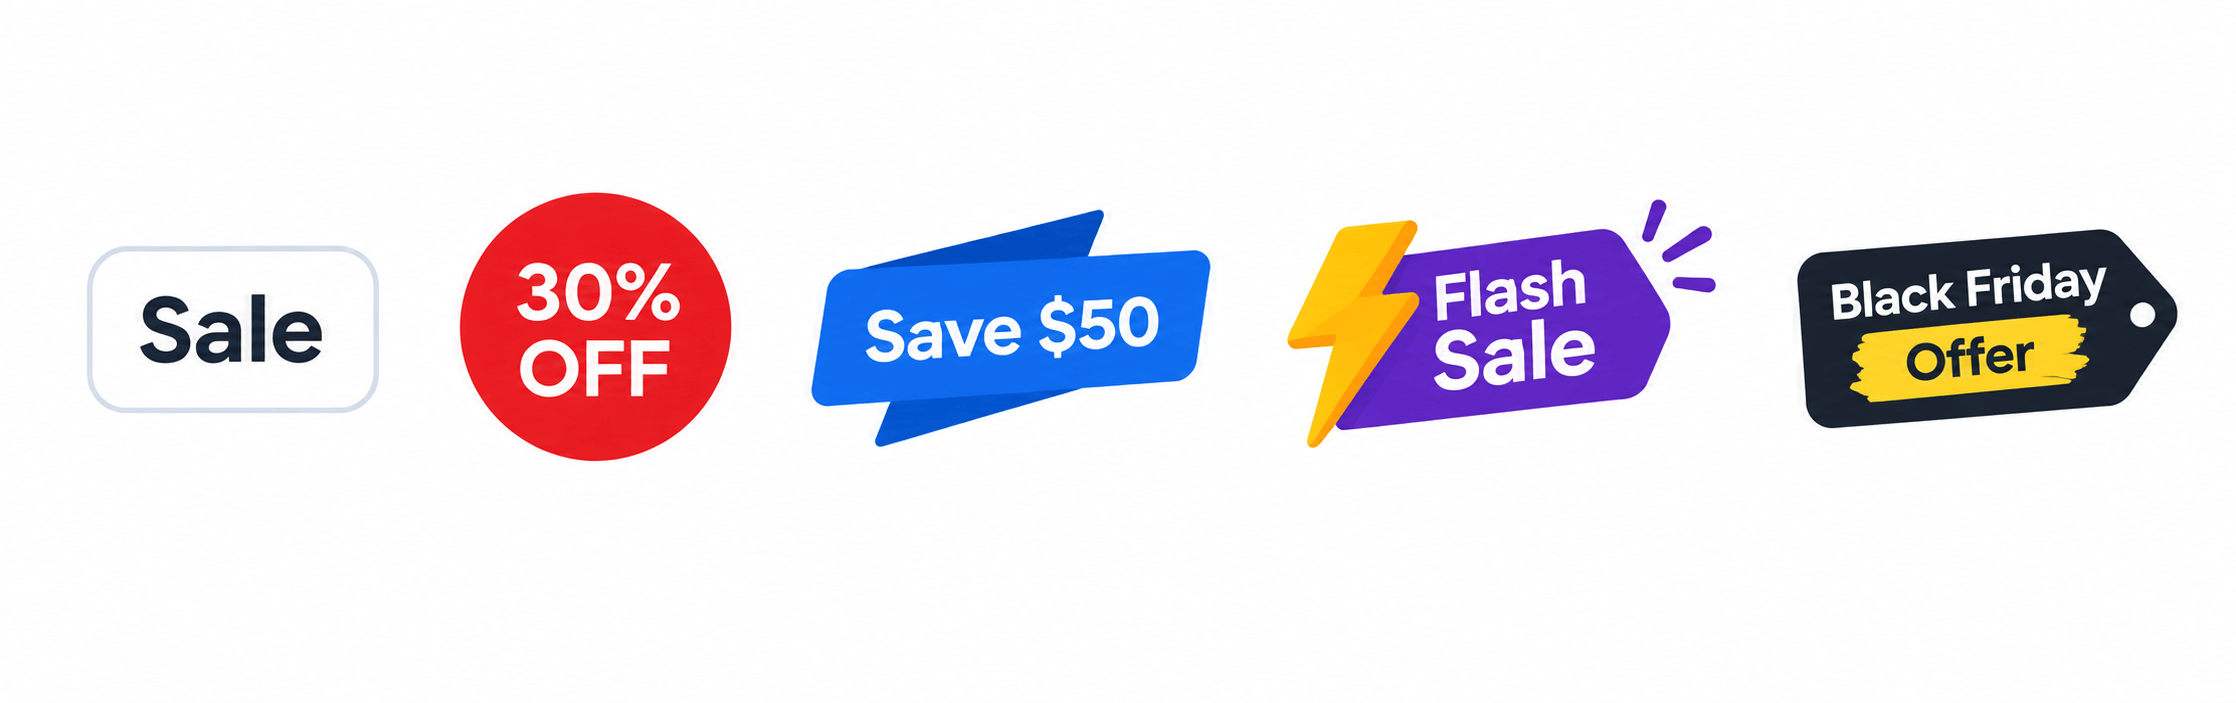
It might simply say Sale, or show something more specific such as 30% OFF, Flash Sale, or another campaign message.
That small visual cue can make a discounted product stand out in a busy product grid, helping shoppers recognize the offer without having to stop and work it out from the price alone.
For example:
Regular price: $120
Sale price: $84
Sale badge: 30% OFF or Save $36
The sale price determines what the customer pays, while the sale badge makes the discount more noticeable. You can set a sale price and let WooCommerce display its default badge automatically. Or, you can use a plugin or custom code to change what that badge says and how it looks.
So when you add a sale badge, you’re not changing the actual discount. You’re changing how that discount is presented to shoppers.
Why Your Sale Badge Matters
A shopper shouldn’t have to stop and calculate the discount before they know there’s a deal.
In a busy product grid, especially one with dozens of products, discounted items can easily blend in with everything else. A visible sale badge gives shoppers a quick visual cue that says this product is worth a closer look.
There’s also a difference between:
Sale
and
30% OFF
Sale tells shoppers that the product is discounted. 30% OFF tells them exactly what the offer is.
A study by researchers at the University of Illinois found that the way a price promotion is framed can affect how significant the discount feels. Percentage discounts had more impact for lower-priced products, while dollar savings had more impact for higher-priced products.
The way you present a discount can change how big the saving feels.
That’s one reason you might want more control over your sale badge instead of sticking with WooCommerce’s default Sale label.
Think about how you shop in a store. A bright sale tag can catch your eye before you’ve even read the price. Your online shoppers aren’t that different. A well-placed badge can help a discounted product stand out before they move on to the next one.
3 Methods to Add a Sale Badge in WooCommerce
The simplest method isn’t always the right one for every store. It depends on whether you need a basic label, more control without code, or complete control through your own code.
There are three practical paths. Here’s how they compare:
The choice is about how much control you need and who will maintain the store afterward.
Let’s use the same $120 watch and $84 sale price to see how each method works.
Method 1: How to Add a WooCommerce Sale Badge With the Built-In Option
If all you need is a simple Sale label, this is the easiest option.
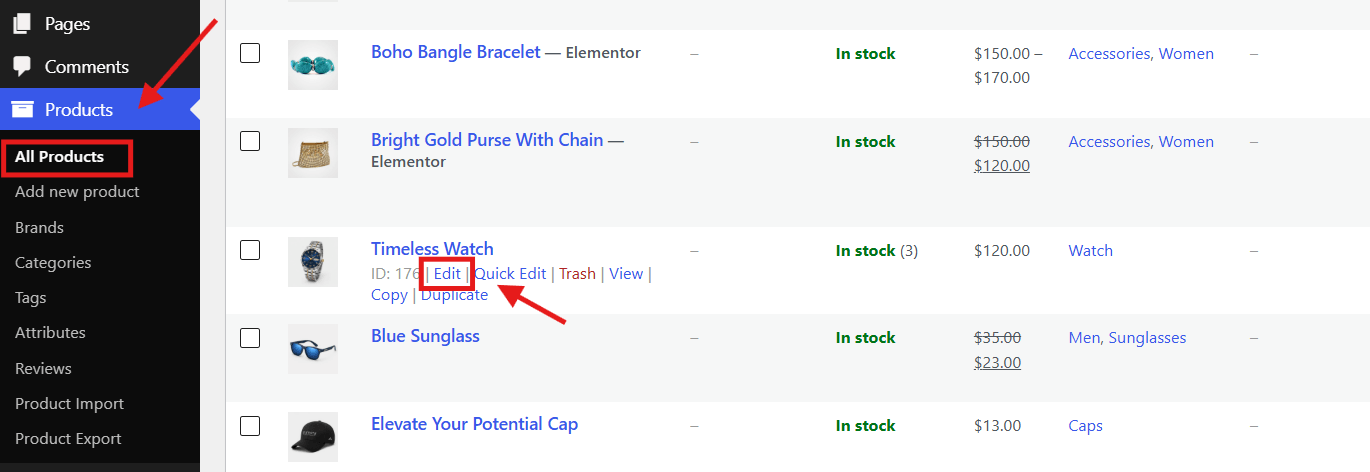
Step 1: Edit the product
Go to Products → All Products and edit the product you want to put on sale.
Step 2: Add the sale price
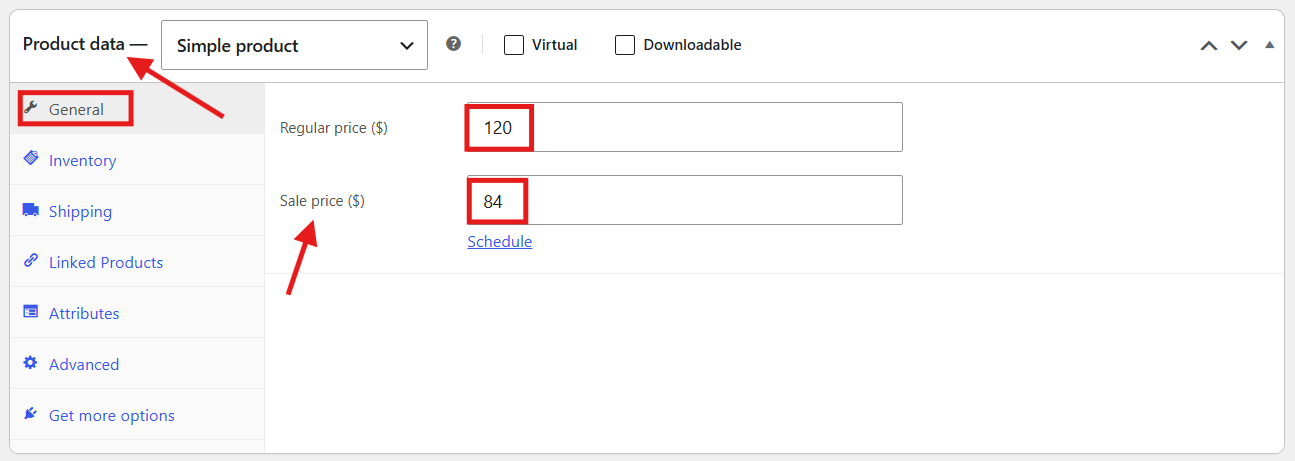
Scroll down to Product Data.
Under Product Data → General, enter:
Regular price: $120
Sale price: $84
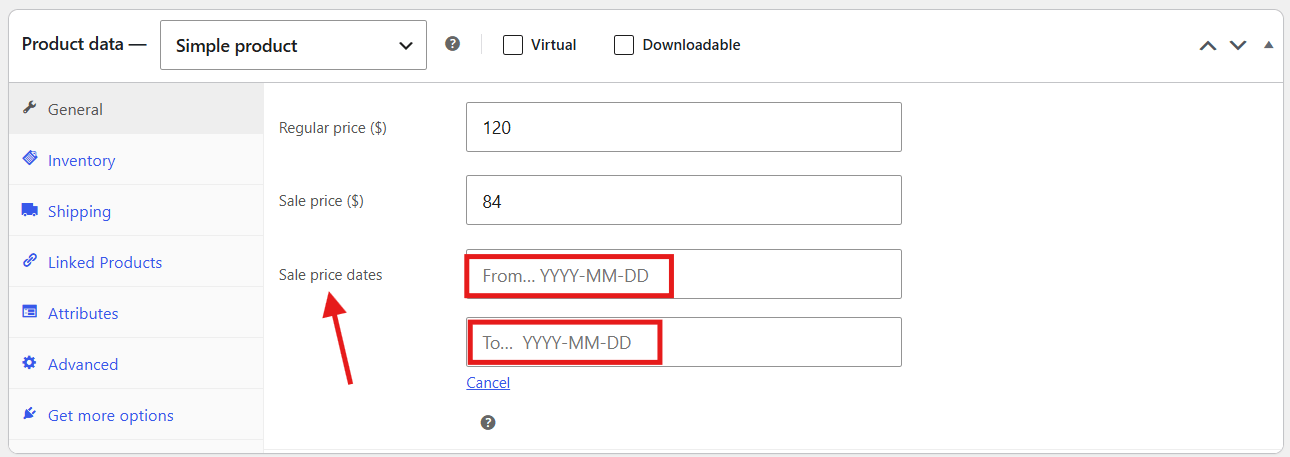
Step 3: Schedule the sale if needed
If the sale is only running for a specific period, click Schedule next to the sale price.
Enter the start and end dates for your promotion.
When the sale price expires, WooCommerce stops treating the product as being on sale.
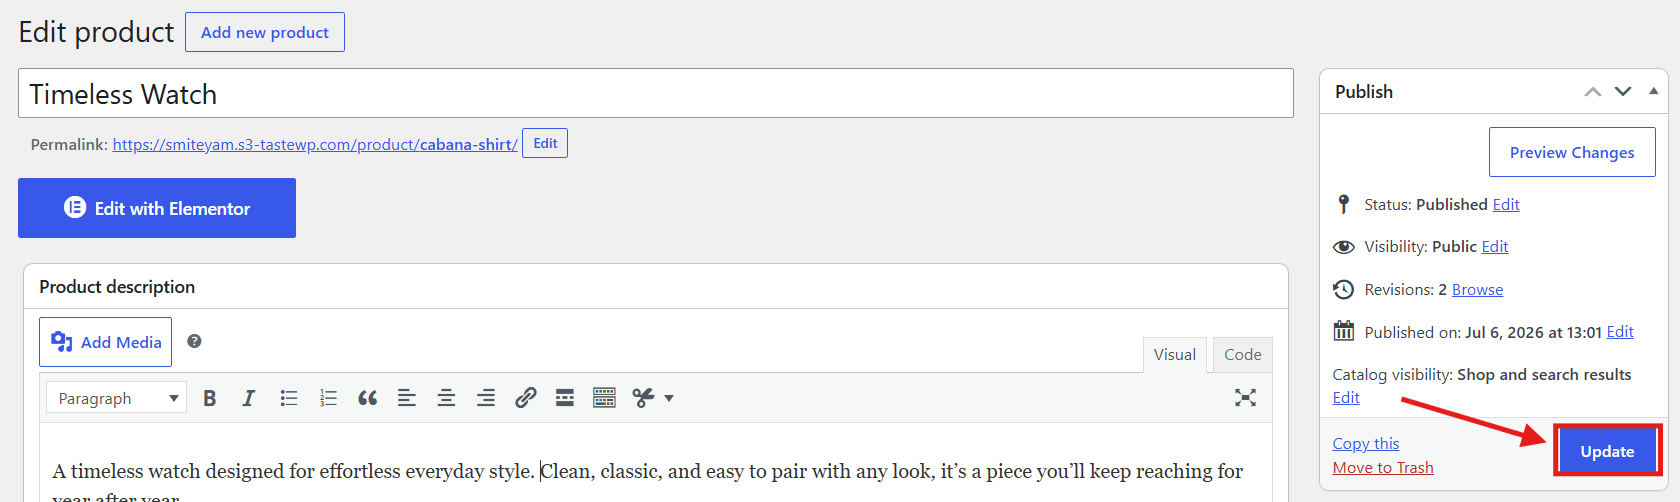
Step 4: Update the product
Scroll up and click Update.
That’s it.
Your product can now display WooCommerce’s default Sale badge, using the styling provided by your theme.
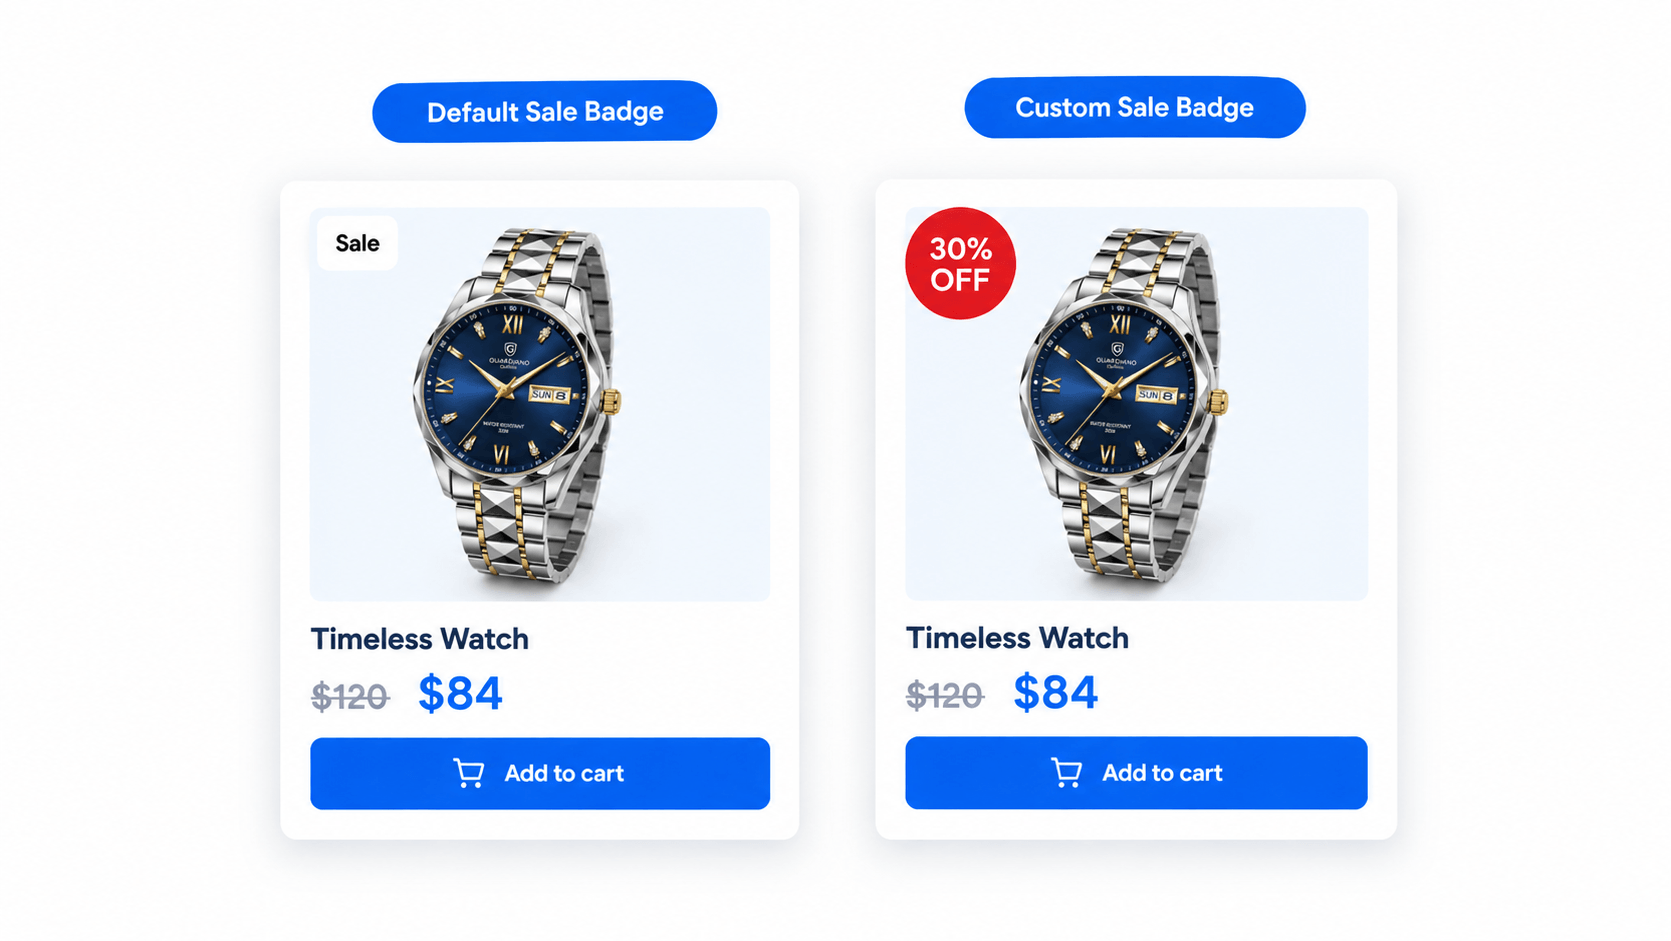
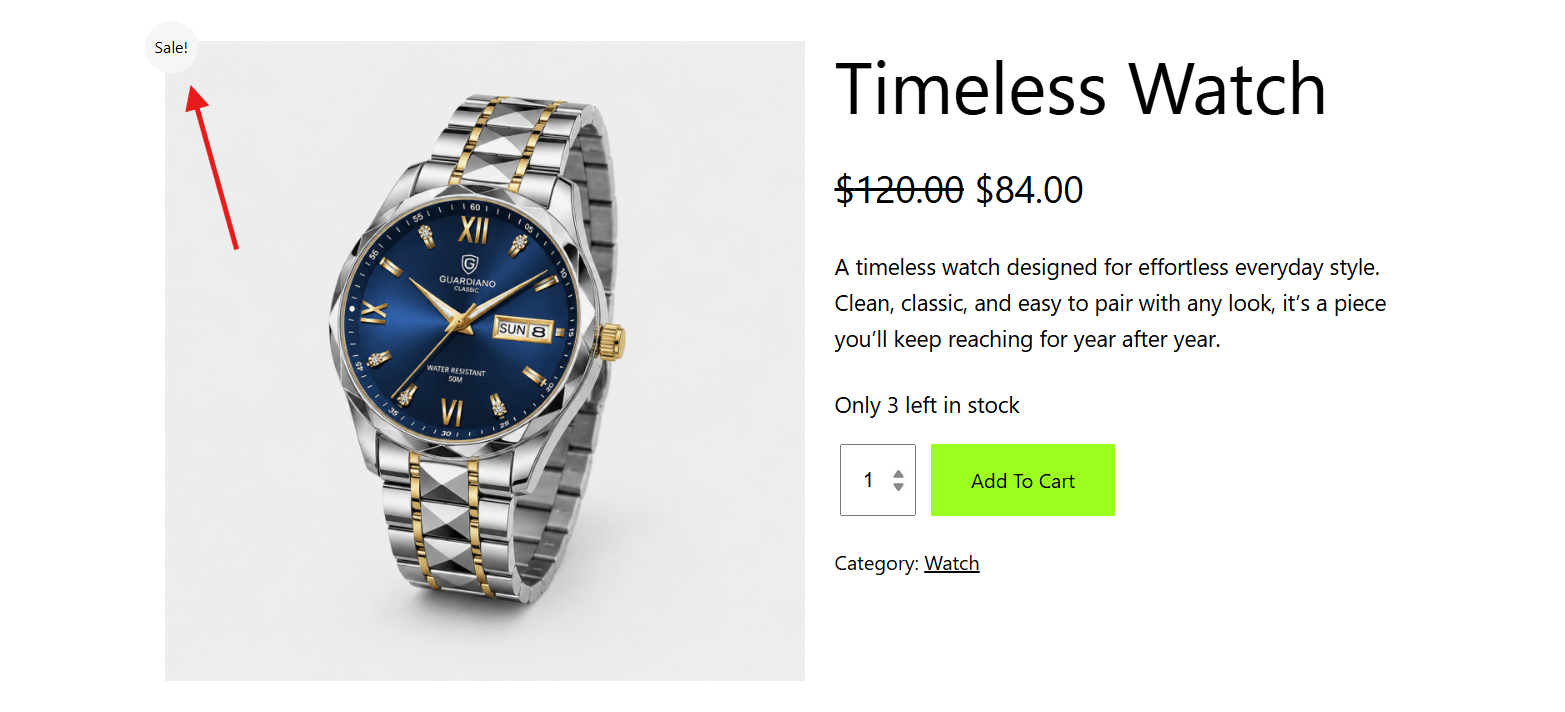
Here’s how that looks on the product page:
It’s functional, but there’s not much to it. Sale is small, generic, and easy to overlook, especially when shoppers are scanning several products at once.
It tells shoppers that the product is discounted, but it doesn’t tell them how much they’re saving or give them much reason to stop and look.
The limitation
The built-in option keeps the badge simple. You get the standard “Sale” label, while the badge’s color, shape, and position are largely controlled by your theme. If you want to show a percentage, campaign message, or more customized design, you’ll need a plugin or custom code.
Method 2: How to Add a WooCommerce Sale Badge With a Plugin
A badge plugin makes sense when you want more control and customization without maintaining custom PHP and CSS yourself.
For this example, let’s say I want the watch to show the actual discount percentage:
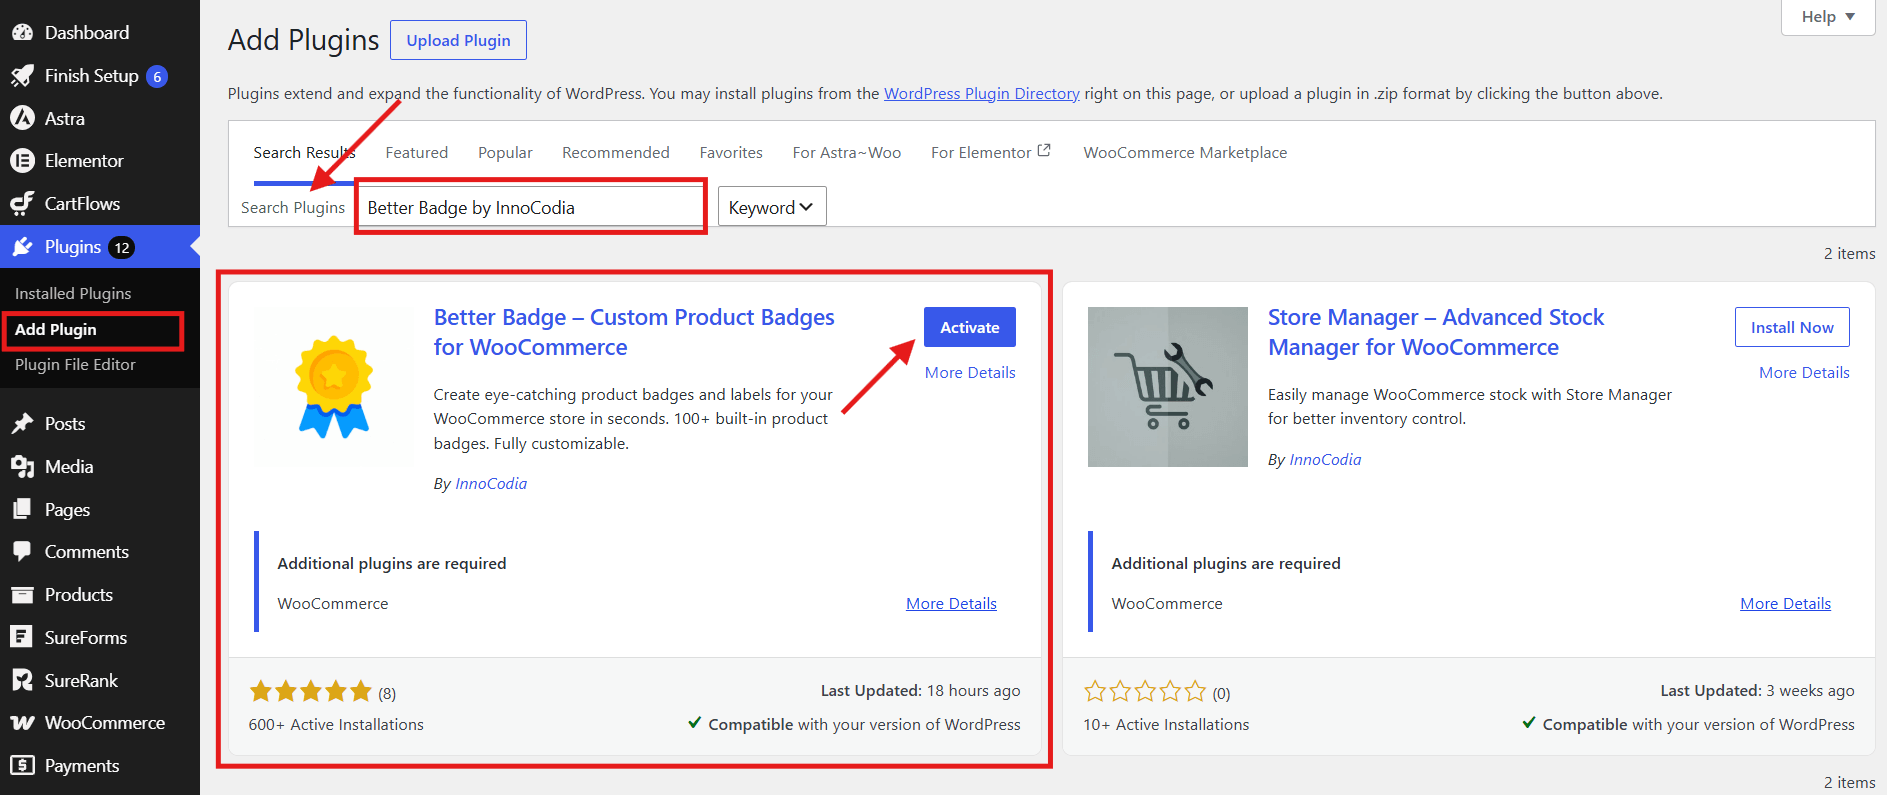
Go to Plugins → Add Plugin, search for “Better Badge by InnoCodia”, then install and activate it.
Step 2: Hide WooCommerce’s default badge
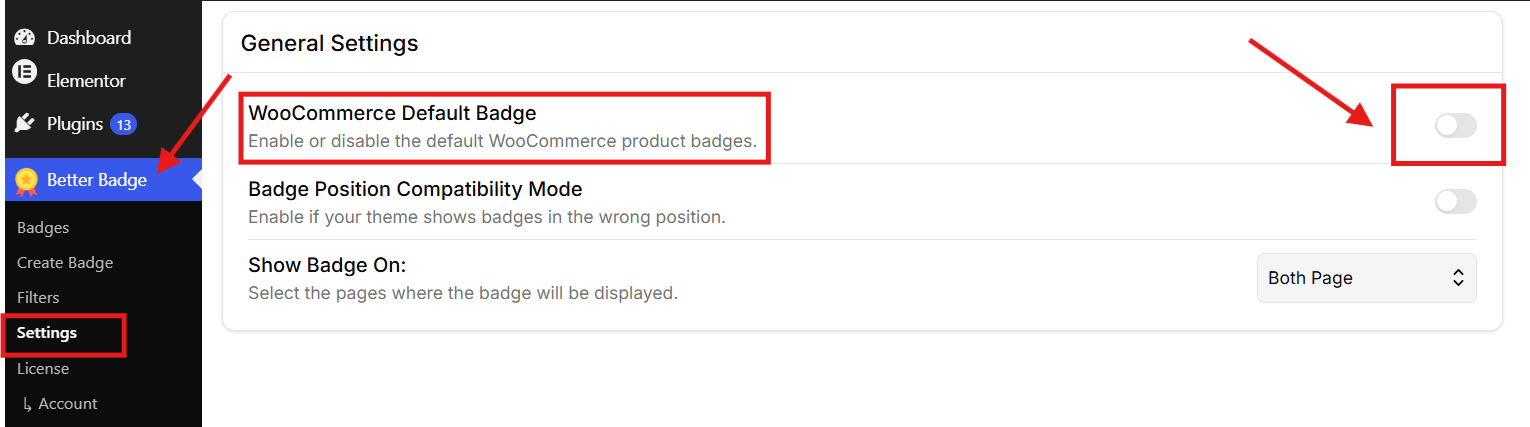
If you create a custom badge without hiding the default one, you can end up with both badges appearing on the same product.
So first, disable WooCommerce’s default sale badge from the plugin settings.
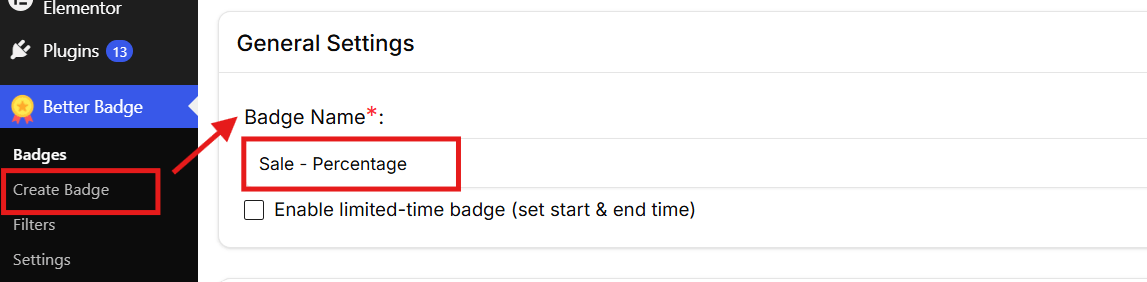
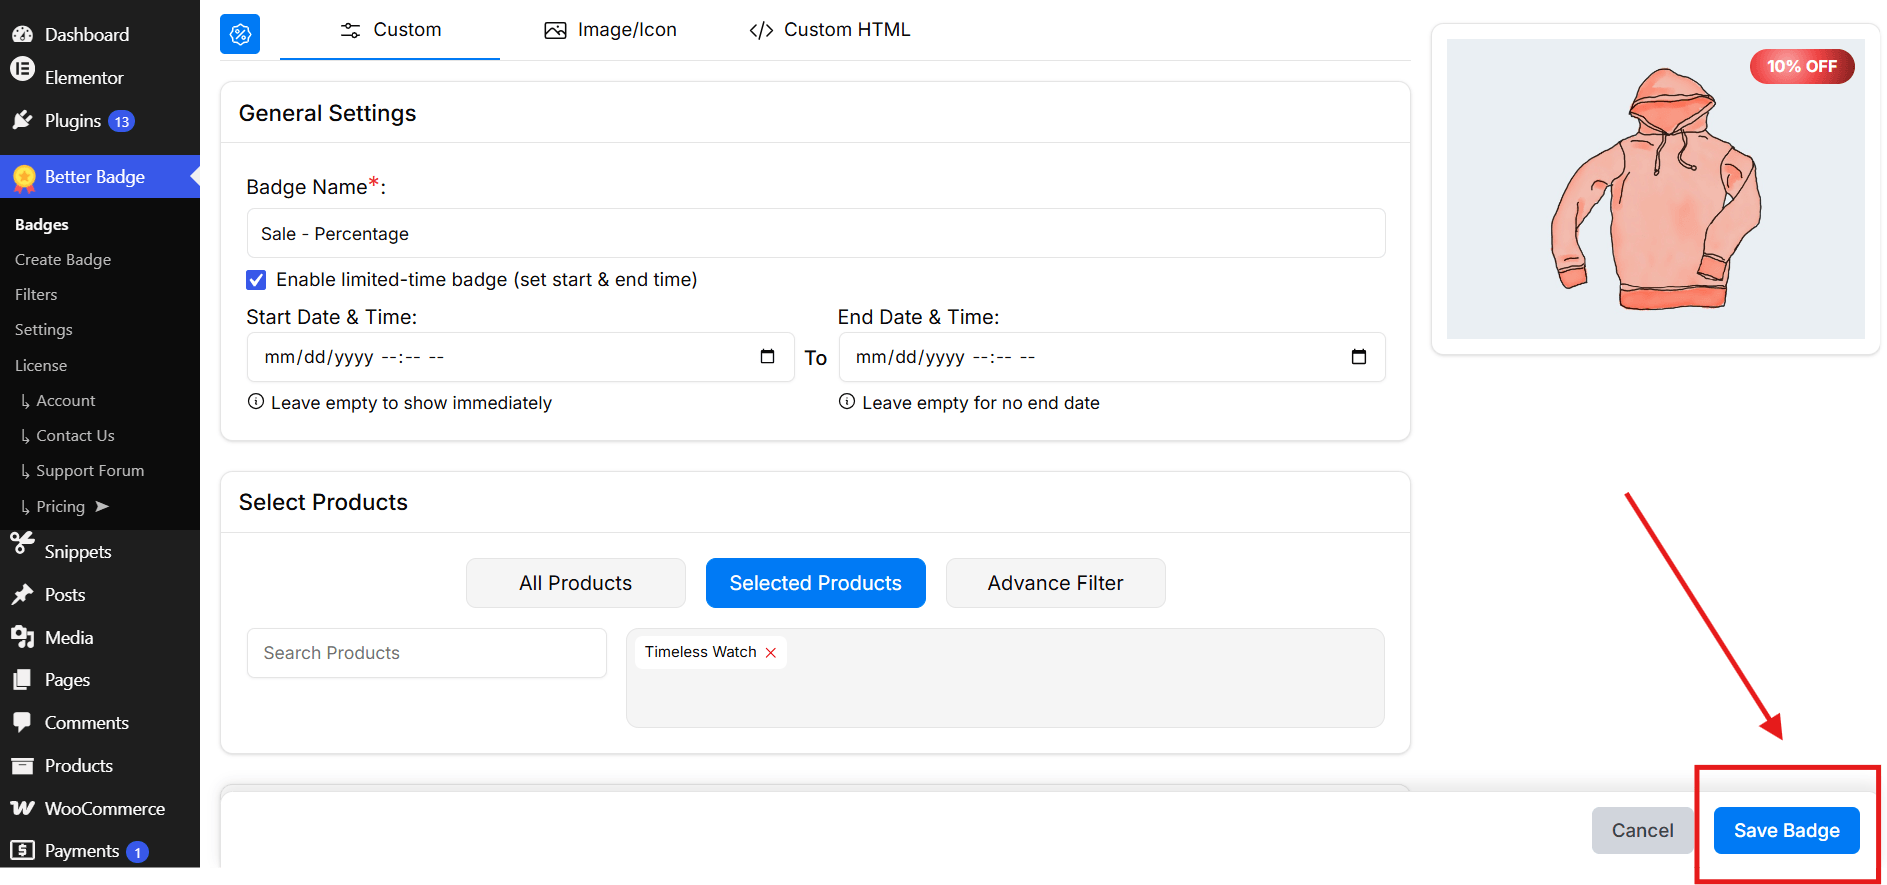
Step 3: Create your sale badge
Create a new badge and give it an internal name such as:
Sale – Percentage
This name is for managing your badges. Shoppers won’t see it.
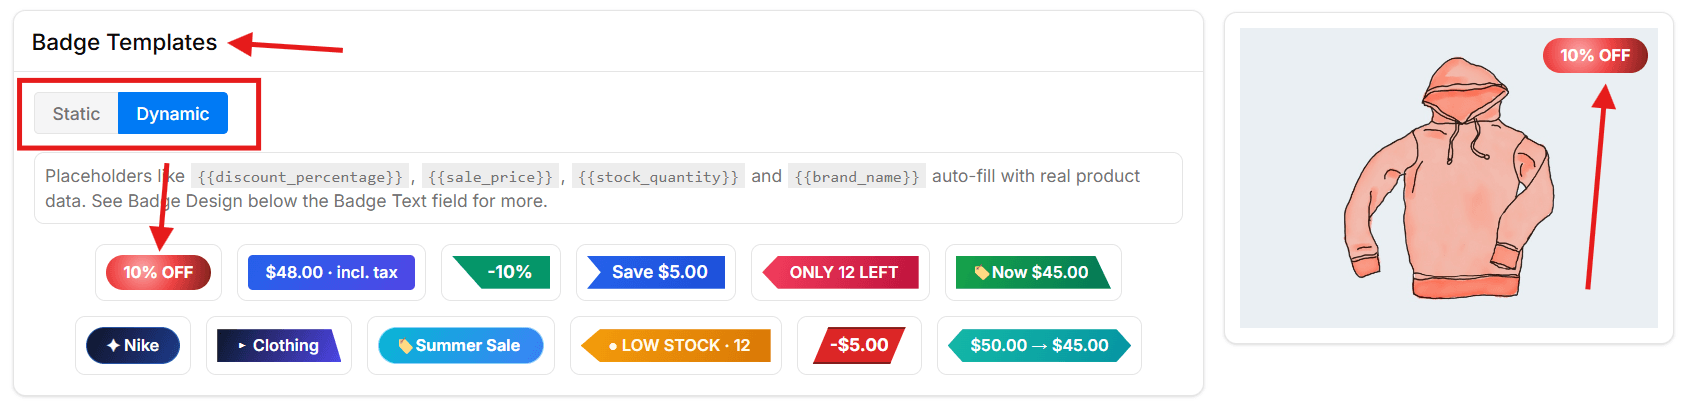
Step 4: Add dynamic badge text
Under Badge Design, you can write whatever badge text you want for your sale or campaign, such as Flash Sale, Summer Sale, or Limited Time Offer. You can also choose any of the 100+ ready-made templates you like.
If you want the discount percentage to update automatically, use the {{discount_percentage}} placeholder in your badge text.
Example: If you write {{discount_percentage}} Off, it will appear as 50% Off on a product with a 50% discount.
You can also choose a template that already uses dynamic discount data. For example, if you pick the 10% OFF template, the badge text field will automatically fill in with the discount percentage placeholder.
This means you can create a badge that fits your campaign while letting the discount update automatically whenever the sale price changes.
Step 5: Set the display rule
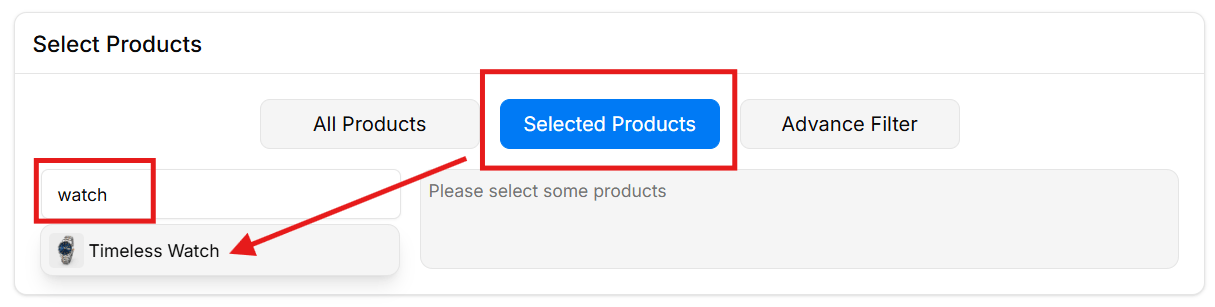
Apply the badge to selected products, such as the watch in this example.
Under Select Products, choose Selected Products. Then search for the products you want to apply the badge to and select them from the results.
For this example, I’m selecting the watch.
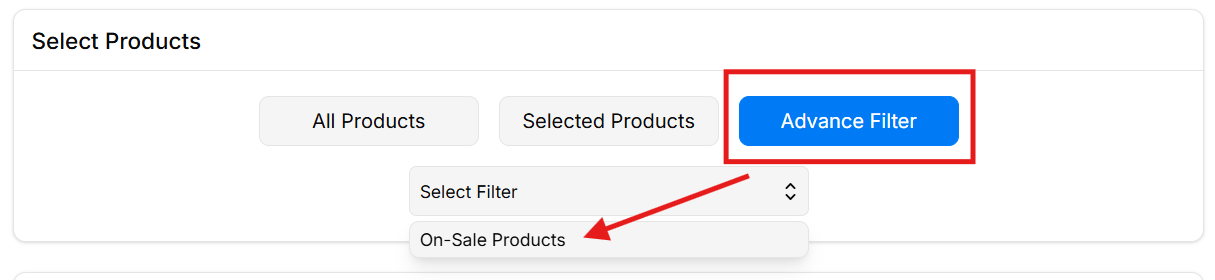
If you don’t want to select products individually, you can also create a filter to automatically target products that meet a specific condition.
If you only want the badge on specific products, you can skip the filter and continue to the next step.
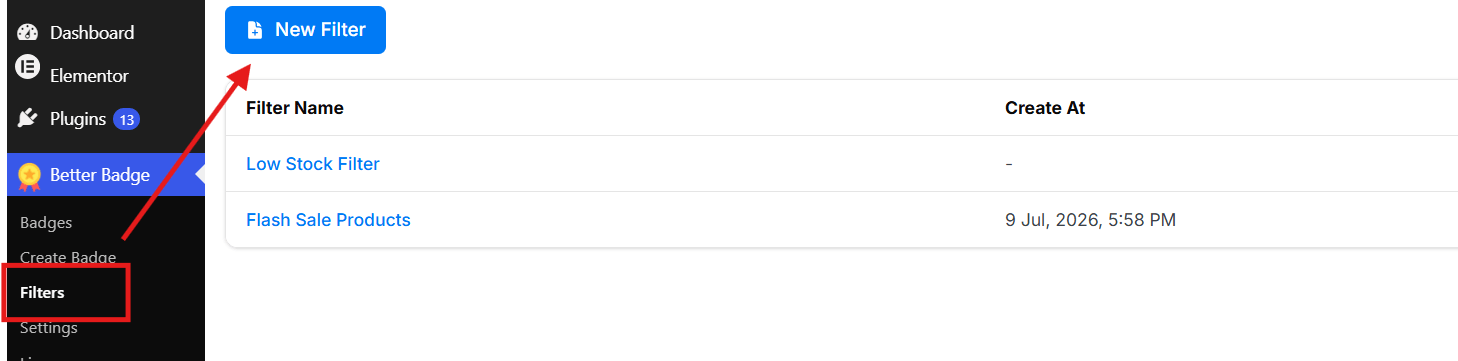
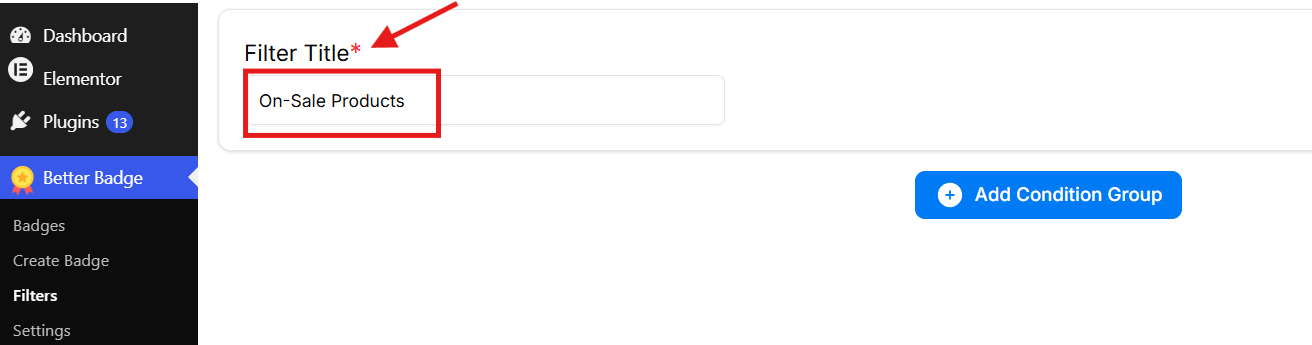
Here’s how you can create a filter for on-sale products:
Go to Filters and click New Filter.
Give the filter a name, such as On-sale Products.
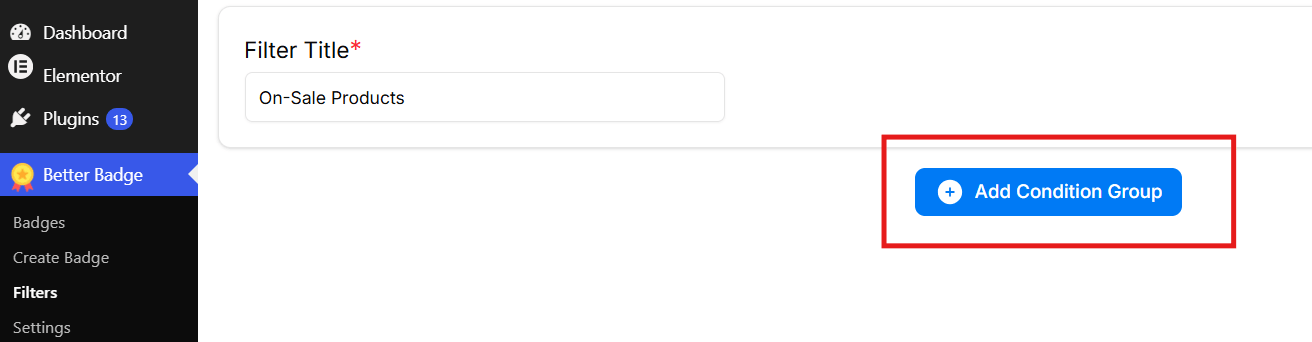
Add a Condition Group.
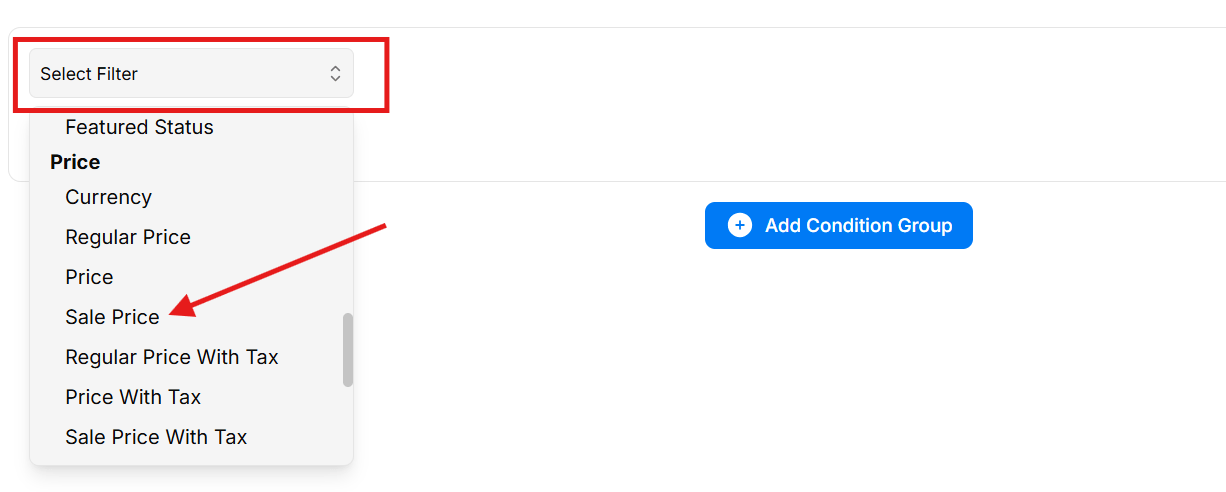
From the filter dropdown, select Sale Price.
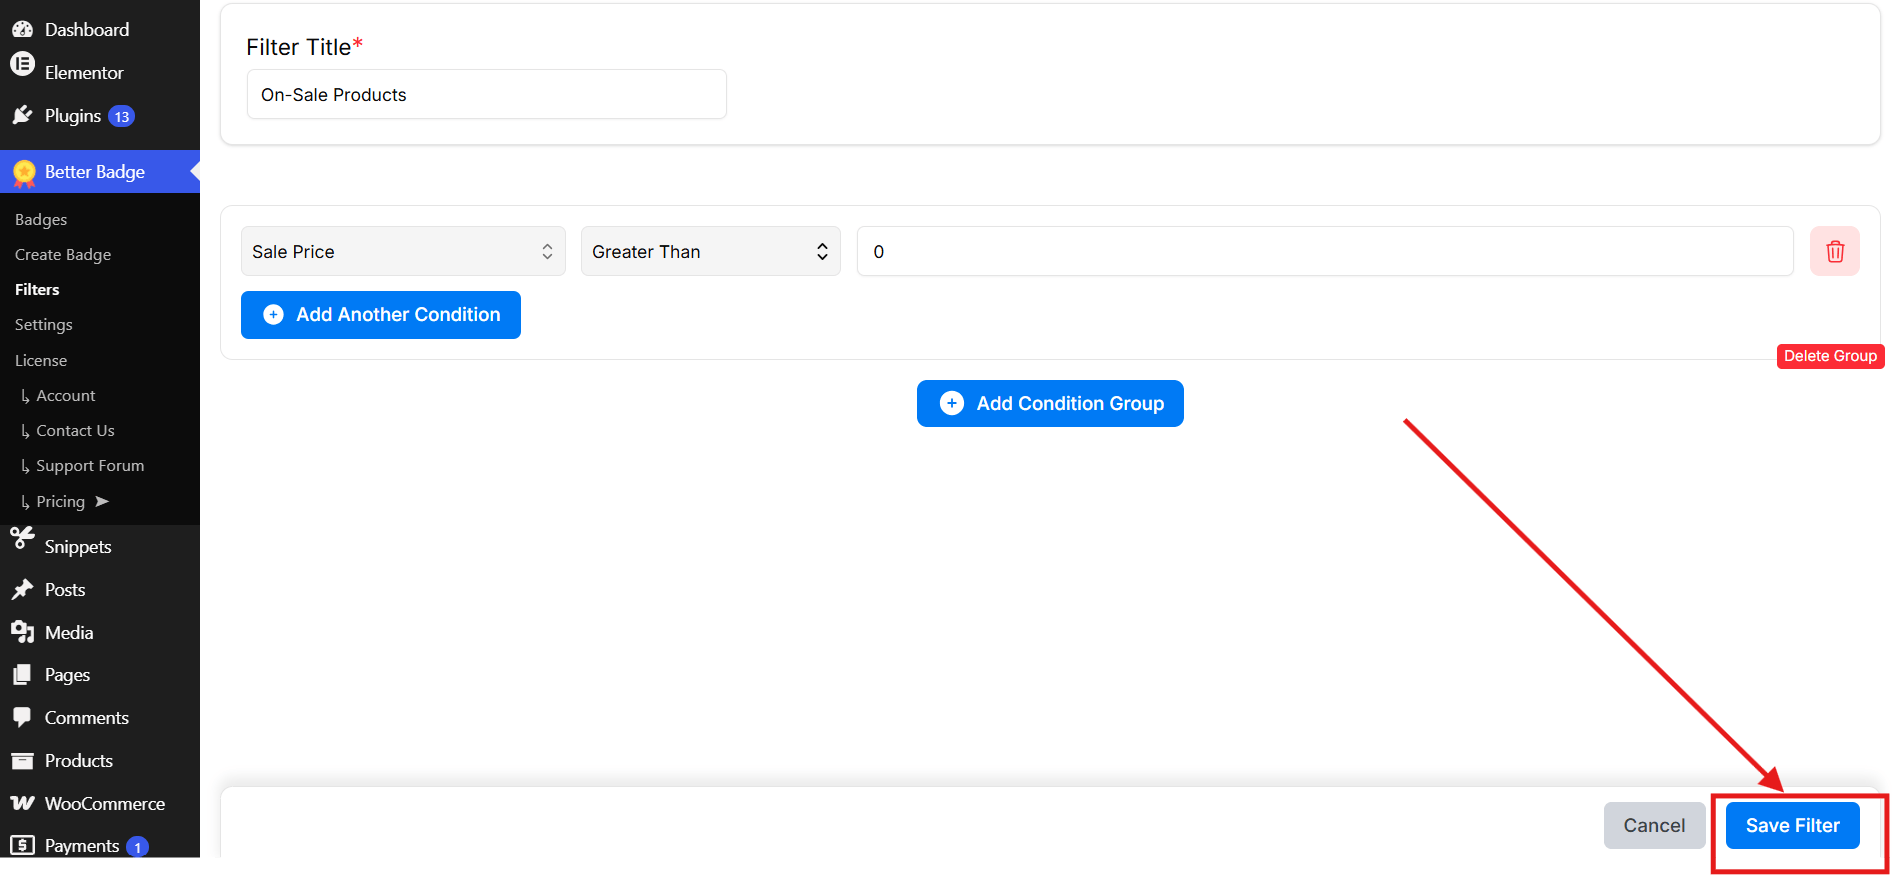
Set the condition to Greater Than and enter 0.
Click Save Filter.
Now apply the filter to your badge. Under the badge’s rules, choose Advanced Filter, then select On-sale Products from the dropdown.
The badge will now apply to products with a sale price greater than 0. When a product goes on sale, it meets the filter condition and the badge appears. When the sale ends, it no longer meets the condition, so the badge disappears automatically.
Step 6: Customize the design (Optional)
Now you can adjust things such as:
Font, padding, and colors
Position
Animation
Shape
Other badge styling
But you’re not limited to text-based badges. You can also upload your own badge image, choose an image, or use custom HTML for even more control over how the badge looks.
I usually keep sale badges in one corner, preferably the top-right or top-left of the product image, and leave enough space for other useful badges, such as low-stock alerts.
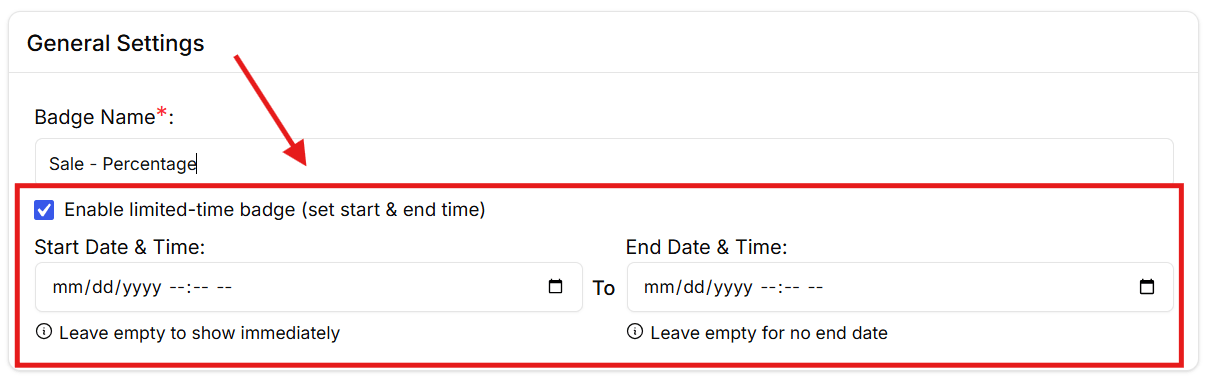
If your badge itself needs a schedule, set the start and end dates and save it.
Step 8: Save the badge
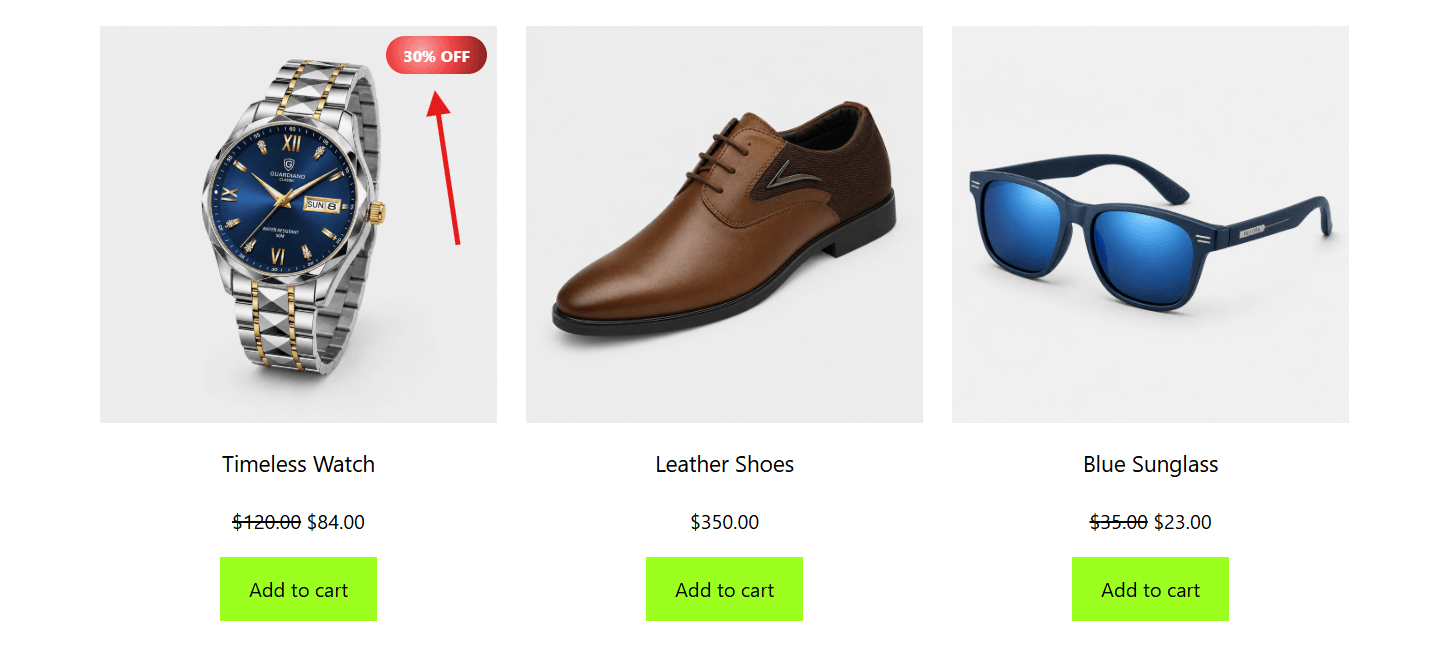
Click Save Badge and check your shop page.
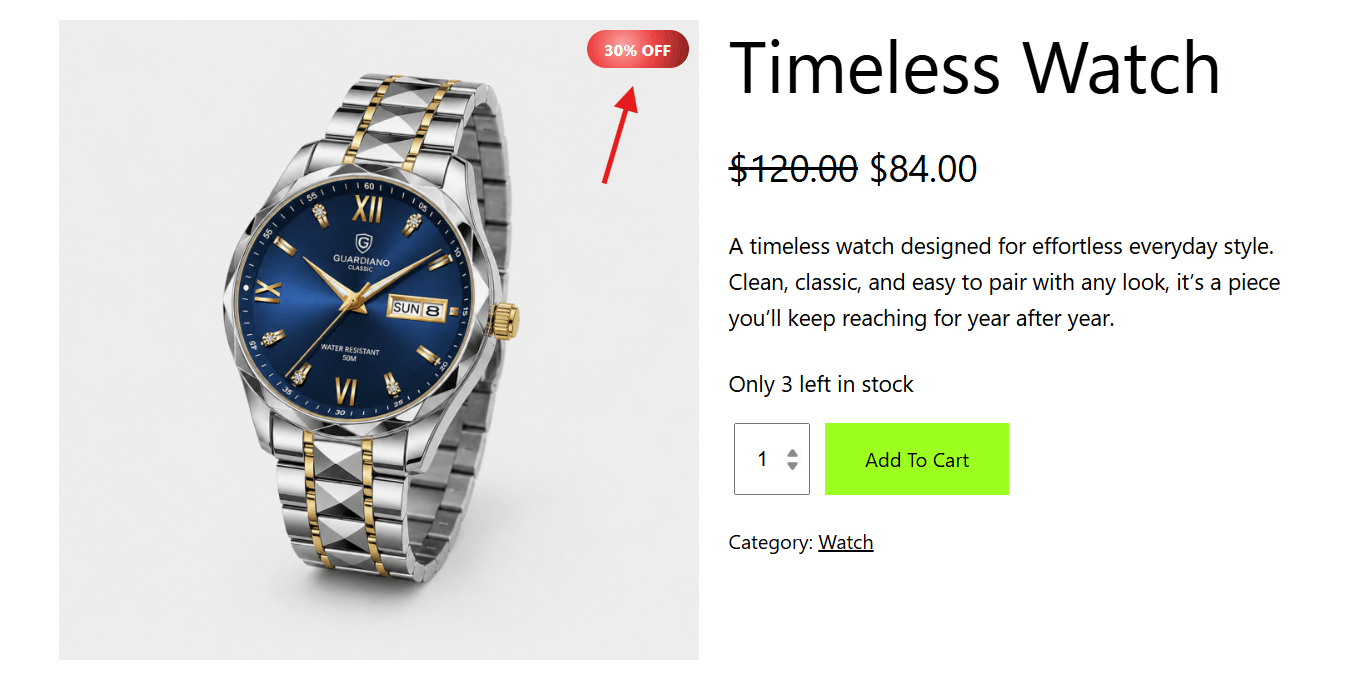
For the watch, the result is a 30% OFF badge that appears while the product meets the sale condition instead of a manually typed label that needs to be updated every time the price changes.
And here’s how it looks on the Product Page:
That’s the main advantage of using a plugin: you can turn the badge into a reusable rule instead of treating every promotion as a one-off task.
Method 3: How to Add a WooCommerce Sale Badge With Custom Code
The third option is custom code.
I’ve used both plugins and code for this kind of customization, and I wouldn’t automatically choose code just because it gives you more control.
Code makes sense when:
You have a developer maintaining the store
The customization is relatively small
You don’t want another plugin for a very specific requirement
You’re comfortable maintaining the code when WooCommerce or the theme changes
I’d avoid it when the store runs frequent promotions, needs several badge types, or will be managed by someone who isn’t comfortable editing code.
In those situations, every new rule becomes another maintenance task.
One Important Difference: Classic vs. Block Themes
This is one place where a simple snippet can become confusing.
WooCommerce uses different filters for sale badge output depending on whether the badge comes from a classic template or the newer On-Sale Badge block:
woocommerce_sale_flash for classic themes
woocommerce_sale_badge_text for the On-Sale Badge block in WooCommerce 10.0 and newer
The block-theme filter expects plain text. HTML returned through it can be escaped and displayed as text rather than being rendered as markup.
So a snippet that works on one store may appear to do nothing on another.
I ran into this myself when testing a snippet that only targeted the classic filter. There was no obvious error. The badge simply stayed as Sale.
If you want the snippet to work across both rendering paths, you need to account for both filters.
Where to Add the Code
Before you add the snippet, you’ll need somewhere safe to store your custom PHP.
The easiest options are:
A child theme’sfunctions.phpfile if you’re comfortable editing theme files
A code snippets plugin if you prefer to manage custom PHP without touching your theme files
If you use functions.php, make sure you’re editing the child theme, not the parent theme. Otherwise, a theme update can overwrite your changes.
Back up your site and test the snippet on a staging site first if possible.
Step 1: Add the Custom Sale Badge Code
Here’s a complete example that calculates the discount percentage and handles both simple and variable products:
For a variable product where different variations have different discounts, the example uses the highest discount and labels it Up to X% off.
That’s important because one badge sitting over one product image can’t display a different discount for every variation at the same time.
Step 2: Add CSS to Style the Badge
Once the text is working, you can style the badge with CSS.
You can add this CSS through Appearance → Customize → Additional CSS if your theme provides that option. Alternatively, add it to your child theme’s stylesheet or use a CSS/snippets plugin that supports custom CSS.
Avoid editing the parent theme’s CSS files directly, since your changes can be overwritten by a theme update.
Here’s a simple example that changes the badge’s color, shape, spacing, and position:
If this doesn’t visibly change anything, your theme’s own .onsale styling may have higher specificity; add !important as a last resort, or use your browser’s inspector to find the exact selector your theme uses.
So, Which WooCommerce Sale Badge Method Should You Use?
You don’t need to overthink this.
If you only want WooCommerce’s standard Sale label, use the built-in option.
If you want 30% OFF, custom designs, dynamic product data, targeting, scheduling, and easier management without editing PHP, use a badge plugin.
If you have a developer maintaining the store and need a small, specific customization, custom code can make sense.
The right method depends on how much control you need: a basic label, more control without code, or complete control through your own code.
For our watch example, I’d use the plugin. The discount percentage can update automatically, and you can use sale-based rules to control when the badge appears, and you can manage it later without opening a PHP file.
WooCommerce Sale Badge Best Practices
A good sale badge should make the offer easier to notice and understand, not make the product image harder to read.
Here are the things worth checking before you publish one.
Keep the Text Short
Your badge needs to work at thumbnail size.
30% OFF is easy to understand at a glance. HUGE SUMMER SALE – SAVE 30% TODAY is not.
Keep the message short enough that shoppers can read it quickly, especially on mobile product grids.
Don’t Cover the Product
Place the badge where it doesn’t hide an important part of the product image. A corner is usually a safe choice, but check how it looks with different product images.
Don’t Overcrowd the Image
Sale, low stock, best seller, new arrival, and free shipping might all be useful, but displaying too many at once can make the product image feel cluttered.
Avoid showing so many badges that they compete with each other. If shoppers have to figure out which label matters, you’ve probably got too many.
Make the Discount Accurate
If your badge says 30% OFF, make sure the actual pricing supports that claim. This is especially important for variable products, where different variations can have different regular and sale prices.
If you’re running price promotions, also check the pricing rules that apply in the markets where you sell.
For example, if you sell in the EU, check the price-reduction rules that apply to your products and markets. Under the EU Price Indication Directive, price-reduction announcements generally use the lowest price applied during at least the previous 30 days as the reference price, with certain exceptions and national implementation details.
Make the Badge Easy to Read
Don’t rely on color alone to communicate the offer. Put the message directly in the badge and make sure the text has enough contrast against its background. WCAG recommends a 4.5:1 contrast ratio for normal-sized text.
Check It at Different Sizes
Don’t judge your badge only on the full product page.
Check it on:
Shop and category pages
Product grids
Mobile screens
Different product images
A badge that looks great on a large product image can become cramped, wrap awkwardly, or cover too much of the image when it’s displayed as a small thumbnail.
Keep Performance in Mind
If you’re displaying badges across a large product grid, avoid unnecessarily heavy assets. Simple CSS-based badges are generally lightweight, while large custom images or scripts can add unnecessary page weight.
Make Sure Your Setup Matches Your Theme
If a custom badge or code snippet isn’t working, check whether your store uses a classic or block theme. The implementation can differ between them, so a solution that works for one setup may not work the same way on another.
WooCommerce Sale Badge Not Working? Try These Fixes
Added a sale badge but can’t see it, or is something not working as expected? Start with these common issues.
Problem
What to check
No badge at all
Make sure the product has an active sale price and that any scheduled sale dates haven’t expired.
Two badges on one product
If you see both Sale and your custom badge, WooCommerce’s default badge may still be enabled. Turn it off in your badge plugin settings.
Badge looks wrong
Your theme may be overriding the badge’s styling or hiding it with CSS. Inspect the badge in your browser and check for styles affecting .onsale.
Wrong percentage on a variable product
Check the regular and sale prices of the variations. A percentage badge may calculate the discount differently depending on how the variations are handled.
Custom code isn’t working
Check whether your store uses a classic or block theme and make sure you’re using the appropriate WooCommerce filter. See Method 3 for the code setup.
Badge stays after the sale ends
Clear your page cache and CDN cache if your store uses one. Cached pages can continue showing an older version of the product.
Still Not Sure What’s Causing It?
If you’re troubleshooting custom code, temporarily disable the snippet. If WooCommerce’s default badge appears correctly afterward, you’ve narrowed the issue down to the custom code rather than the product or theme.
For variable products, remember that a custom-code solution also needs to account for variation-level pricing. If you don’t want to maintain that logic yourself, a badge plugin can handle the dynamic calculation for you.
Best WooCommerce Sale Badge Plugin: Why I Recommend Better Badge
If you want more control than WooCommerce’s default badge provides without maintaining custom PHP, Better Badge is the option I’d recommend.
What I like about it for this use case is that you can create the badge once and let your rules handle when it appears. For example, instead of manually changing a 30% OFF badge every time a sale price changes, you can use dynamic discount data and sale-based targeting.
The features that are most relevant to sale badges are:
Dynamic discount percentages
Sale-based targeting
Badge scheduling
Product rules
Custom styling
100+ ready-made designs
For the watch example, that’s the main advantage: set the rule once, and the badge can appear whenever the product meets the conditions.
Frequently Asked Questions
No.
WooCommerce can display its standard Sale badge when a product has an active sale price. You only need a plugin if you want additional control, such as custom text, WooCommerce sale badge percentage displays, styling, or more advanced rules.
Yes.
When a product has an active sale price, WooCommerce can display its standard sale indicator without requiring a separate badge plugin. This is also the simplest way to add a sale tag in WooCommerce.
You can use a badge plugin or custom code.
A plugin is generally easier if you want to change the text without maintaining PHP. Many WooCommerce product badges plugins also include ready-made WooCommerce sale badge templates.
You can use a plugin that supports dynamic discount values or calculate the percentage with custom code.
A WooCommerce sale badge percentage can update automatically when the product’s sale price changes, depending on how the plugin or code is set up.
Yes.
If you’re looking for a free WooCommerce sale badge plugin, Better Badge is a good option to start with. Its free version lets you create and customize product badges without adding code.
If you only need the standard Sale label, WooCommerce’s built-in option is enough. But if you want more control over the badge’s text and design, a plugin gives you more flexibility.
A WooCommerce Smart Sale Badge generally refers to a badge that can use product data or predefined rules to display relevant sale information automatically.
For example, a smart badge could show a discount percentage when a product is on sale instead of displaying the same Sale text on every product.
Yes.
You can use multiple WooCommerce product badges on the same product. Just make sure they have enough separation so the badges don’t overlap or make the product image difficult to read.
Start by checking whether the product has an active sale price.
If that looks correct, check your theme’s styling, plugin settings, caching, and any custom code you’ve added.
If you’re trying to remove a sale badge in WooCommerce and it still appears, check whether your theme or another plugin is generating its own badge.
Variable products can have different regular and sale prices for different variations.
If your badge calculates the discount across variations, it may show the highest available discount rather than the discount for one specific variation. For example, variations discounted by 10%, 20%, and 30% could display Up to 30% OFF.
If Sale is enough, use WooCommerce’s built-in option.
If you want custom text, dynamic sale badge percentage displays, styling, targeting, or less manual maintenance, use a badge plugin.
If you have a developer maintaining the site and need a small, specific customization, custom code can make sense.
Conclusion
A sale badge is one of the smallest changes you can make to a product page, and one of the most useful. It makes a discount visible before the shopper reads a word.
If you’re not technical, start with WooCommerce’s built-in badge. When you want more control over percentages, colors, scheduling, and targeting, use a badge plugin. If you’re a developer, custom code gives you more flexibility.
Whichever route you choose, keep the discount accurate, the text specific, and the end date clear.
Don’t let your next offer get lost in the product grid. Make it clear, make it visible, and give shoppers a reason to stop.
Every promotion on your store ends up with the same badge. You’re running a flash sale, and the badge says “Sale!” It’s a summer sale, the badge still says “Sale!” You’re clearing out old stock. Same badge. Again. WooCommerce doesn’t care what’s actually happening in your store; every promotion gets the same generic badge, no matter […]
Someone visits your store, finds a product they like, and thinks “I’ll grab it later.” Later never comes. The item sells out. They don’t come back. This is called purchase hesitation, and a well-placed low stock badge is one of the simplest ways to kill it. In ecommerce, hesitation is expensive. Even interested shoppers can […]
You’ve built a beautiful online store, sourced amazing products, and invested in marketing. But when you check your dashboard each morning, the sales numbers are… disappointing. Sound familiar? You’re not alone. In 2026, global ecommerce sales are projected to exceed $7.3 trillion, yet research shows that over 70% of online stores fail to scale profitably […]







 Samia Nasreen
12 min read
Samia Nasreen
12 min read