You’ve planned your Black Friday offer. The prices are ready, and the emails and banner both say “Black Friday.” Then a shopper opens your shop page, and every discounted product still says “Sale!”, the same badge you used for last March’s clearance.
A WooCommerce Black Friday sale badge puts the campaign name on the products themselves, so shoppers can see at a glance which items are part of the event.
WooCommerce’s default badge has no setting to change that text. You can do it with a badge plugin or with custom code. I recommend the plugin for most stores, because you manage the text, dates, products, and design in one place.
Why the Default WooCommerce Sale Badge Isn’t Enough
The default label tells shoppers that a product is on sale. It doesn’t identify your Black Friday promotion, and scheduling a sale price doesn’t change that label’s wording.
Some themes add their own sale-label settings, so check those if your store already has them. But the standard WooCommerce badge alone doesn’t provide the campaign text, targeting, and scheduling setup we’re building here. Our guide to changing WooCommerce sale badge text explains that limitation in more detail.
Before You Start: Set the Offer and Campaign Dates
Let’s use one example throughout: a watch that normally costs $120, reduced to $84 for your Black Friday campaign. The badge will say Black Friday. The saving is $36, or 30%.
In Products → All Products, edit the watch. Under Product data → General, enter the regular and sale prices. Use Schedule beside the sale price if the discount should run only during your campaign, then update the product. For variable products, review the relevant variations and their prices too.
A badge does not apply a discount. It labels the offer you have already configured. If you use a coupon instead of a sale price, make the coupon requirement clear near the price or offer details.
Set your badge dates to match the offer, and check your store’s timezone under Settings → General. If the offer ends at midnight Eastern, convert that to your store’s timezone before you choose dates, and write “midnight ET” in your emails so shoppers in other timezones know what it means.
How to Add Black Friday Sale Badges in WooCommerce
Both methods below can change the message. The difference is how much you want to maintain yourself.
Method
Best for
What you manage
Plugin (recommended)
Store owners who want visual controls
Product rules, dates, text, and design in the dashboard
Custom code
Stores with a developer maintaining the setup
PHP logic, theme compatibility, styling, and future changes
Method 1: Add a Black Friday Badge With Better Badge (Recommended)
I’ll use Better Badge for this walkthrough. It’s our plugin at InnoCodia, and the reason I recommend it here is practical: you can prepare the badge for a specific campaign without reopening PHP files every time your offer changes.
The six-step setup below uses Advanced Filters, a Pro feature. If you only need a text badge on a few products, you can select those products manually in the free version instead.
Prefer to watch the basic text-editing workflow first? This tutorial shows how to change sale badge text with Better Badge. For the Black Friday schedule and filter, follow the steps below.
Related tutorial: changing sale badge text with Better Badge.
Step 1: Install and Activate Better Badge
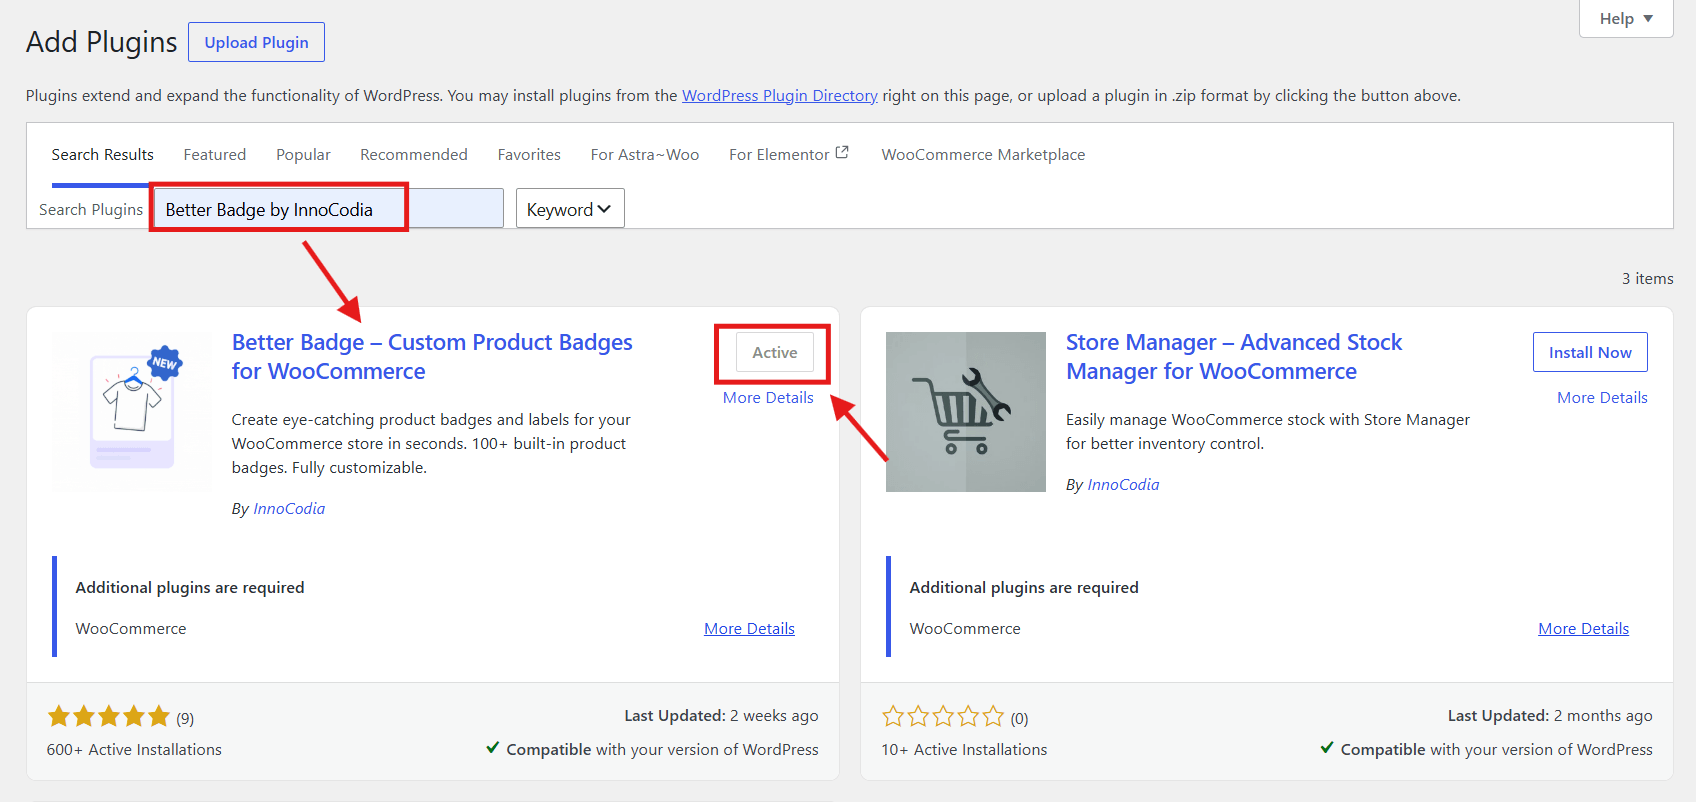
Go to Plugins → Add Plugin in your WordPress dashboard. Search for Better Badge – Custom Product Badges for WooCommerce by InnoCodia, then click Install Now and Activate. Activate Pro as well if you’re following the filter-based setup.
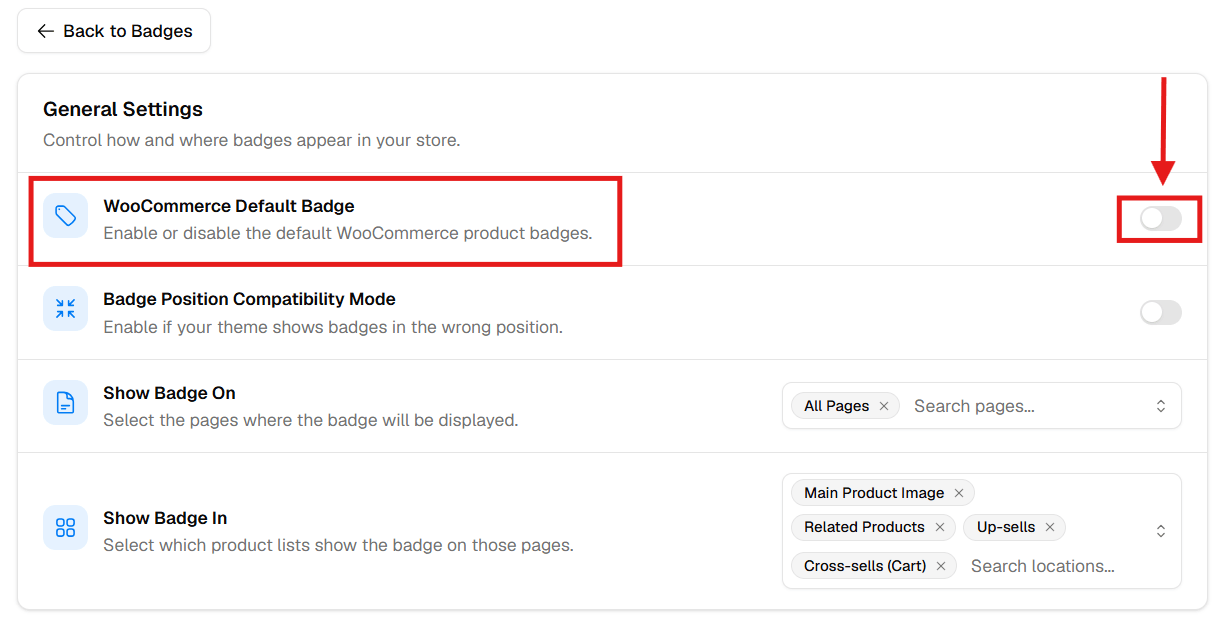
If your custom badge will replace “Sale!”, open Better Badge → Settings and turn off WooCommerce Default Badge. Check for a sale label from your theme too, so products don’t end up with two badges saying the same thing.
Step 2: Create a Filter for Your Black Friday Products
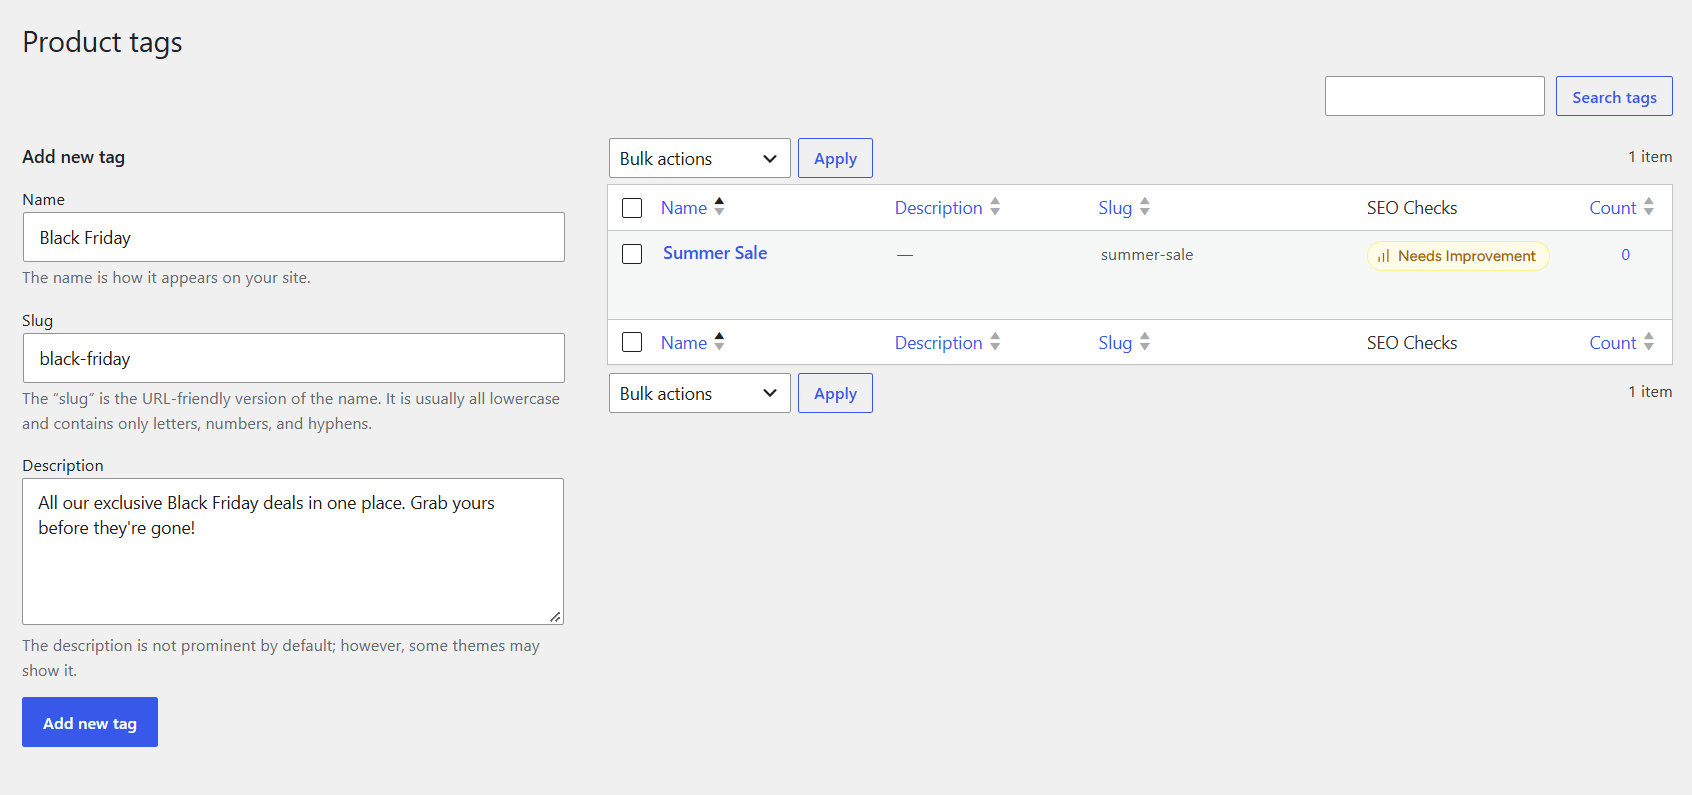
First, mark which products are in the campaign. The simplest way is a dedicated tag. Go to Products → Tags, create one called Black Friday, and add it to every participating product. (Prefer a category? That works too, especially if you want a Black Friday category page to link to from your emails. Just make sure only eligible products are in it.)
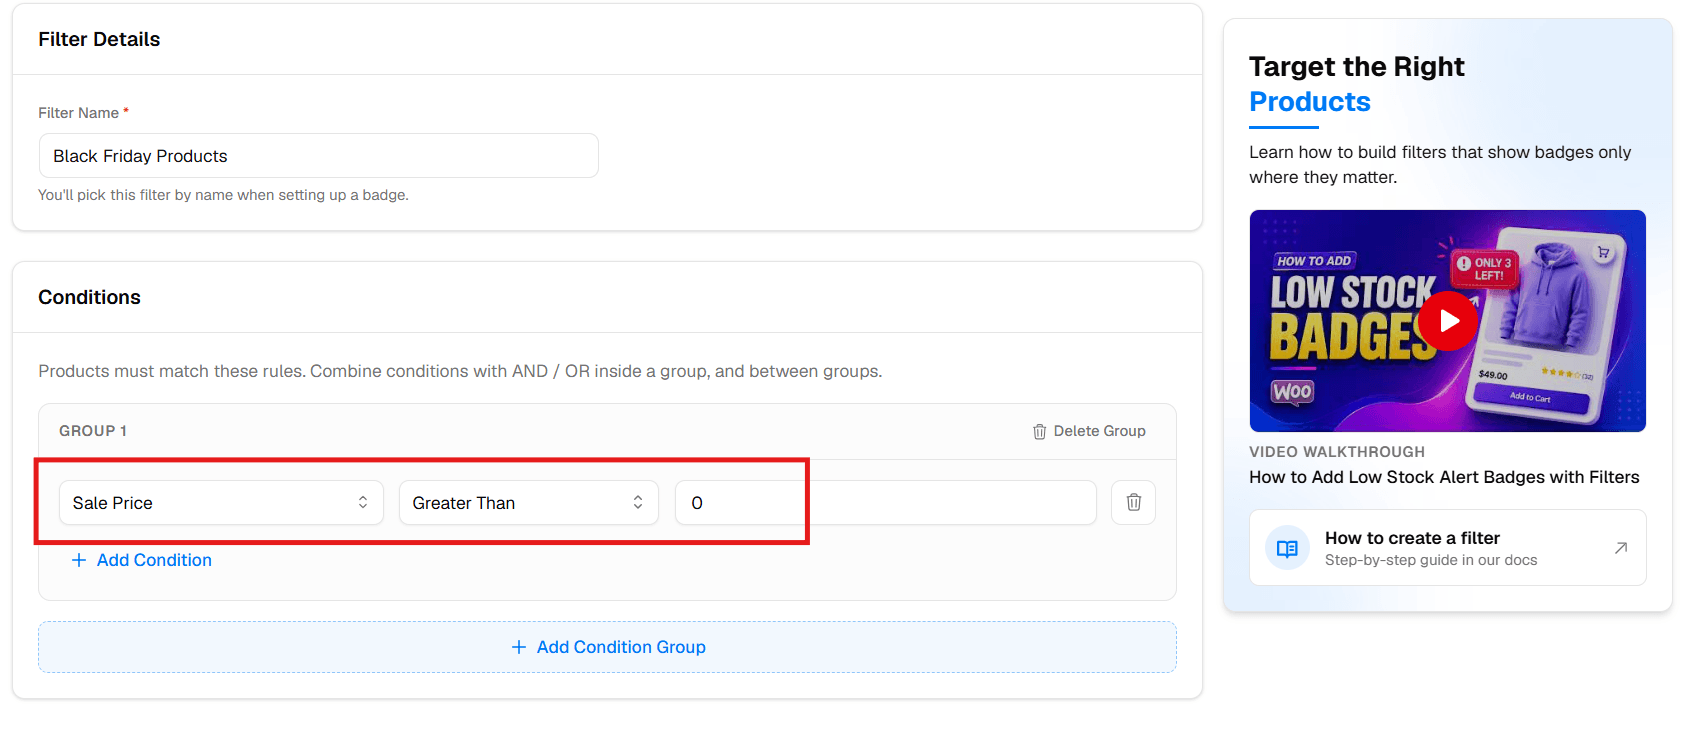
Then go to Better Badge → Filters → New Filter. Name it Black Friday Products, add a condition group, set the condition to the Black Friday tag, and click Save Filter.
The filter decides which products get the badge. The badge’s Limited Time setting (Step 4) decides when it shows. For more examples, see how to create and apply a Better Badge filter.
Step 3: Create a New Badge and Give It a Name
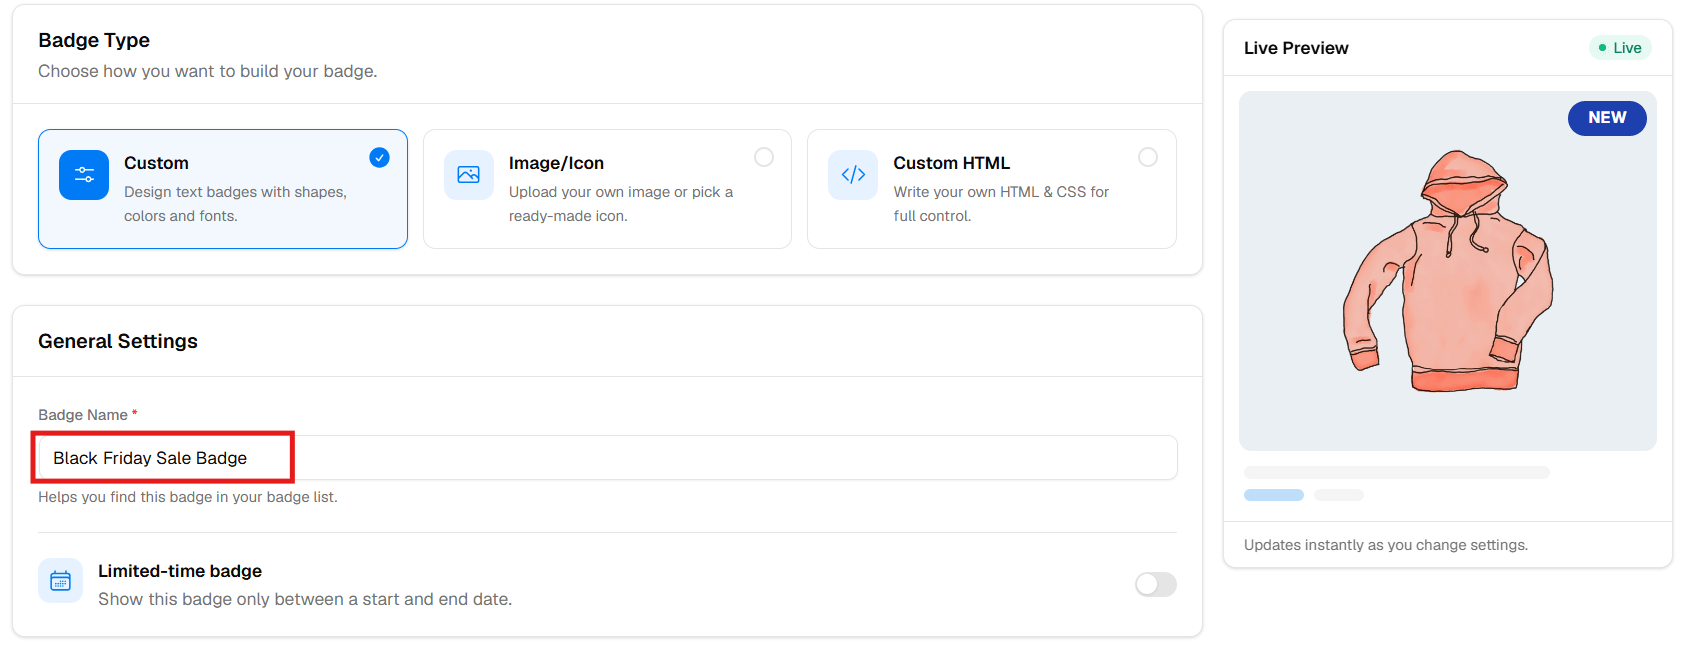
Open Better Badge → Create Badge, or open the badges list and click New Badge. Enter an internal name such as Black Friday Sale Badge.
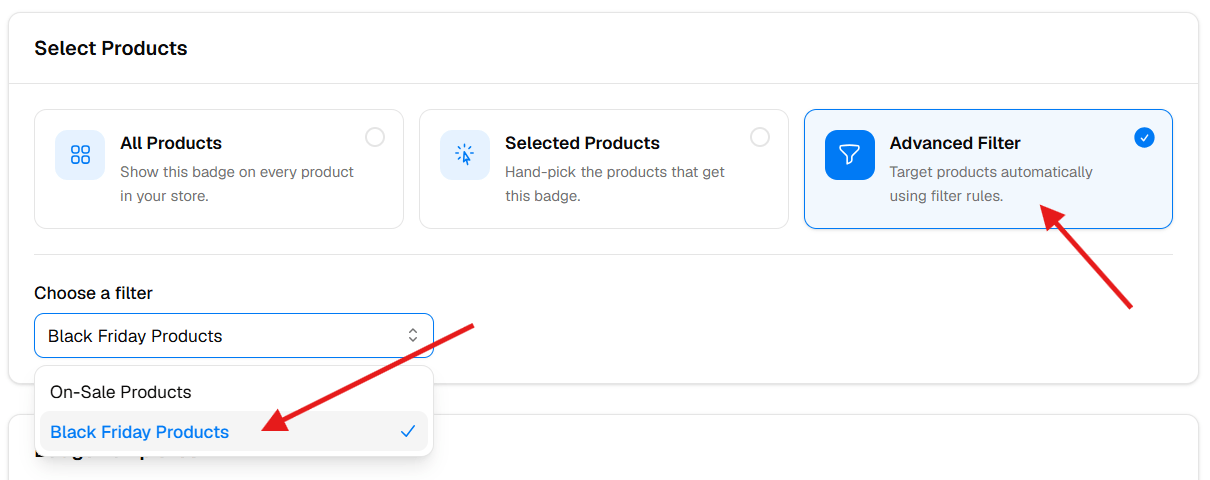
This name helps you find the badge later. It isn’t the text shoppers see. Under the product selection controls, choose Advanced Filter and select the Black Friday Products filter you just saved. Using the free version? Choose Selected Products and add the participating products manually.
Shortcut: if every product currently on sale is part of Black Friday, you can use All Products instead . Skip it if you have other sales running, or a clearance item will get a Black Friday badge just because it has a sale price.
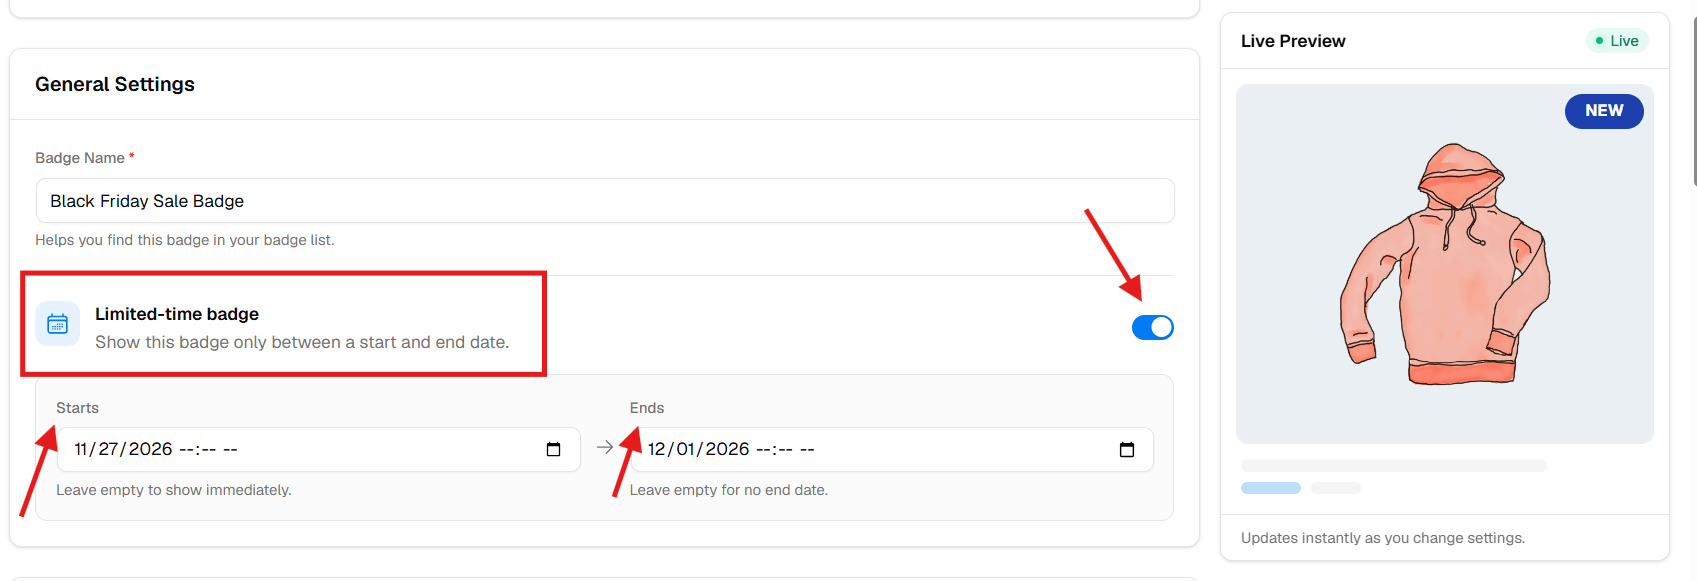
Step 4: Toggle Limited Time and Pick Your Dates
Turn on Limited Time, then choose the start and end dates for the badge. Match them to your actual Black Friday offer. If your sale continues through Cyber Monday, set the badge’s window to cover that campaign rather than leaving it active indefinitely.
Check the selected dates before moving on. A badge scheduled for next week should not appear today, and a badge that says “Black Friday” should not keep advertising an expired offer.
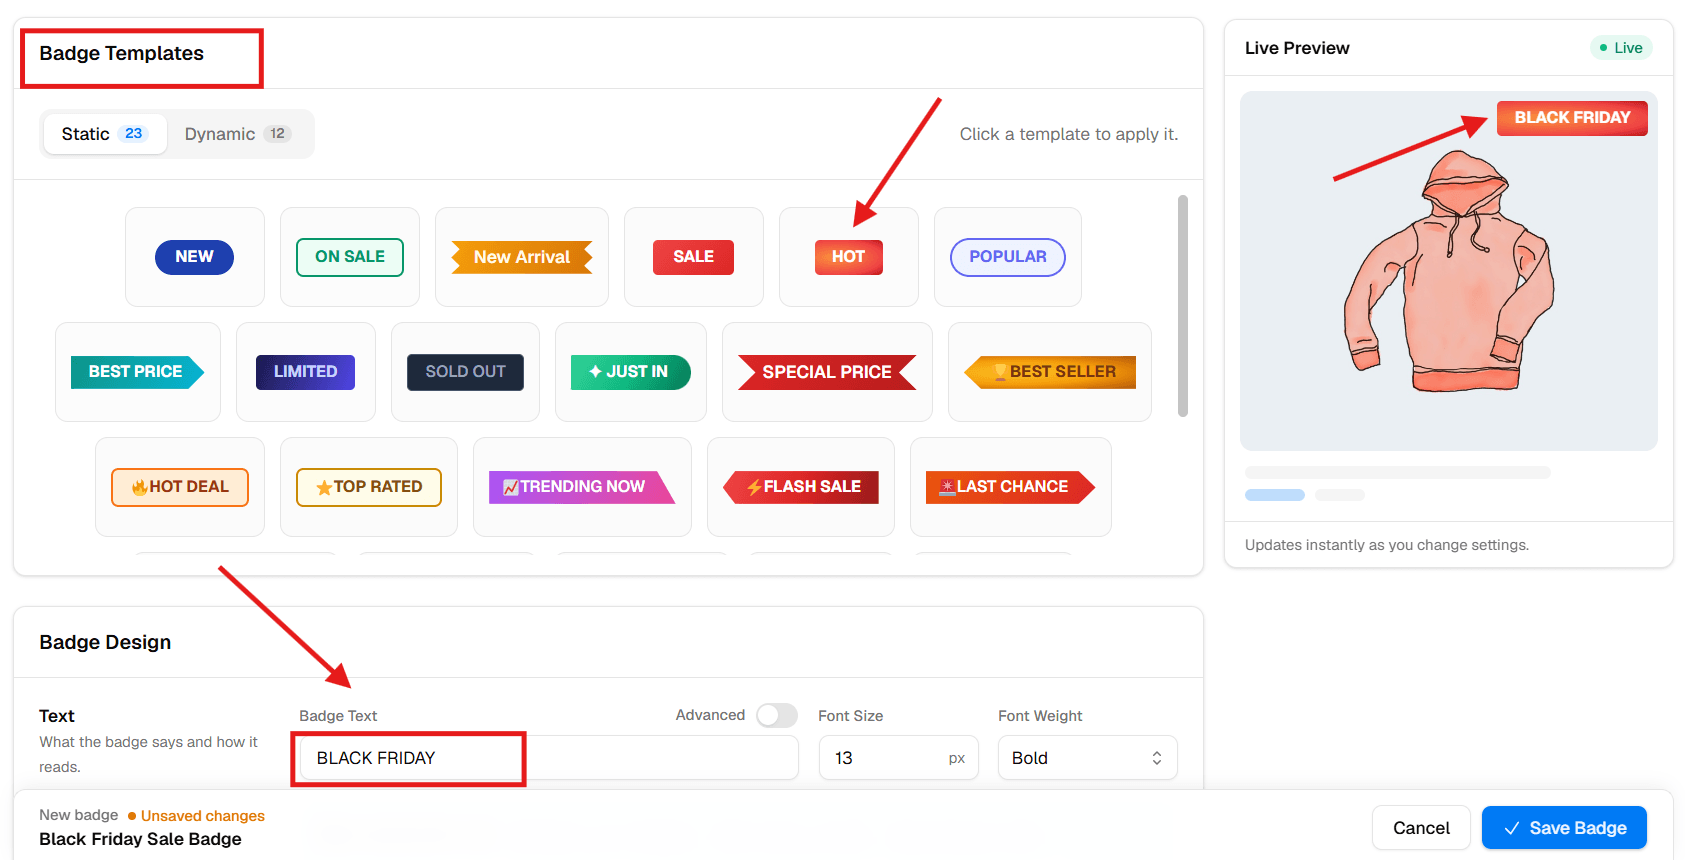
Step 5: Choose a Template and Write “Black Friday”
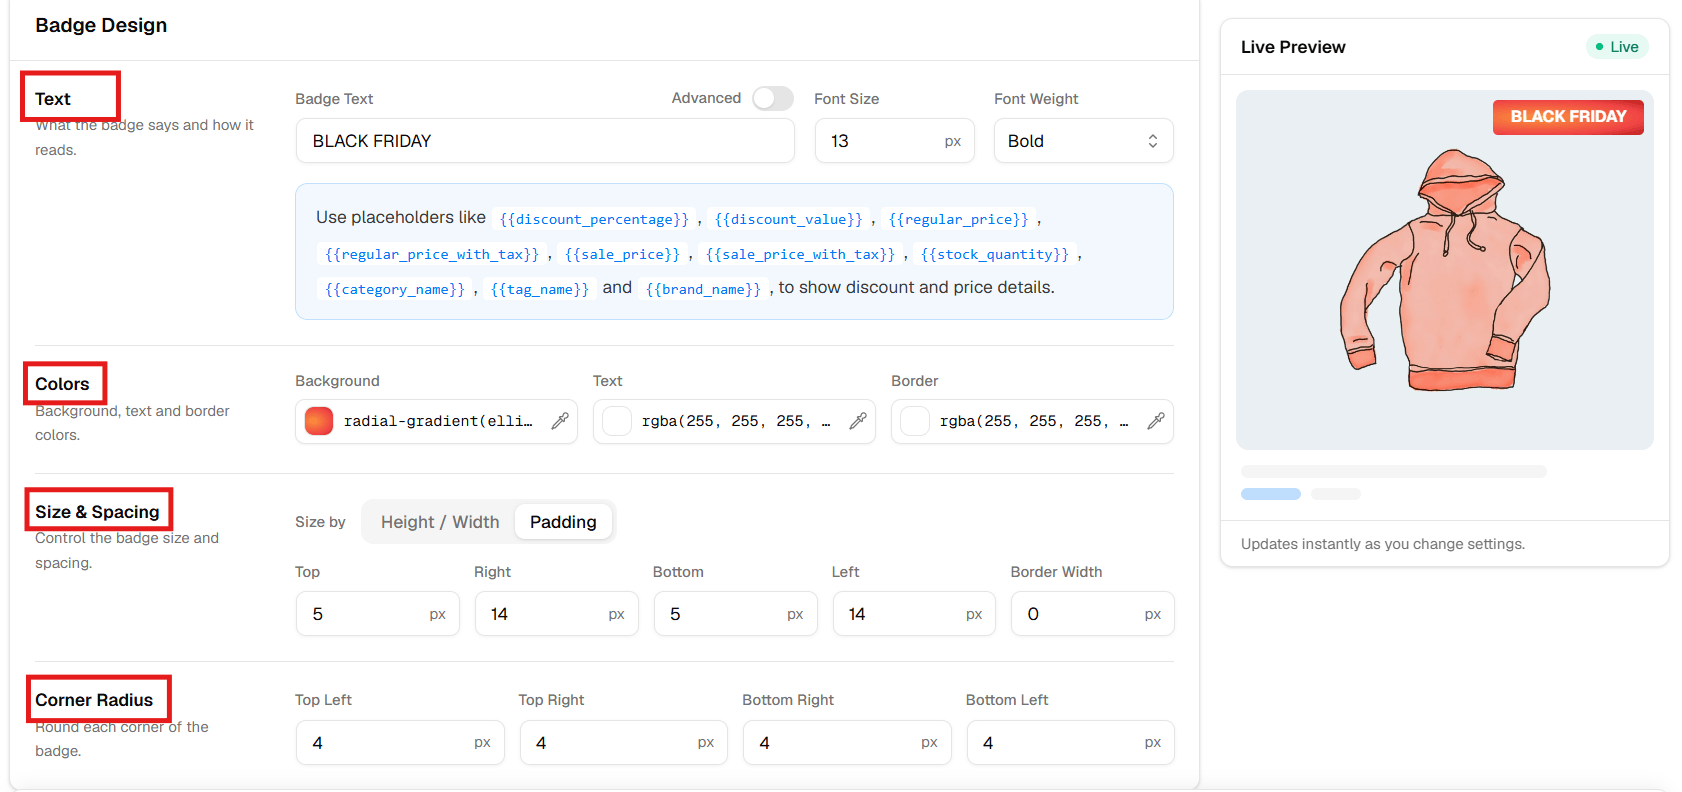
Pick your template first, because switching templates later can reset the design and text. Choose a ready-made one as your starting point, then replace its text with BLACK FRIDAY under the badge design controls.
Watch the live preview as you type. It should show the text shoppers will see, not the internal name from Step 3.
Keep the wording short enough to read on a product thumbnail. “Black Friday” or “Black Friday Deal” fits more easily than a full promotional sentence. We’ll cover the design options below.
Step 6: Save and Check Your Storefront
Click Save Badge, then check the shop page, a category page, and the watch’s product page. If the campaign hasn’t started yet, test on a staging copy with a temporary active window, then restore the real dates.
Eligible product: the watch shows the badge during the campaign.
Excluded product: a product outside the campaign doesn’t.
Price: the watch shows $120 reduced to $84 while the offer is active.
Mobile: the text is readable and doesn’t cover the product or another label.
After the end date: the badge disappears and the discount ends as planned.
Caching: if you use a page cache or CDN, purge it right after the campaign starts and again right after it ends. Otherwise cached pages can show the badge late or keep showing it after the sale.
That’s the basic setup. One campaign badge, the right products, and a clear display window.
What It Looks Like on Your Storefront
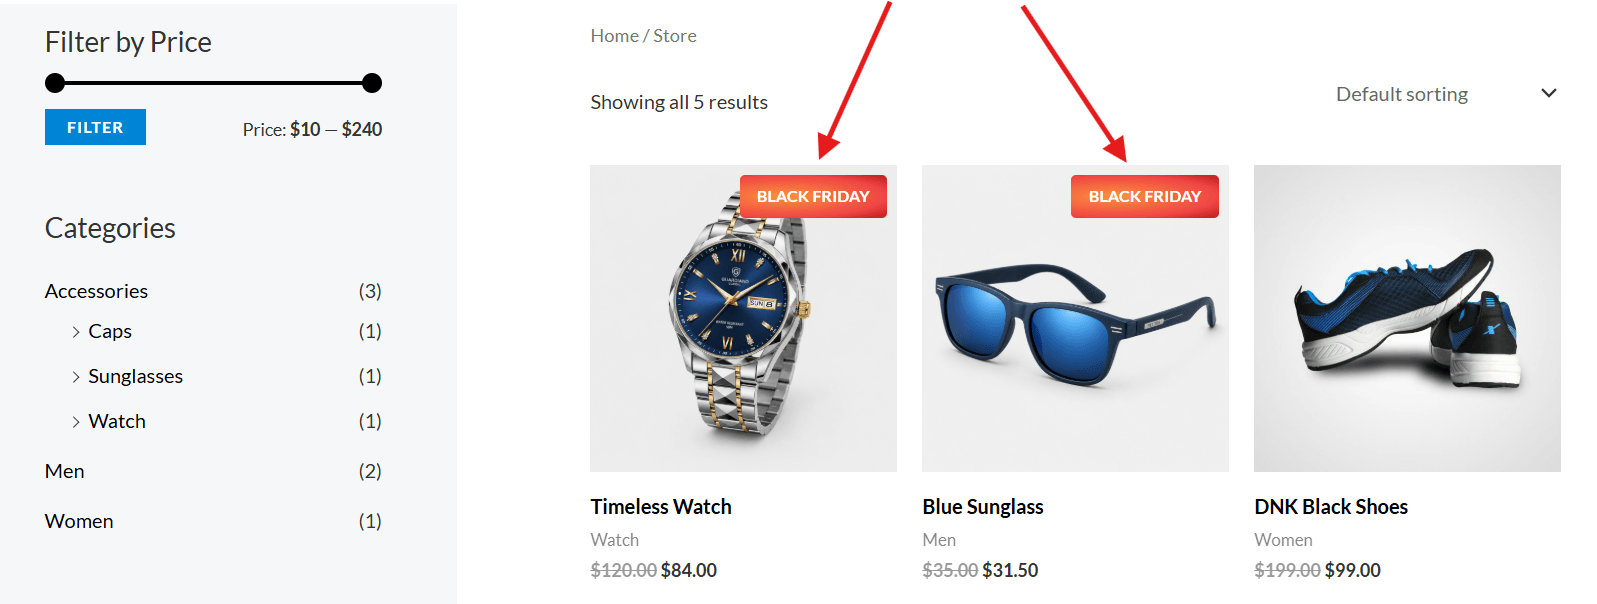
Here’s the shop page with the badge active. Participating products now show “Black Friday” instead of a generic “Sale!” label.
Shoppers scanning the grid can tell which items are in the event without opening each product. Products outside the campaign keep their normal look, so the badge also shows what isn’t part of Black Friday.
Customize Your WooCommerce Black Friday Sale Badge
Black Friday product labels don’t have to look like every other store’s black-and-red sticker. Start with a template, then make the design fit the storefront around it.
Adjust the Font, Border, and Colors
Change the font size and weight, text color, background, border, padding, and dimensions. Check the longest version of your message at thumbnail size. If “Black Friday” wraps awkwardly, widen the badge or simplify the shape before making the text too small.
Choose the Position
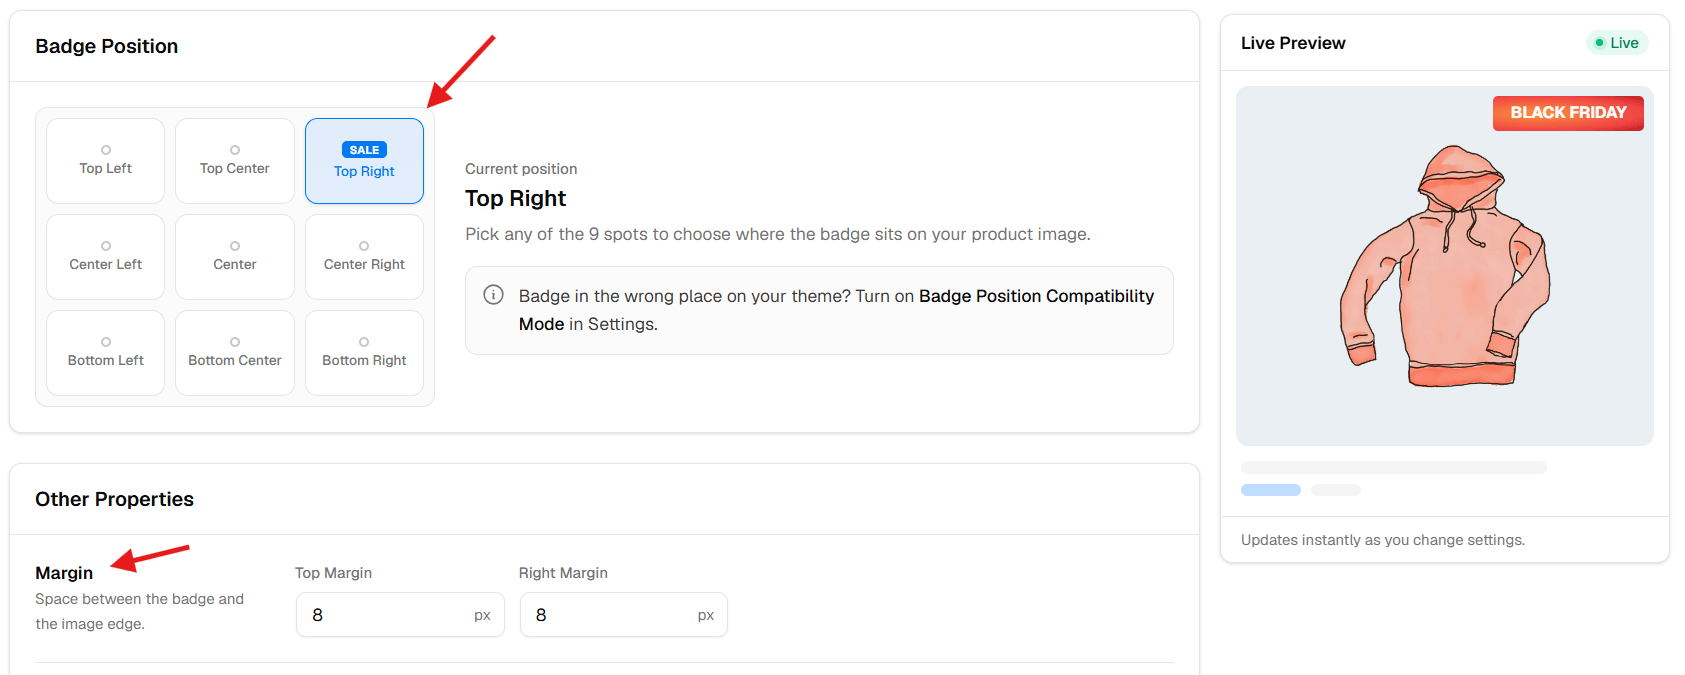
Try a top corner of the product image, then check several products. A position that works on the watch might hide the neckline of a shirt. Leave space for wishlist buttons, quick-view controls, and other labels.
Change the Shape
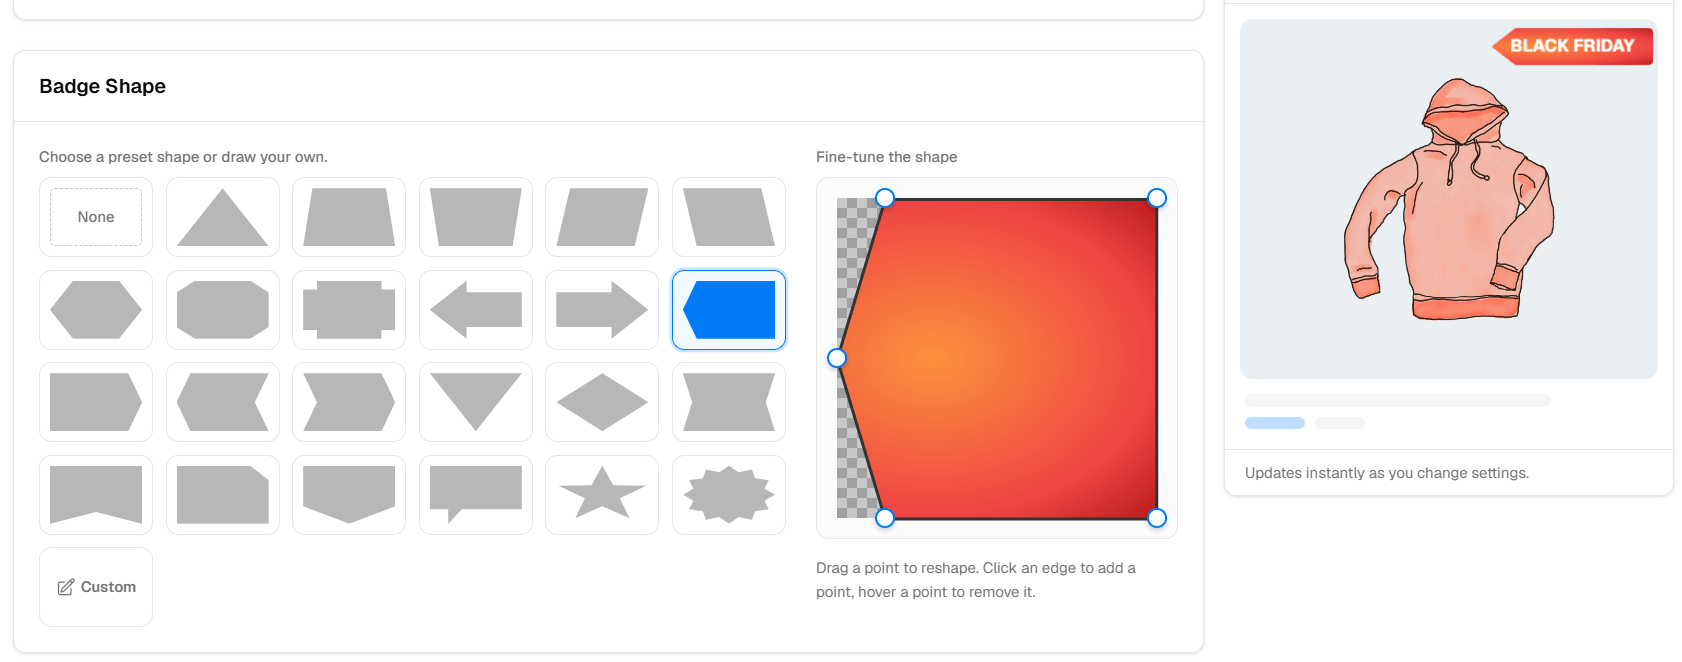
Use a pill, rectangle, circle, ribbon, or another available shape that suits the message. A wide badge gives “Black Friday” more breathing room than a small circle. The shape should help the wording fit, rather than force you to squeeze it in.
Add Animation Carefully
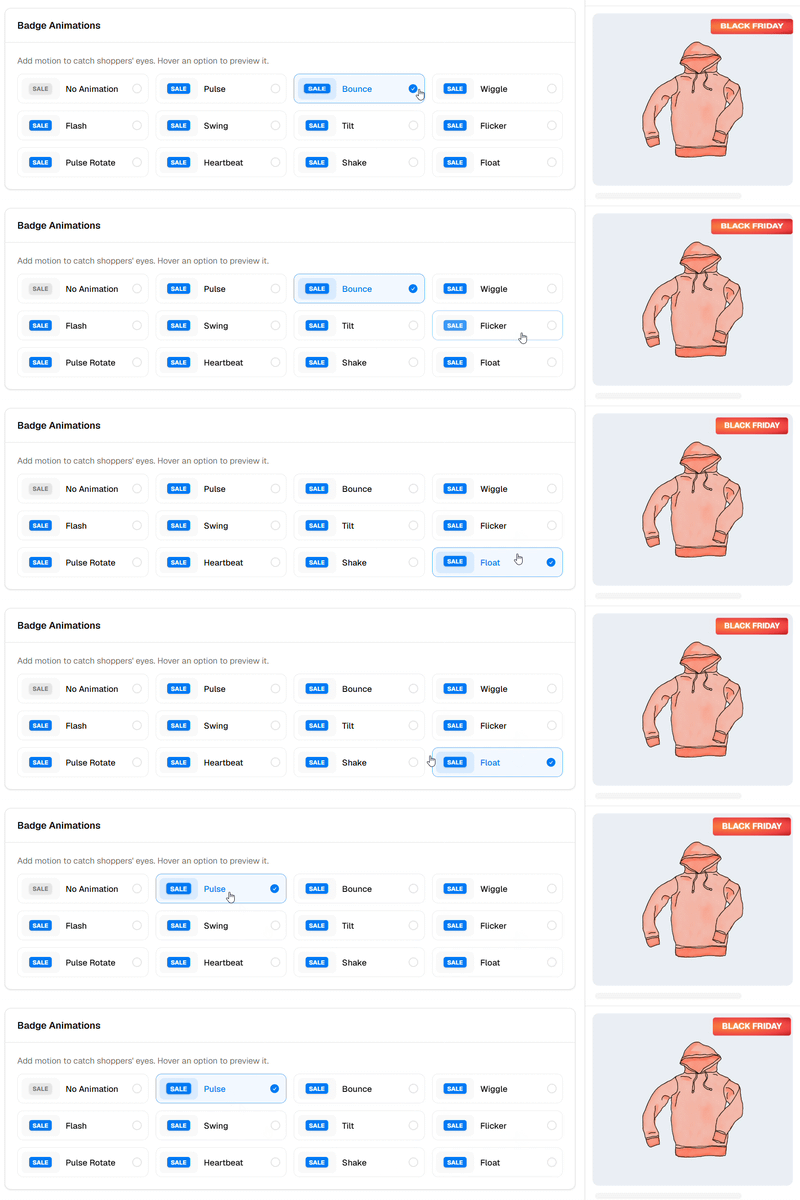
Animation is available in Pro if you want a little movement. Keep it restrained, especially across a full product grid. A readable static label is a better starting point than a page full of flashing badges.
Use an Image Upload or Custom HTML for More Flexibility
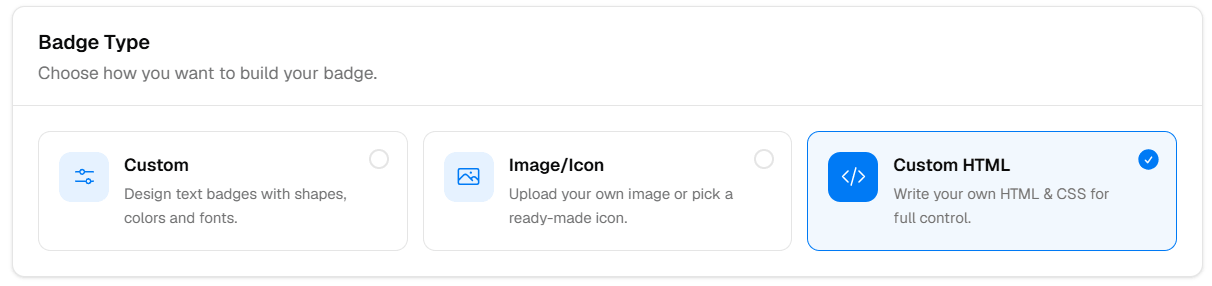
If a text template doesn’t give you the look you want, Pro also supports image badges (upload artwork that matches your campaign) and custom HTML badges (full control over layout with HTML and CSS).
This overview shows the wider Better Badge workflow and the kinds of labels you can build:
Better Badge overview: product badges, design controls, and display rules.
Want to Show “Black Friday 30% OFF” Instead?
You can write that message manually when every targeted product really has a 30% discount. If discounts vary, don’t put the same number on all of them. Use an accurate dynamic percentage or keep the campaign badge as “Black Friday” and show the saving beside the price.
Better Badge Pro supports the {{discount_percentage}} placeholder. Our WooCommerce percentage discount badge guide covers dynamic text and variable products in detail. For the watch, $120 reduced to $84 is 30% off; another product may need a different label.
Running Black Friday Into Cyber Monday
If your sale continues through Cyber Monday, you have two options:
One badge for the whole weekend. Use “Black Friday Weekend” or keep “Black Friday,” and set Limited Time to cover the full campaign.
Two badges back to back. Create a “Cyber Monday” badge whose Limited Time starts exactly when the Black Friday badge ends. Use the same filter so the products stay the same. Make sure the dates don’t overlap, or both badges may show at once.
The same approach works for a final-day “Last Chance” badge, as long as the offer really ends that day.
Method 2: Change the Black Friday Sale Badge With Code
Code is an option if you have a developer maintaining the store. But changing one word is only part of this job. You also need product targeting, dates, styling, and compatibility with the product layouts your store uses. That’s why I recommend the plugin for most campaigns.
The example below replaces the existing sale label on selected, currently discounted products during a defined campaign window. It does not create discounts or add a new independent badge.
Back up your site and test on staging first. Add it through a PHP snippets plugin or a child theme’s functions.php, without adding a second opening <?php tag to an existing PHP file. Keep a way to disable the snippet if it causes an error.
Create a product tag with the slug black-friday (the same one from the plugin method) and add it to your participating products. To add or remove a product later, change its tags; you don’t need to edit the code. Change the example dates to match your campaign.
This window covers November 27 through November 30, 2026, and ends at the start of December 1 in your WordPress site timezone. Outside the window, or for products without the tag, the original sale label is shown. Replace your-textdomain with your child theme’s text domain.
For variations, this example checks the parent product’s tags. It does not target individual sizes or colors separately, and a parent product’s sale status does not mean every variation is discounted. Keep the label general unless you add variation-specific logic.
There are two filters because WooCommerce’s classic sale templates return HTML, while the On-Sale Badge block in WooCommerce 10.0+ expects plain text. WooCommerce’s official badge documentation explains the difference. Custom theme cards, older blocks, and page-builder widgets may use another rendering path, so test your actual layouts.
The snippet inherits the existing badge styling. For classic templates, you can style the added .innocodia-bf-badge class in your child theme or custom CSS area. Block styling is separate. Any extra shape, animation, or positioning work becomes code you maintain too.
This is an illustrative starting point, not a snippet tested against your store. If you want to change campaign dates and design through visual controls, use the plugin method above.
Black Friday Sale Badge Best Practices
Make the Badge Match the Actual Offer
Only put “Black Friday” on products that are part of the event, and only put “50% OFF” on items that are actually 50% off. If the deal needs a coupon, say so next to the price. Selling in the EU? A “% off” claim must be based on the lowest price you charged in the previous 30 days, not on an inflated regular price.
Keep One Main Message Easy to Read
Use short wording, clear contrast, and enough spacing around the text. Check light and dark product images on mobile. Don’t rely on color alone, and avoid stacking “Sale!”, “Black Friday,” “Hot Deal,” and “Limited Time” over the same corner.
If you also show a stock warning, make sure it reflects real inventory. Our low stock alert badge guide explains the setup and the trust issues to avoid.
Plan What Happens After the Campaign
Check the storefront after the scheduled end, including any cached shop pages. If you extend the offer, update the price rules, badge dates, email copy, and landing page together. “Ends tonight” should mean the same thing everywhere a customer sees it.
The badge is missing: confirm it is enabled, the current date falls inside Limited Time, and the product matches the assigned filter or selection.
The wrong products have the badge: a Sale Price greater than 0 rule may include unrelated sale items. Narrow it to the campaign products or category.
Two badges appear: check WooCommerce Default Badge in Better Badge settings, plus labels added by your theme or another plugin.
The badge stays after the sale: recheck the badge’s own end date, the price schedule, and the site timezone. Clear page and CDN caches before checking again.
The badge appears late or stays after the sale: check the badge’s own start and end dates, the price schedule, and your site timezone. Then purge your page cache and CDN; cached pages can lag behind the schedule in both directions.
It works on one layout only: test your theme’s shop grid, product page, and page-builder widgets separately. For code, confirm which sale-badge filter that layout uses.
Conclusion
Your Black Friday promotion already has a name. The products should be able to say it too.
For most store owners, Better Badge is the easier route: create the filter, name the badge, set Limited Time, choose a template, write “Black Friday,” and save. Then use the design controls to make it look like part of your brand.
Custom code can do the job when someone is available to maintain it. Either way, check the products, prices, dates, and mobile view before the campaign starts. A useful badge makes the offer clear and stays accurate for as long as it appears.
Frequently Asked Questions
Use a badge plugin such as Better Badge to choose the participating products, set a display schedule, and enter “Black Friday” as the badge text. Alternatively, a developer can customize the existing WooCommerce sale label with PHP.
Yes, with custom code. Classic templates use woocommerce_sale_flash, while the current On-Sale Badge block uses woocommerce_sale_badge_text. Your theme may also provide its own label setting. Standard WooCommerce does not give you a general sale-badge text field in the product editor.
You can create a custom text badge with Better Badge Free and select participating products manually. The Advanced Filter setup in this guide requires Pro. Custom image uploads, HTML badges, animation, and dynamic discount text are Pro features.
Yes. Turn on Limited Time in the badge settings and choose the start and end dates. Match the window to the real promotion, check your store timezone, and verify the storefront after the start and end boundaries.
No. The badge is a visual label. Set sale prices, coupons, or other discount rules separately, and check the final price in the cart and checkout.
Assign the badge to selected products manually, or use an Advanced Filter in Pro. If other sales are running at the same time, use campaign-specific product or category targeting rather than a broad sale-price rule.
Yes. Use accurate manual text for products sharing the same discount, or use dynamic percentage text in Pro. Review variation-level prices before showing a percentage on a variable product; the same discount may not apply to every option.
Yes. Duplicate or edit the badge, change the customer-facing text to “Cyber Monday,” and update the products and dates. Check that the original campaign badge no longer overlaps the new one. You can also create a separate Cyber Monday badge with its own Limited Time window, so you don’t have to edit the first one on the day.
A visual badge is not a ranking guarantee or a replacement for accurate product data. Its main purpose is to help shoppers understand the offer on your storefront. Keep product prices, availability, and any structured data aligned with the real offer.
Usually it’s caching, the timezone, or the badge’s own end date. Purge your page and CDN cache, then check the Limited Time end date against your store timezone.
Picture two products in a WooCommerce shop. Both are discounted. One has a badge that says “Sale!” The other says “30% OFF.” Which one tells you more before you even look at the price? If a product drops from $120 to $84, the second badge answers the question immediately. In this guide, I’ll show you […]
You want more orders this Black Friday, along with happy customers, manageable workloads, and fewer last-minute surprises. There is already plenty to prepare: offers, stock, emails, banners, shipping. It is easy to spend days promoting a sale and miss something small that stops people from buying. I want to help you catch those problems before […]
You put a product on sale. The old price gets crossed out, the new price appears, and the discount is technically right there. But shoppers don’t always stop to read the price. A sale badge gives them a quick visual cue that says, this product is on sale. And here’s the useful part: you don’t […]





 Samia Nasreen
19 min read