Someone visits your store, finds a product they like, and thinks “I’ll grab it later.” Later never comes. The item sells out. They don’t come back.
This is called purchase hesitation, and a well-placed low stock badge is one of the simplest ways to kill it. In ecommerce, hesitation is expensive. Even interested shoppers can lose momentum if there’s no reason to act now.
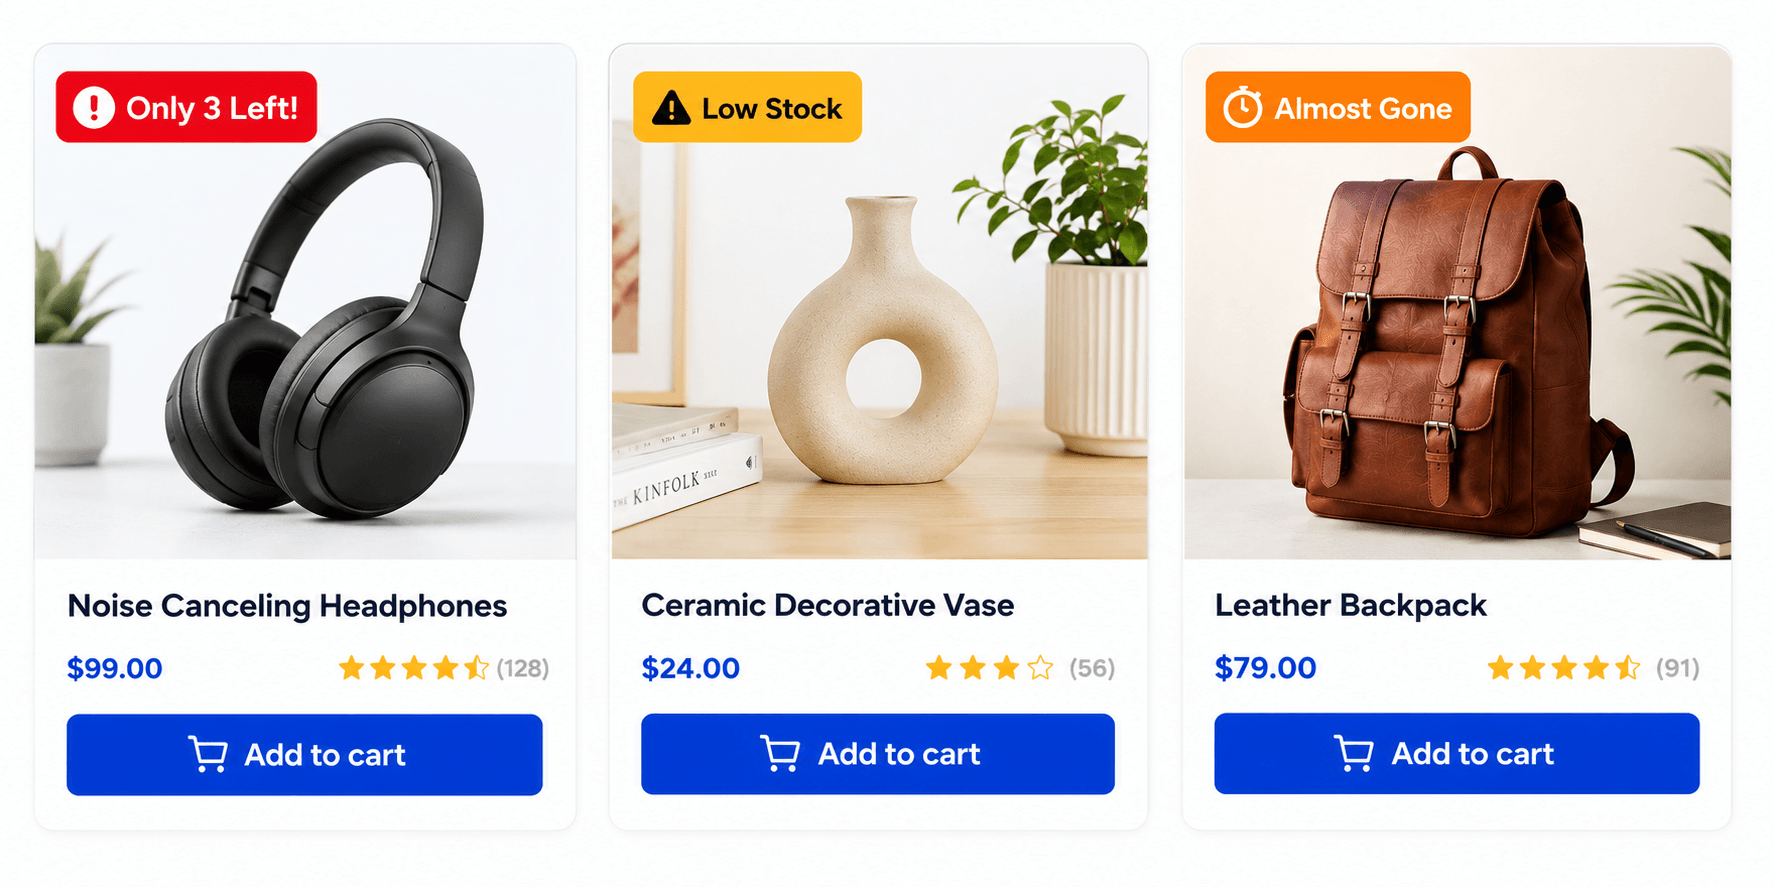
A badge that says “Only 3 Left!”or “Low Stock” communicates one thing clearly: decide now or miss out. That’s not manipulation. That’s just honest product information -presented at the right moment, in the right format. It creates urgency, reduces indecision, and helps customers feel more confident about buying now instead of waiting.
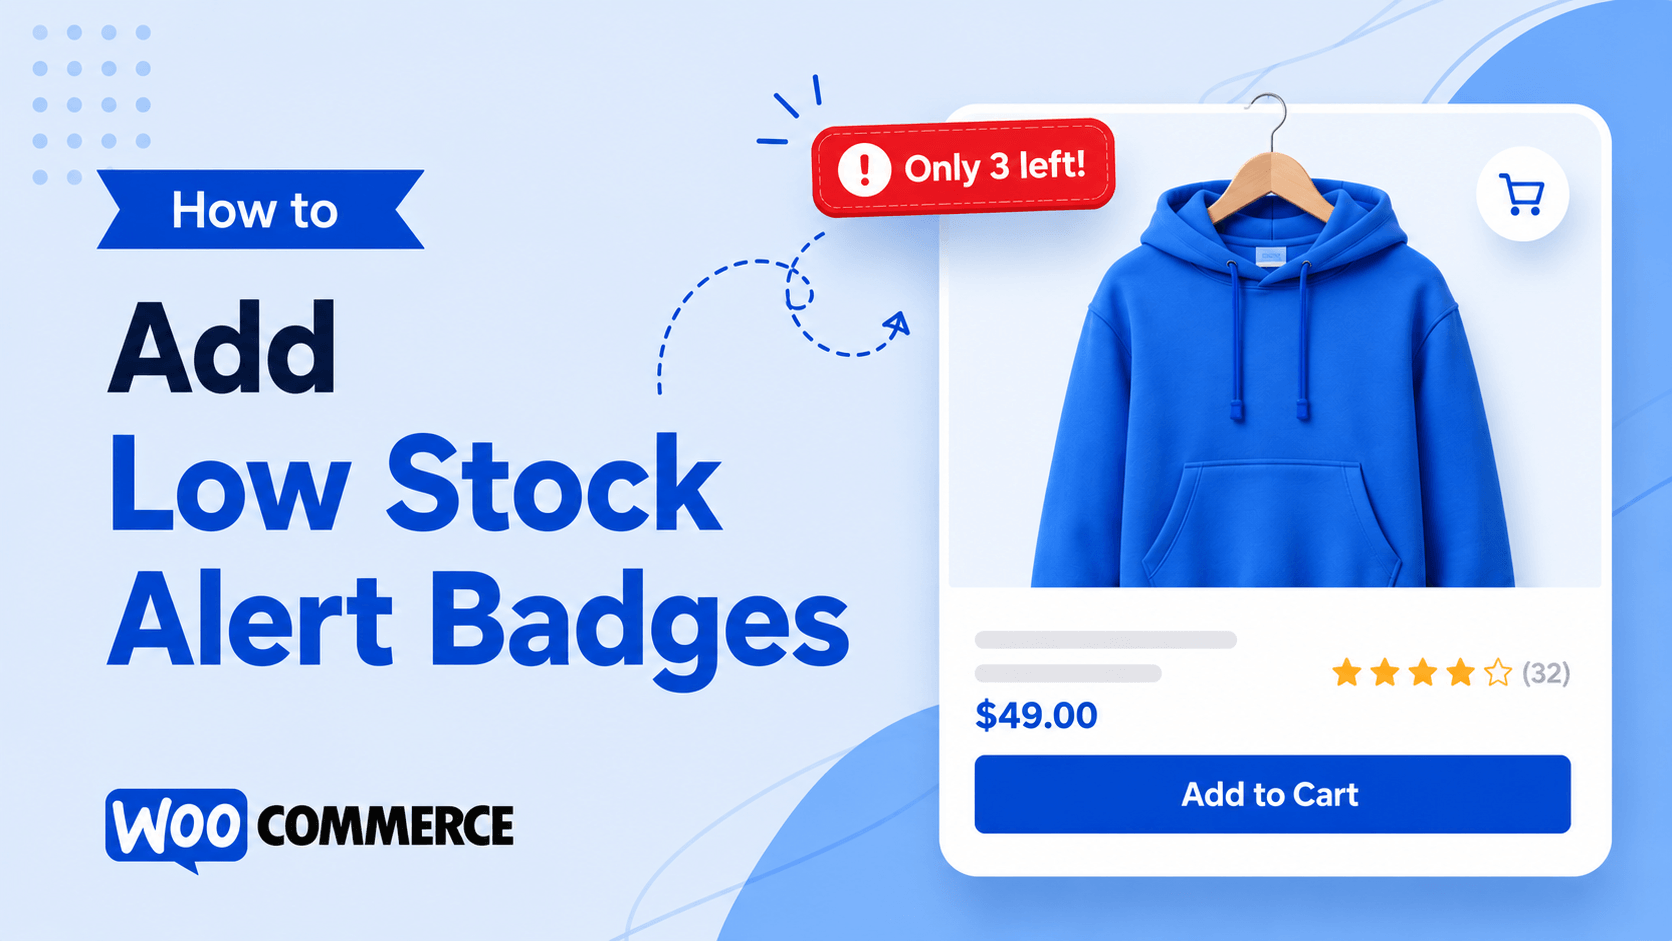
In this guide, we’ll walk through how to addlow stock alert badges in WooCommerce using both WooCommerce’s built-in stock notices and dedicated badge plugins. Advanced custom code is also possible, though outside the scope of this guide. We’ll also cover how to customize your badges, set smart stock thresholds, and use them in a way that improves conversions without hurting trust.
What Is a WooCommerce Low Stock Badge?
A low stock badge is a visual label. It is usually placed on a product image or just beneath the product title, that alerts shoppers when inventory is running low.
Examples:
Unlike a sale badge, which highlights a price discount, a low stock badge communicates scarcity. These are two different psychological levers, and both matter.
WooCommerce doesn’t add a low stock badge automatically the way it does with the “Sale!” label. You have to set it up- either through a text notice below the product title, a plugin, or custom code. The rest of this guide covers exactly that.
Why Low Stock Badges Actually Work
The core mechanism is straightforward: scarcity reduces decision friction. When a shopper thinks there are plenty of units available, they feel no pressure to act. When they see there are only a few left, the calculus shifts.
This isn’t just theory either. A Boston College study found that showing low product availability can increase long-term revenue and improve customer satisfaction.
This works for a few reasons:
Loss aversion: People are wired to avoid losing something more than they’re motivated by gaining it. “Only 2 left” frames inaction as a loss.
Perceived value: Low stock implies demand. If other people are buying it, it must be worth buying.
Decision shortcut: Badges cut through analysis paralysis. “Should I buy this?” gets a nudge toward yes.
Done right, low stock badges don’t feel pushy. They just surface information that’s genuinely useful for a shopper making a decision.
I mean, think about how many times that’s worked on you and me. We’ve all grabbed something completely unnecessary just because we couldn’t let the last few go.
One important note
Only show a low stock badge when stock actually is low. Using it when you have 500 units in the warehouse destroys credibility. Use real inventory thresholds and let WooCommerce data drive when the badge appears.
3 Methods to Add a Low Stock Alert Badges in WooCommerce
There are two main practical paths for most store owners: WooCommerce’s built-in stock notices and a dedicated badge plugin. Developers can also build custom solutions if needed. Let’s go through all of them.
1. Using WooCommerce’s Built-in Low Stock Management
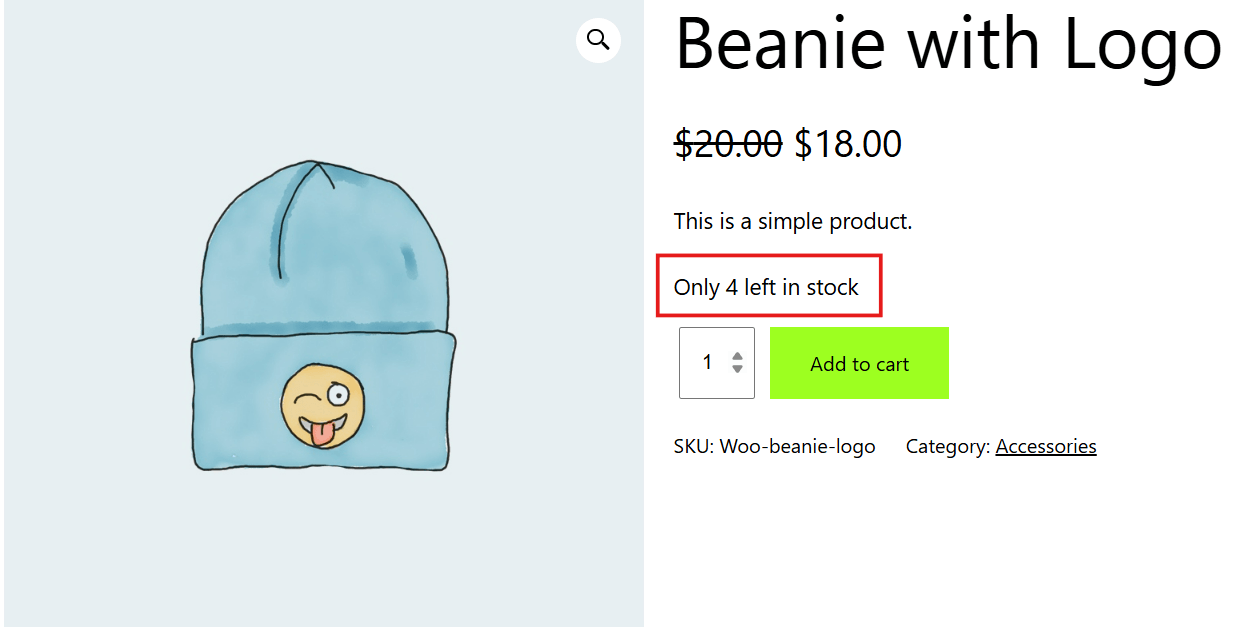
WooCommerce includes a native low stock notice, but it appears as plain text below the product description on the single product page and not as a visual badge on product archive grids. It doesn’t show up on the shop page or category page at all.
Still, it’s a solid starting point if you just need the basics on product pages.
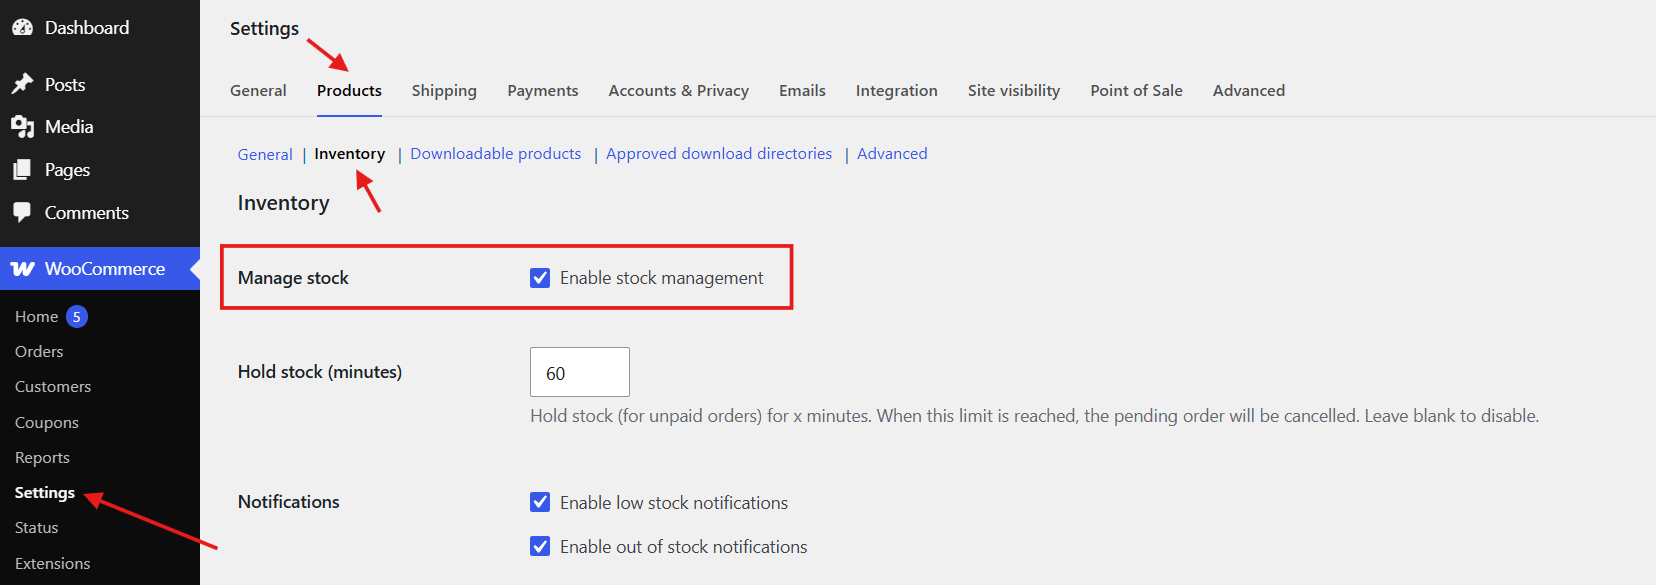
Step 1: Enable stock management
Go to WooCommerce > Settings > Products > Inventory. Make sure “Enable stock management” is checked.
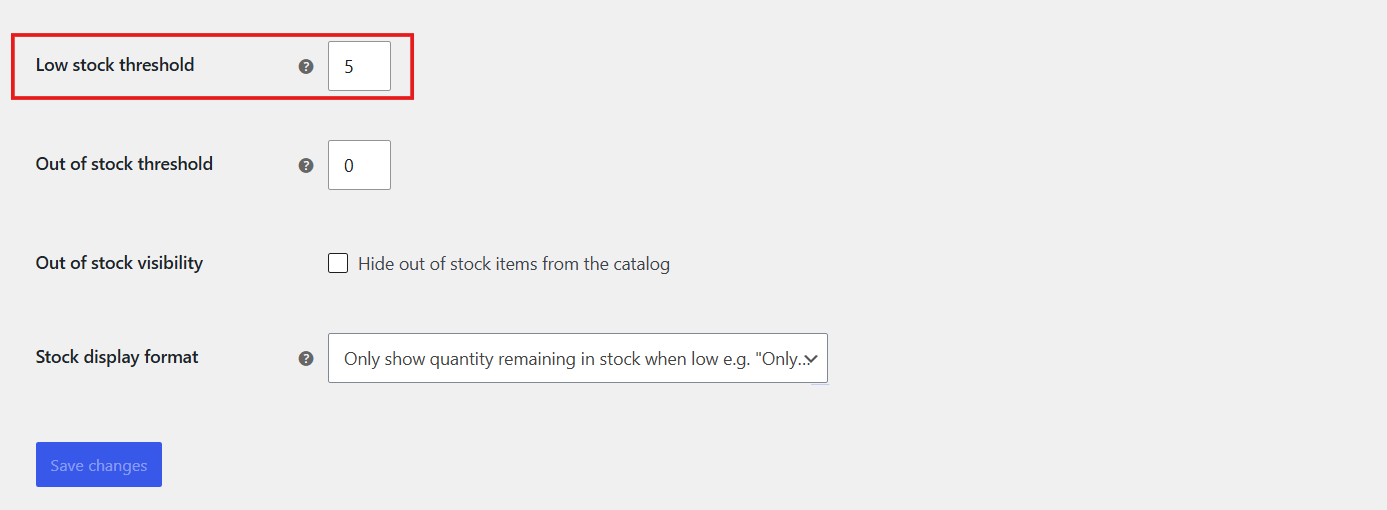
Step 2: Set your low stock threshold
On the same page, scroll down and find the Low Stock Threshold field. Set the number at which WooCommerce considers a product “low stock”. The default is 2, but most stores benefit from a higher number like 5 or 10.
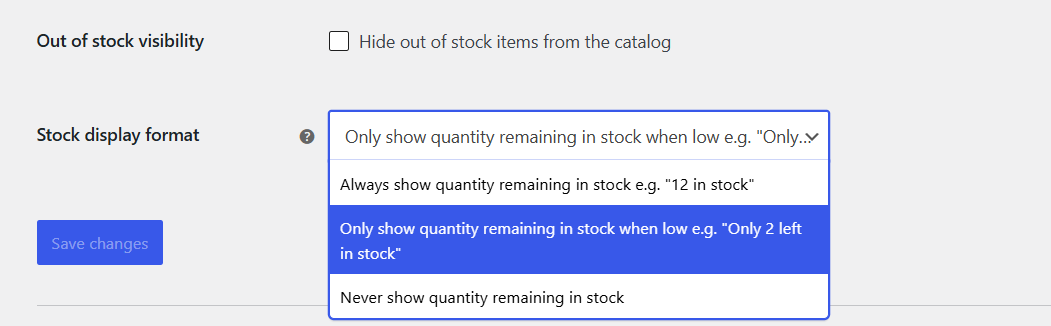
Step 3: Choose how stock quantity is displayed
Right below the low stock threshold, set the Stock display format. This controls how stock information appears on your product pages.
For low stock badges, the best option is usually: “Only show quantity remaining in stock when low”. This creates urgency by showing messages like “Only 2 left in stock” instead of revealing full inventory all the time.
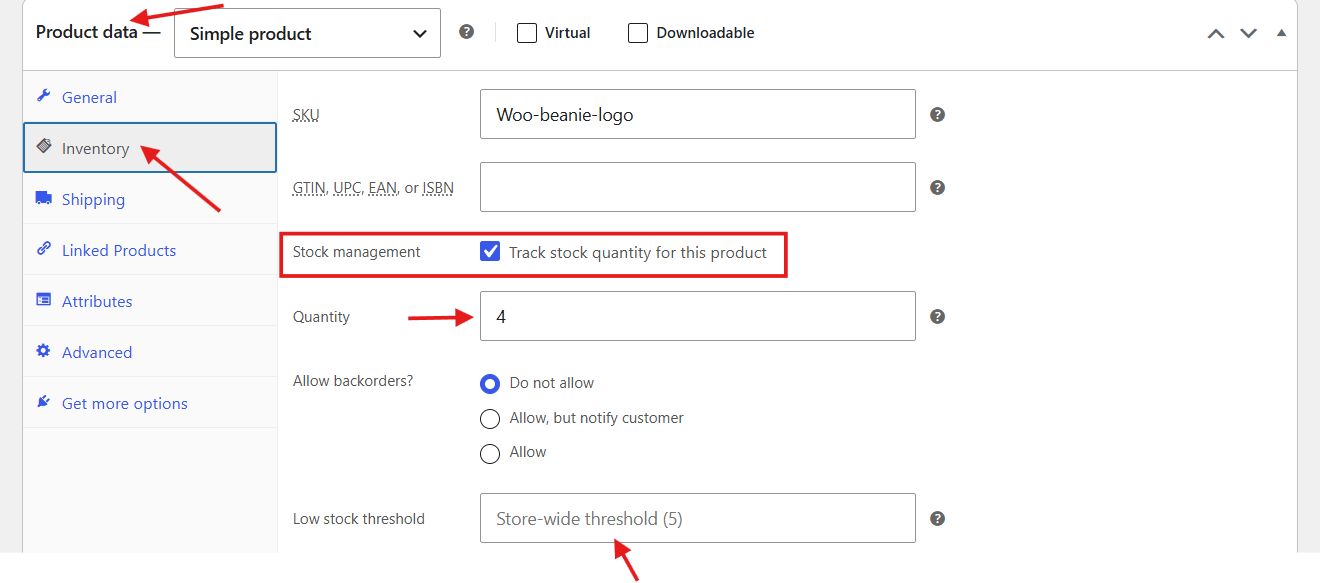
Step 4: Enable stock management for each product
Go to Products → Edit Product, then scroll down to Product Data → Inventory. Check “Track stock quantity for this product” and enter the current stock quantity.
Here, you can also set a Low stock threshold for this specific product. If you leave it blank, WooCommerce will use the default threshold you set earlier in Settings → Products → Inventory.
Once this is set up, WooCommerce will automatically show stock messages based on the display format you chose in Step 3.
For example, if you selected “Only show quantity remaining in stock when low,” shoppers will see messages like “Only 4 left in stock” when inventory falls below your threshold.
The limitation
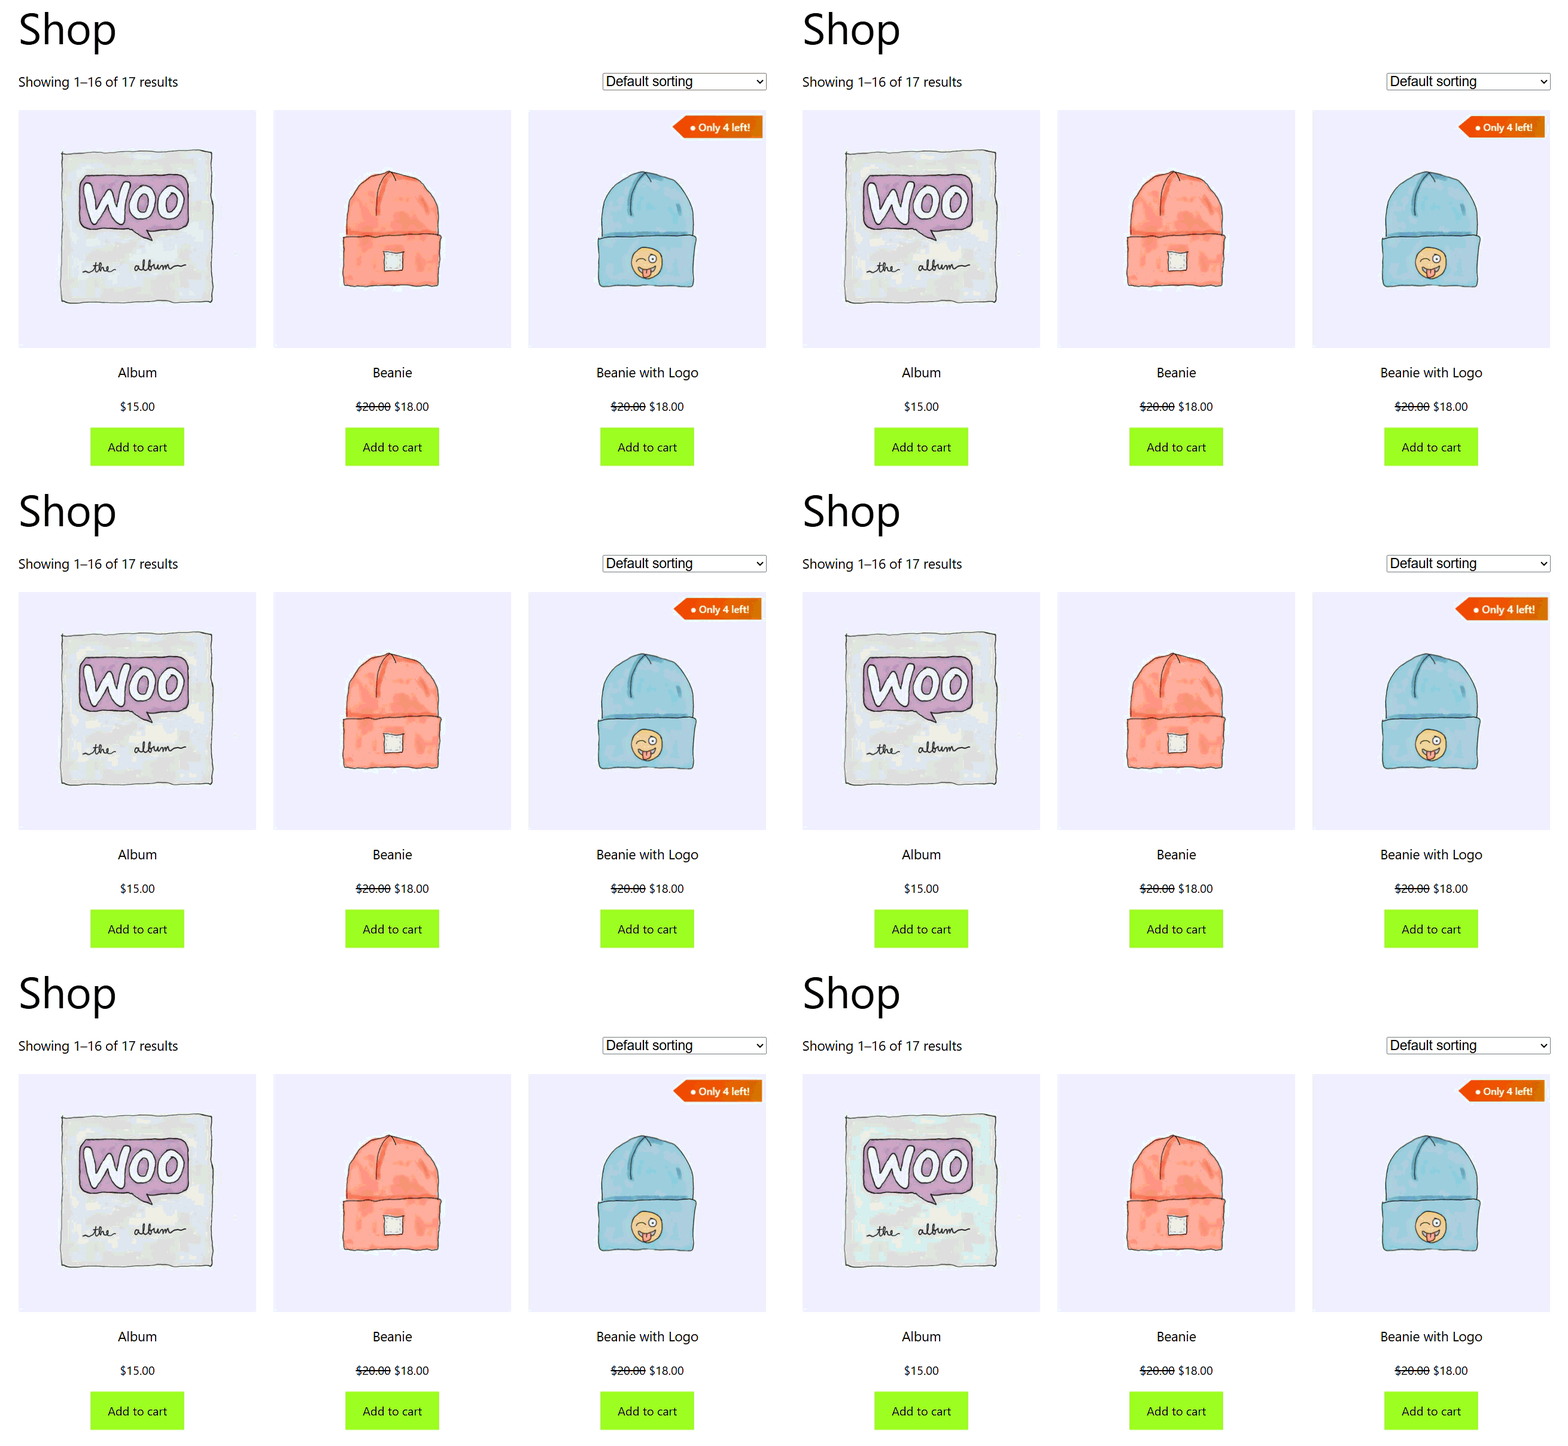
The built-in notice only shows on the single product page. It won’t display as a badge on your shop page, category pages, or related product sections- which is where most shoppers make their first impression. For that, you’ll usually want a badge plugin.
2. Using a Plugin (Recommended)
If you want a proper visual badge that shows up in product grids, with control over position, color, shape, text, and trigger threshold- a dedicated plugin is the way to go.
The plugin I use and recommend here is Better Badge. The free version gets you started, and Pro adds dynamic placeholders like {{stock_quantity}} so the badge can display the actual number of remaining units automatically.
Step 1: Install Better Badge
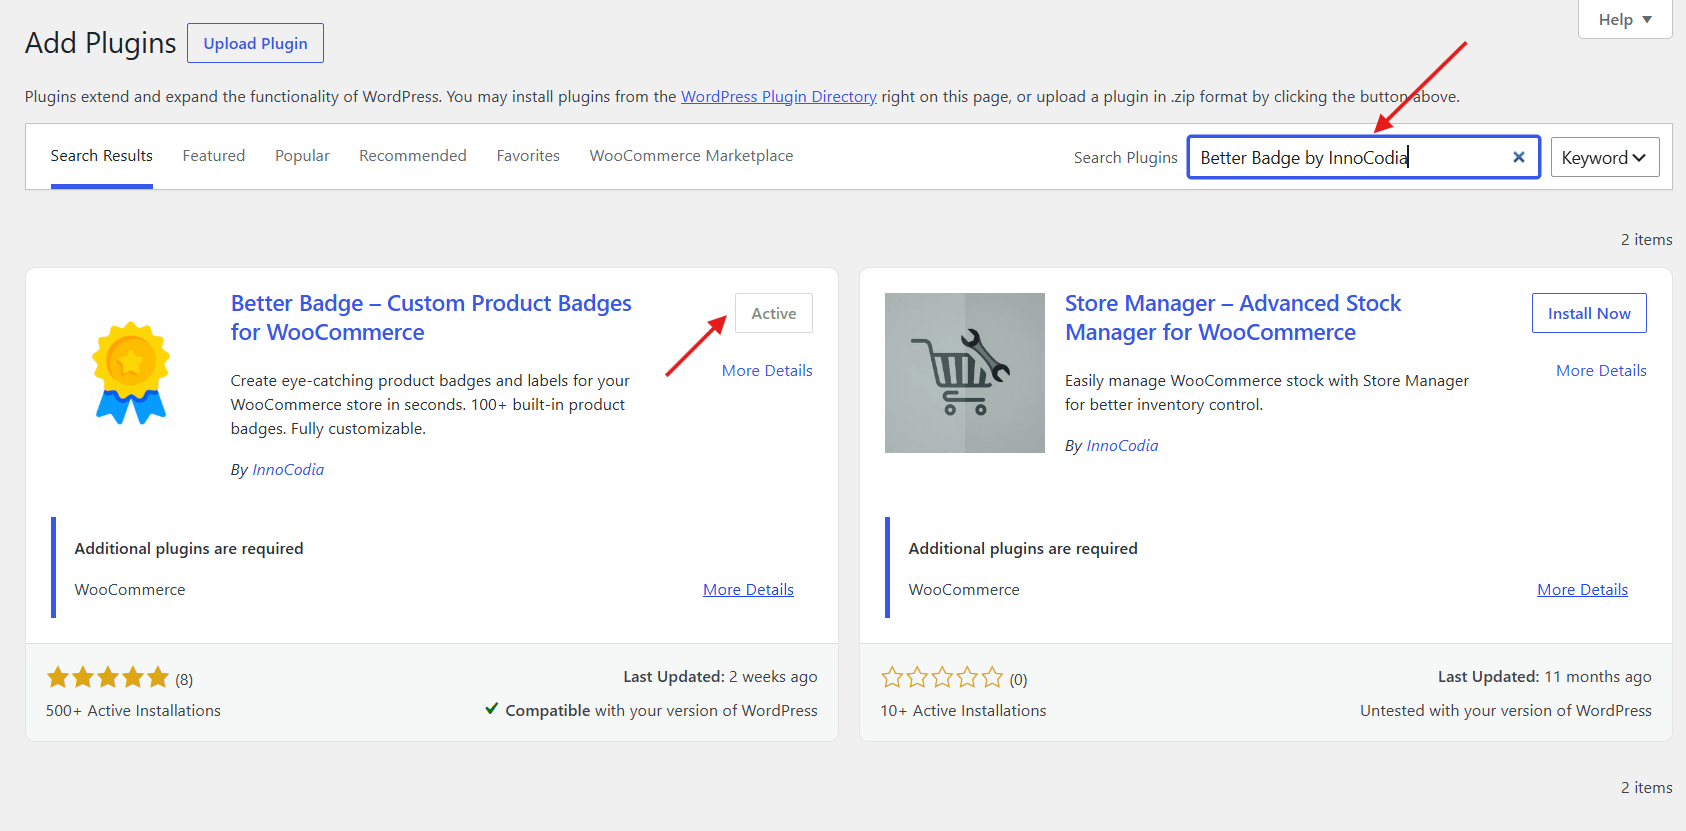
Go to Plugins → Add New in your WordPress dashboard. Search for Better Badge – Custom Product Badges for WooCommerce, install and activate it. Once activated, you’ll see a new Better Badge menu in your sidebar.
Step 2: Create a new filter
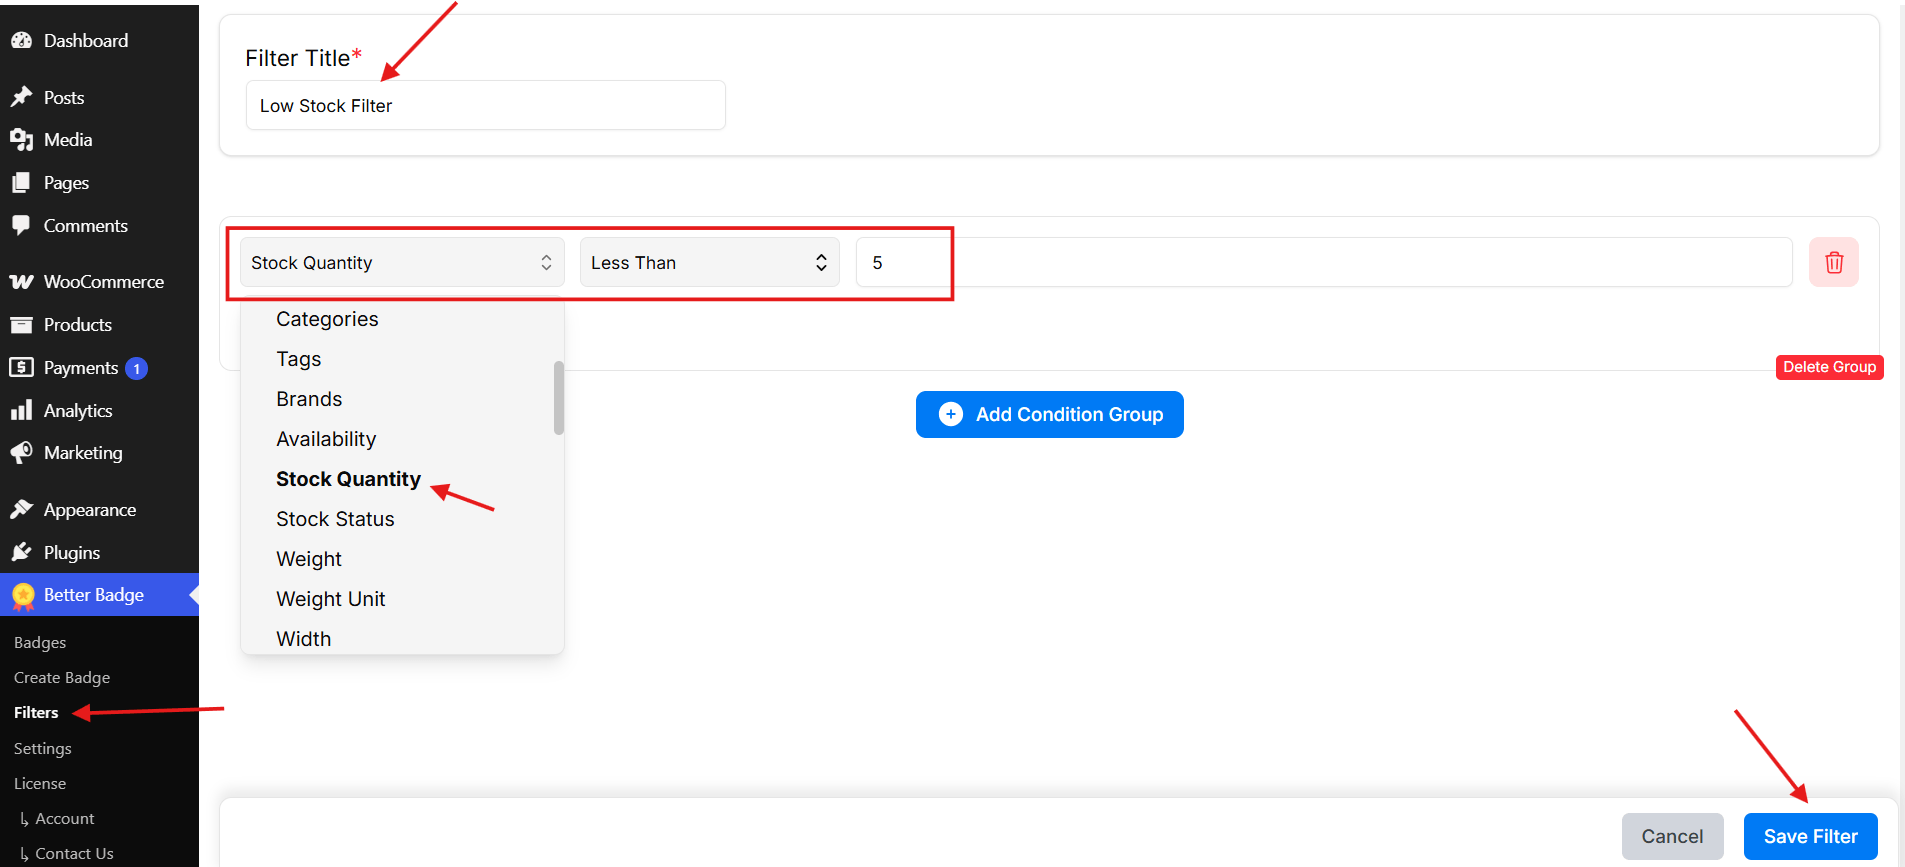
Before creating your badge, go to Better Badge → Filters and create a new filter. Enter a filter name (for example, Low Stock Filter), then click Add Condition Group.
From the filter options, scroll down and select Stock Quantity from the dropdown menu. Next, choose your condition, like less than or less than or equal to- depending on how you want it to trigger. Enter your stock threshold (for example, 5) and click Save Filter.
Step 3: Create a new badge
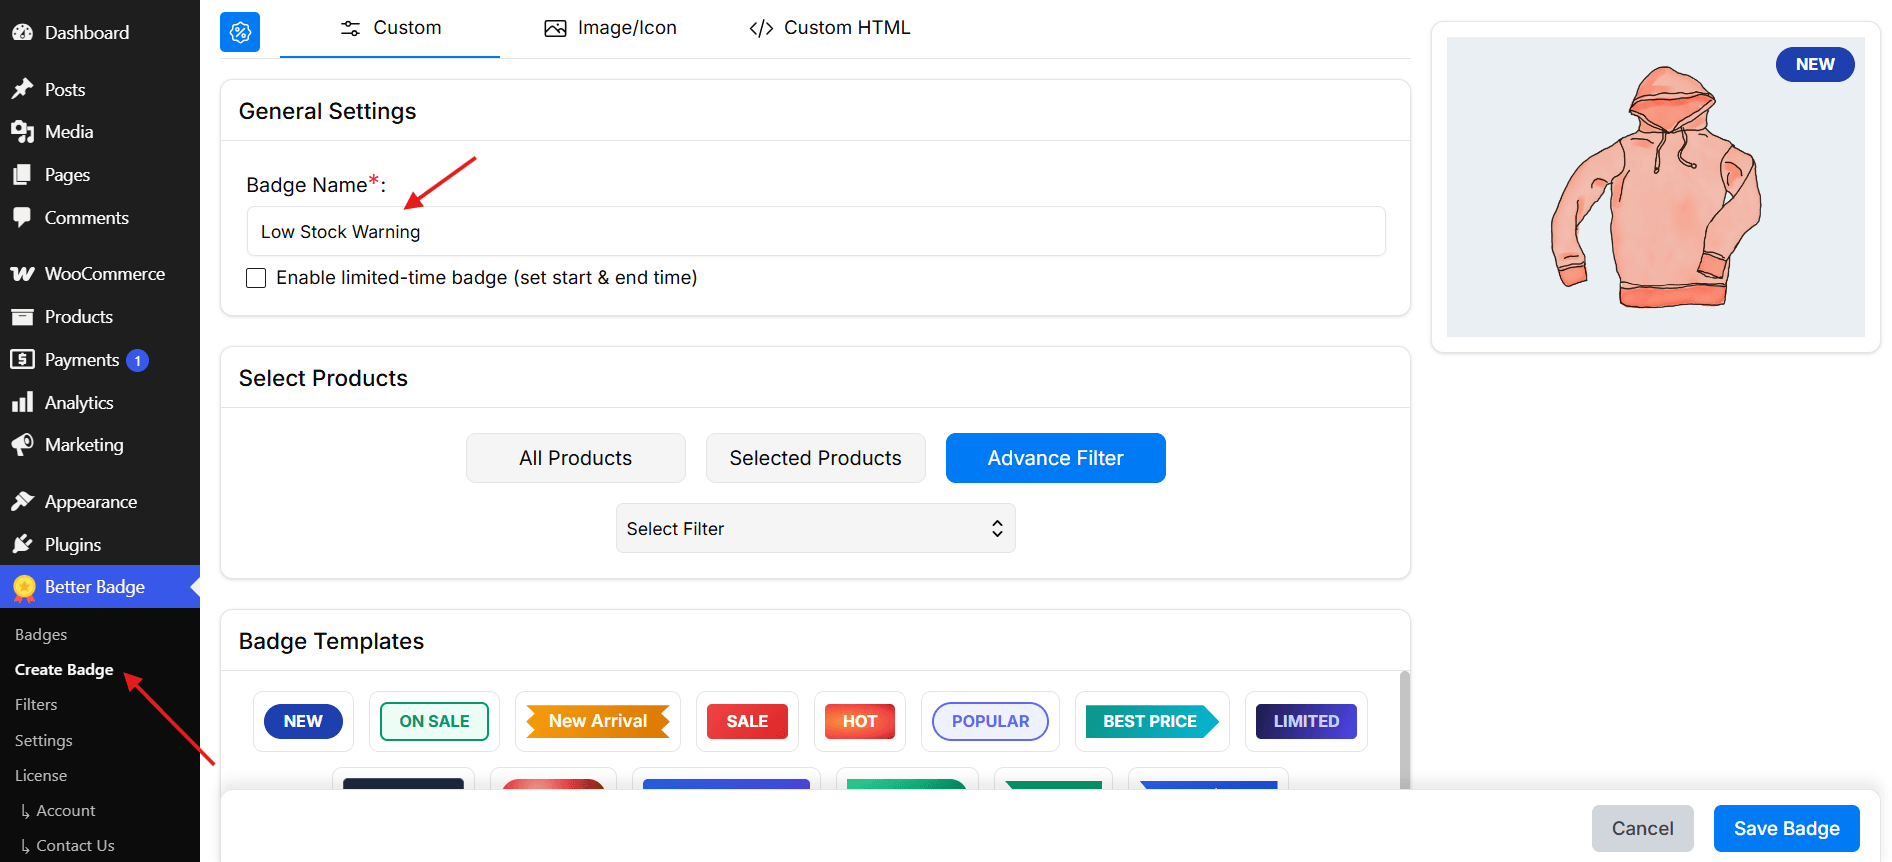
From the sidebar, go to Better Badge → Create Badge. Give your badge a name. Something internal like “Low Stock Warning” works well.
Step 4: Choose where the badge should appear
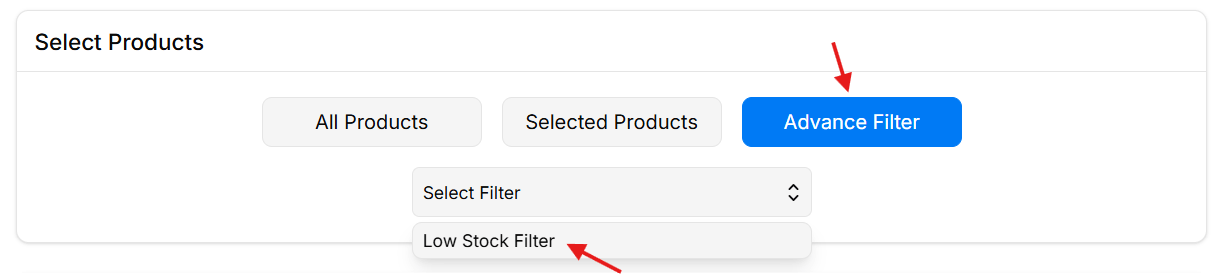
Under the Products section, select which products or categories should display this badge. For this low stock setup, apply the Low Stock Filter you created earlier so the badge only shows when a product’s stock falls below your chosen threshold. You can apply it store-wide or limit it to specific products or categories.
Step 5: Choose a badge template
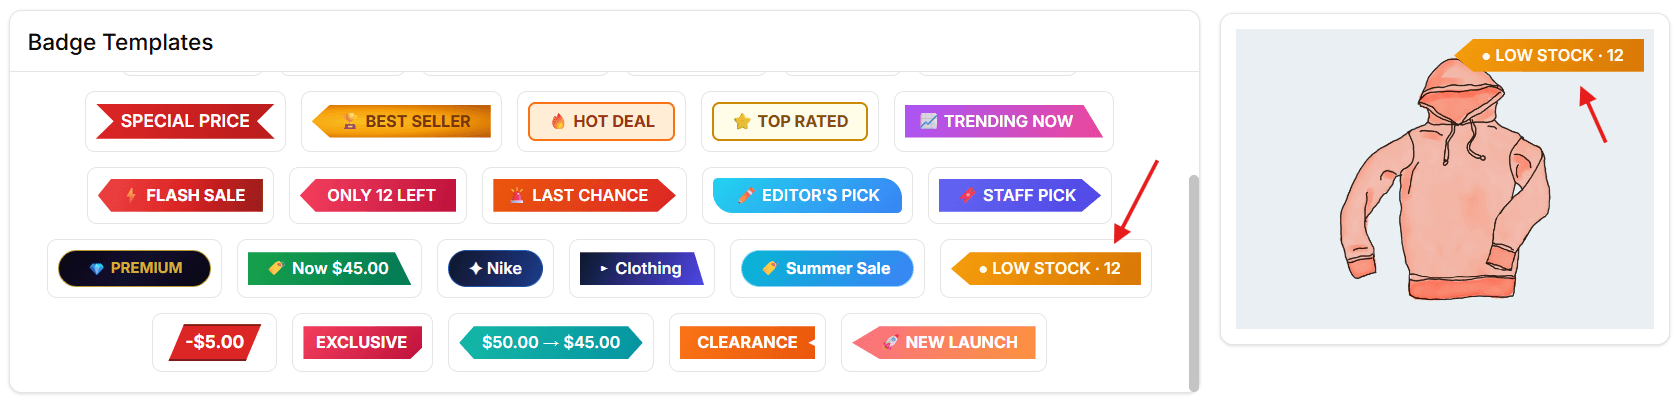
Before customizing the badge, pick one of Better Badge’s pre-made Badge Templates as your starting point. For this setup, select the Low Stock template. It already gives you a good urgency-focused base design, which you can customize further in the next step.
Step 6: Customize the badge design
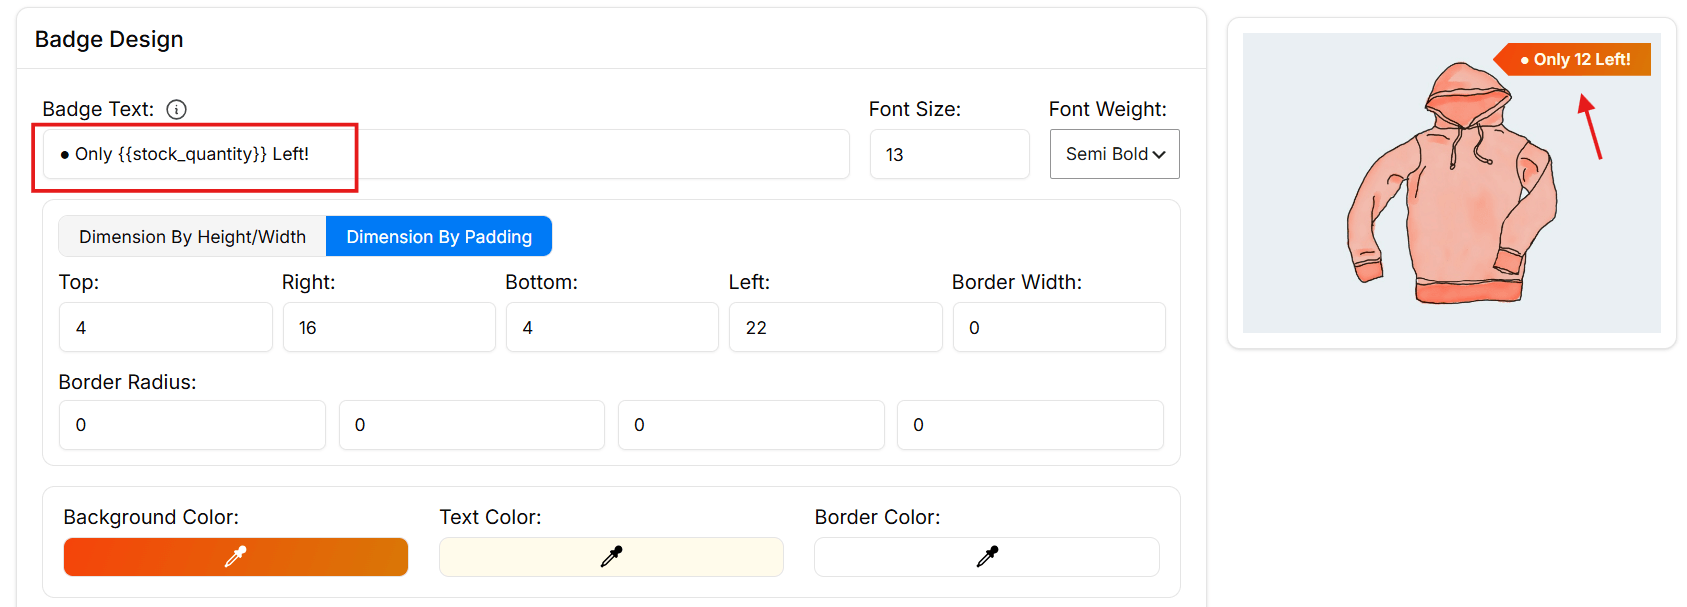
Now it’s time to style your badge. In the Badge Design section, enter your badge text. You can put something short and urgent like Low Stock, Almost Gone, or Only {{stock_quantity}} Left!.
If you’re using the Pro version, the {{stock_quantity}} placeholder will automatically display the live stock count.
Here you can also customize:
Font size and font weight to make the badge more noticeable
Padding or dimensions to control badge size
Border radius to make it pill-shaped or sharp-edged
Background, text, and border colors to match your store branding
For low stock alerts, red, orange, or amber usually work best because they naturally signal urgency.
Step 7: Choose the badge position
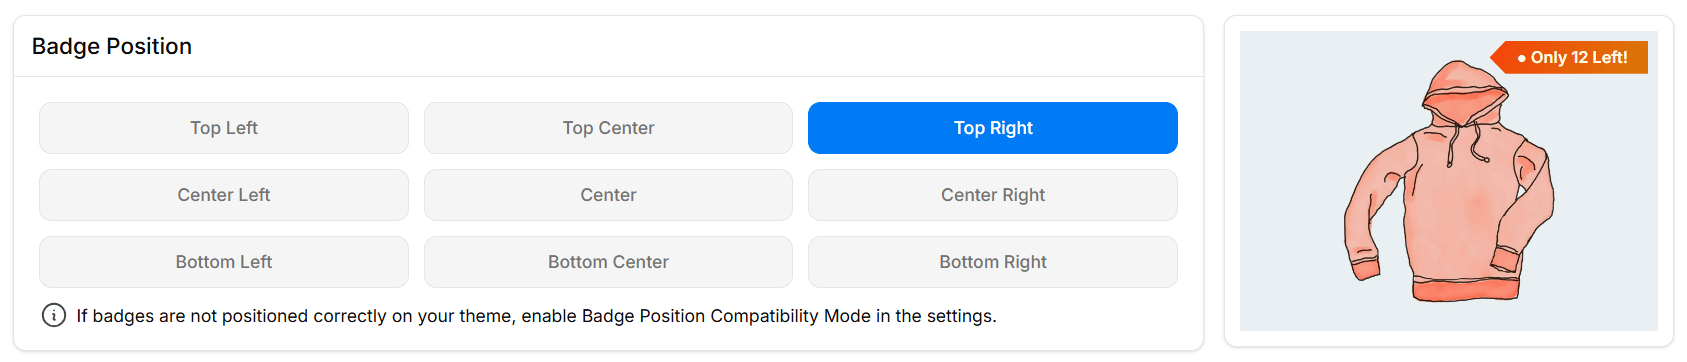
Scroll down to the Badge Position section and choose where the badge should appear on the product image. For visibility, Top Left or Top Right usually works best.
If the position looks off on your theme, enable Badge Position Compatibility Mode in the settings.
Step 8: Adjust extra properties (optional)
Fine-tune the badge with:
Margin X / Y for spacing
Z-index to control layering
Opacity for transparency
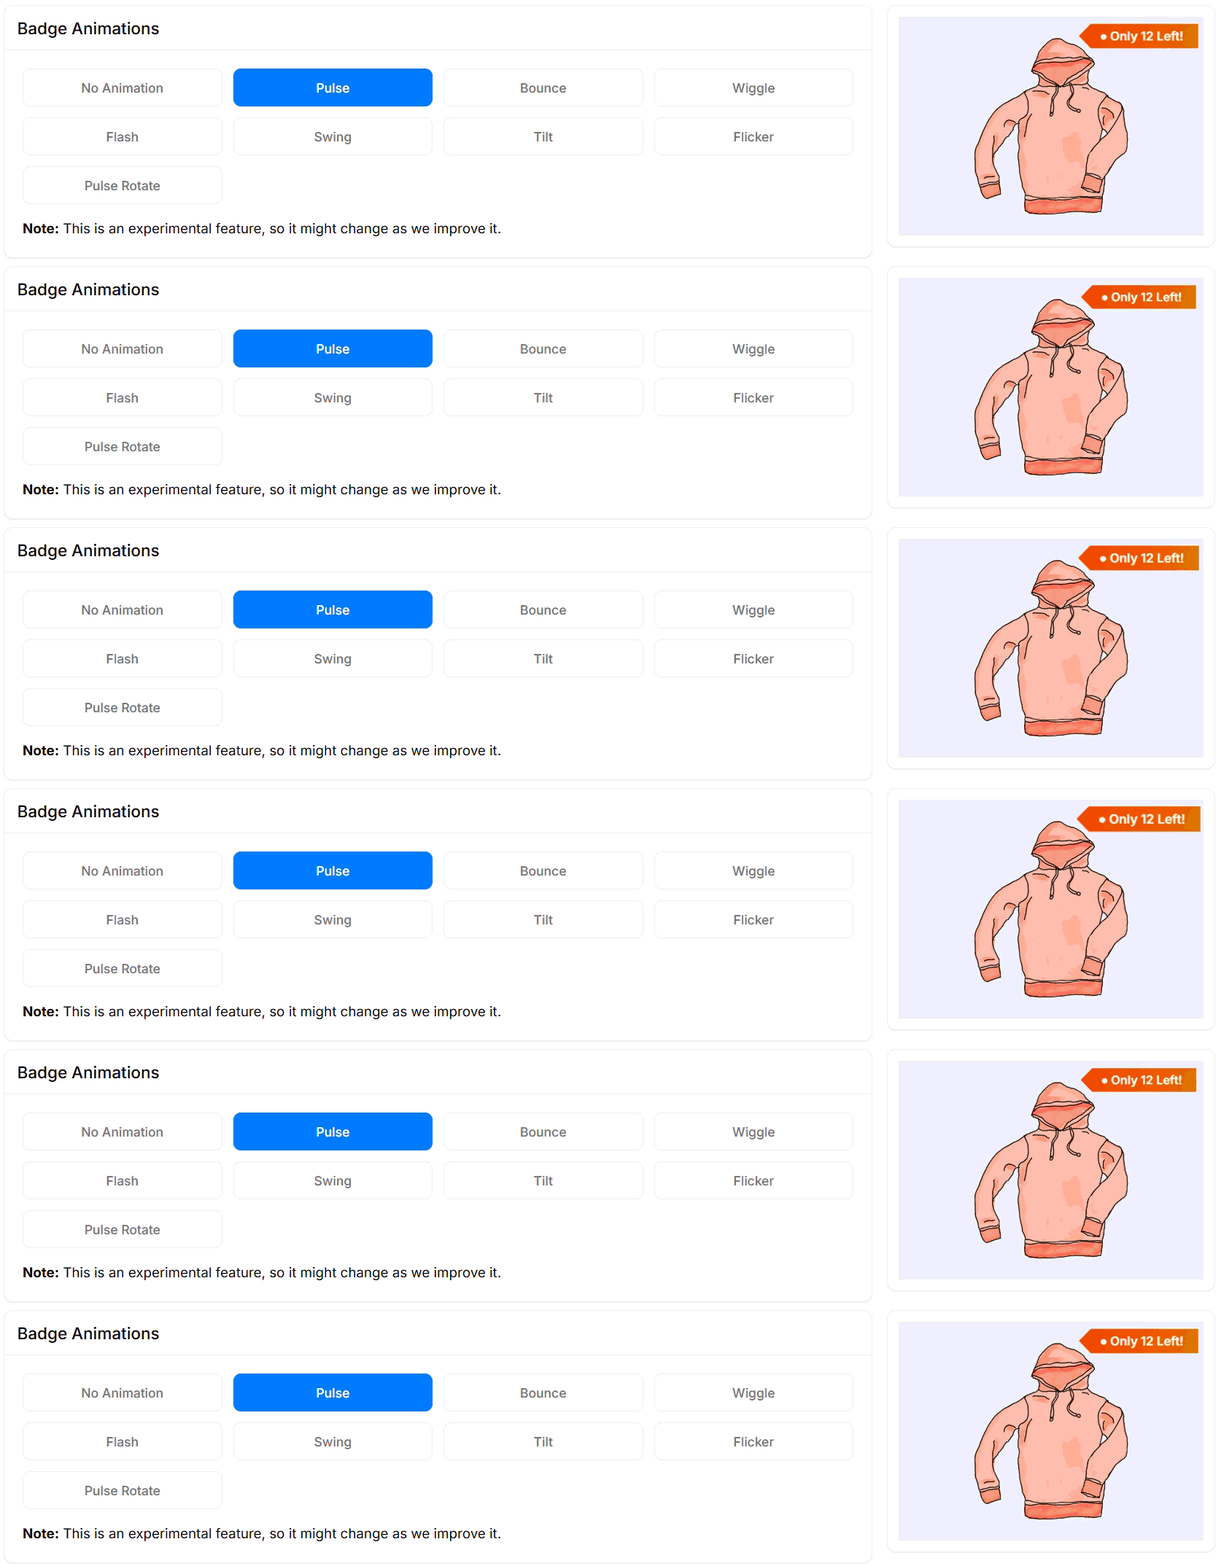
Step 9: Add an animation (optional)
To make the badge more attention-grabbing, you can choose an animation like Pulse, Bounce, Wiggle, or Flash. For low stock badges, subtle animations like Pulse usually work best since they create urgency without being distracting.
A little movement can help draw the eye, but keep it minimal. The goal is to highlight scarcity, not overwhelm the shopper.
Step 10: Finalize and save your badge
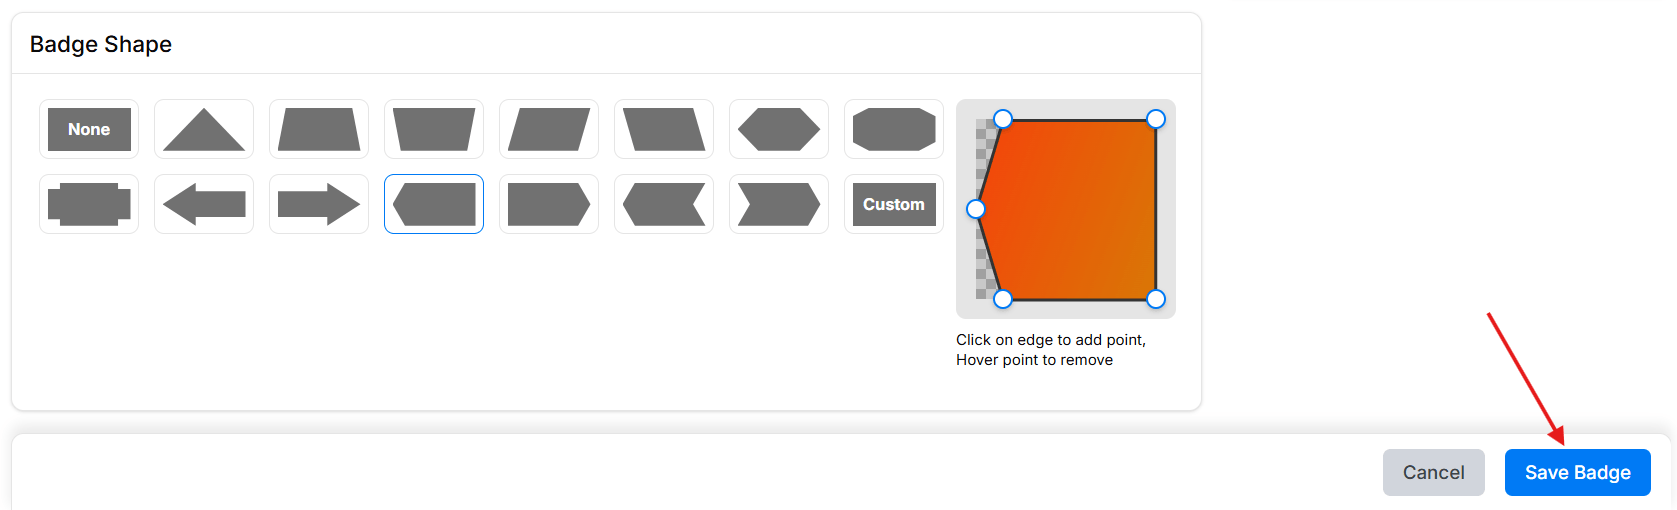
Before saving, you can also choose a badge shape or customize any other settings to better match your store’s style. Once everything looks good, click Save Badge.
Your low stock badge will now automatically appear on the products you assigned whenever stock matches your filter conditions.
After saving, you’ll find all your badges in the Badges List, where you can turn them on or off, edit them anytime, duplicate them, or create new ones for different campaigns.
Beyond the basic setup, Better Badge also supports image badges and custom HTML badges if you want more advanced styling.
Pro tip: Dynamic stock display
With Better Badge Pro, you can use the {{stock_quantity}} placeholder in the badge text. This pulls the actual WooCommerce stock count for each product and displays it live. So the badge reads “Only 4 Left!” for one product and “Only 1 Left!” for another, without any manual updating.
The plugin route covers most stores. If you’re building a heavily customized theme or want zero plugin dependencies, custom code gives you full control.
3. Custom Code
If you’re comfortable working with PHP, you can also create low stock badges manually using WooCommerce hooks and custom CSS.
For example, you can hook into WooCommerce product loops to display custom low stock badges dynamically based on inventory.
This gives you full control over where the badge appears and how it behaves, without adding another plugin.
WooCommerce’s hook system makes it straightforward for a developer. The relevant hooks are woocommerce_after_shop_loop_item for archive pages and woocommerce_single_product_summary for product pages.
For most use cases, a plugin like Better Badge is the cleaner option. But if you’re building a highly customized store or want developer-level control, custom code is always on the table.
How to Customize Your Low Stock Badge
Once the badge is live, you’ll want to make it look right for your brand. Here’s how to approach the main customization areas.
Text and Urgency Level
The badge text matters more than most people think. A few options, from low pressure to high:
Low Stock — neutral, informative
Almost Gone — soft urgency
Only 3 Left! — specific, creates urgency
Selling Fast! — implies demand, broader appeal
Specificity generally converts better. “Only 2 Left!” feels more real than “Low Stock” because it gives a concrete number. If your badge plugin supports a stock quantity placeholder, use it.
Color and Position
Your color choice sends a signal. Orange and amber read as caution, so they are appropriate for scarcity. Red can feel alarming if overused. Avoid green (that reads as “plenty in stock”) and blue (that reads as informational, not urgent).
Position: Top Left is the most common placement. Top Right is also fine, but make sure it doesn’t compete with a sale badge if you’re running both. If you’re still using WooCommerce’s default sale badge, our guide on how to add and customize a WooCommerce sale badge walks through the whole process. Two badges in the same corner gets cluttered fast. Give each one its own corner or stack them carefully with spacing.
Using Better Badge for Full Visual Control
In Better Badge, the customization interface is all point-and-click:
Go to your badge and open it in edit mode.
Badge Position — pick from a grid of positions with a live preview.
Badge Colors — set background, text, and border colors using the gradient color picker.
Badge Dimensions — control width, height, padding, and border radius.
Badge Shape — choose from prebuilt shapes like rounded rectangle, circle, ribbon, or starburst.
Badge Animations (Pro) — subtle pulse or bounce animations work especially well for scarcity badges. Use sparingly.
Image Badges (Pro) — upload a custom PNG or SVG if you want a fully branded look.
Setting a Threshold: When Should the Badge Show?
The threshold you pick changes everything. Too high (showing “Low Stock” when you have 50 units) and shoppers stop trusting it. Too low (triggering at 1 unit) and you miss the window where urgency can actually influence a purchase.
A threshold of 5–10 is a good starting point for most stores. If your products are high-velocity and sell out fast, go higher. If you’re selling made-to-order or premium items, even 3 can be reasonable.
In WooCommerce, the global threshold lives at WooCommerce > Settings > Products > Inventory > Low Stock Threshold. Individual products can override this in their own Inventory tab.
Best Practices for Low Stock Badges
A low stock badge may look small, but it influences real buying decisions. Getting the implementation details right keeps it fast, accessible, and honest.
1. SEO: Badges Don’t Replace Schema
A visual badge is a UX cue, not structured data. If you want Google to surface stock information in search results, you need a proper Product/Offer schema with availability set to https://schema.org/LimitedAvailability or InStock. The badge on its own does nothing for search engines.
WooCommerce generates Product schema by default. Just make sure your stock status is set correctly at the product level so it maps accurately.
2. Accessibility: More Than Color
Don’t rely on color alone. Always include text in the badge (“Low Stock,” not just a red dot). Shoppers with color vision deficiency won’t see the urgency in a color change.
3. Honesty: The Most Important Rule
Don’t fake scarcity. If the badge shows “Only 3 Left!” but the product is back in stock a day later, customers notice. It erodes the trust you built. Use real inventory thresholds, remove the badge once stock is replenished. Let your actual supply chain drive the urgency- not manufactured pressure.
Conclusion
A low stock badge is one of the smallest changes you can make to a product page, yet it’s one of the more consistently effective ones. It turns passive information (your inventory count) into an active decision trigger for shoppers on the fence.
If you’re not technical, start with the built-in WooCommerce stock notice and pair it with Better Badge for the visual badge on archive pages. If you ever need deeper customization later, developer-built solutions are always an option.
Either way, keep the badge honest, keep it lightweight, and make sure the stock threshold is set to a number that actually reflects your inventory reality.
One badge, one threshold and one less reason for a shopper to say “I’ll grab it later”.
Frequently Asked Questions (FAQs)
Do I need a plugin to show low stock badges?
Depends where you want it. WooCommerce’s built-in stock notice works without a plugin, but it’s text-only and appears on the single product page. For a visual badge on shop or category pages, you’ll need a plugin like Better Badge.
What’s a good low stock threshold to start with?
5–10 units works for most stores. Go higher if products sell fast, lower (even 3) for made-to-order or premium items.
Can the badge show the exact number of items left?
Yes, with dynamic placeholders like {{stock_quantity}} in Better Badge Pro, or WooCommerce’s “Only show quantity remaining in stock when low” display setting.
Does a low stock badge help with SEO?
No. It’s a visual UX element, not structured data. For search engines, you need accurate Product schema with the right availability status — the badge doesn’t affect that.
What happens if I set the threshold too low or too high?
Too high, and shoppers stop trusting the badge. Too low, and you miss the window where urgency actually drives a purchase. Match it to real sales velocity.
Can I run a low stock badge and a sale badge at the same time?
Yes, but give them separate positions — Top Left and Top Right, for example. Stacking both in one corner gets cluttered fast.
What happens if I keep showing “Low Stock” after a product is restocked?
Shoppers eventually notice the mismatch, and it reads as a manufactured urgency tactic rather than real inventory data. That erodes trust fast — remove the badge as soon as stock is replenished.
What color should I avoid for a low stock badge?
Green and blue — green reads as “plenty in stock,” and blue reads as informational rather than urgent. Orange and amber work best for scarcity messaging.
You put a product on sale. The old price gets crossed out, the new price appears, and the discount is technically right there. But shoppers don’t always stop to read the price. A sale badge gives them a quick visual cue that says, this product is on sale. And here’s the useful part: you don’t […]
Every promotion on your store ends up with the same badge. You’re running a flash sale, and the badge says “Sale!” It’s a summer sale, the badge still says “Sale!” You’re clearing out old stock. Same badge. Again. WooCommerce doesn’t care what’s actually happening in your store; every promotion gets the same generic badge, no matter […]
You’ve built a beautiful online store, sourced amazing products, and invested in marketing. But when you check your dashboard each morning, the sales numbers are… disappointing. Sound familiar? You’re not alone. In 2026, global ecommerce sales are projected to exceed $7.3 trillion, yet research shows that over 70% of online stores fail to scale profitably […]






 Samia Nasreen
20 min read
Samia Nasreen
20 min read