Every promotion on your store ends up with the same badge. You’re running a flash sale, and the badge says “Sale!” It’s a summer sale, the badge still says “Sale!”
You’re clearing out old stock. Same badge. Again.
WooCommerce doesn’t care what’s actually happening in your store; every promotion gets the same generic badge, no matter how different the occasion. A flash sale, a seasonal clearance, and a 5% discount or 50% off, all get the exact same label.
Doesn’t make much sense, right? So I’ll show you how to change sale badge text in WooCommerce, because right now, there’s no setting for it anywhere in the dashboard.
The default sale badge only tells a shopper a price changed, but nothing about why, how much, or how long they have to act on it. Even if your promotions differ from each other, the badge never does. And that costs you conversions.
A plugin or a bit of code will fix that, though, and I’ve tested both on a live store. You can change it to anything you want, “Flash Sale,” your brand name, even gibberish (that’s how flexible it is), if that’s what you’re going for.
Let’s first see why the default badge isn’t enough, then get into what each of those two methods actually involves.
The Problem With the Default WooCommerce Sale Badge
WooCommerce shows “Sale!” on every discounted product. That’s it. No settings page to change it, no dropdown with alternate text.
The badge is generated automatically the moment you set a sale price, and it shows up the same way everywhere, the shop page, category pages, the product page itself. You can schedule when it starts and ends, but you cannot touch the word “Sale!” itself.
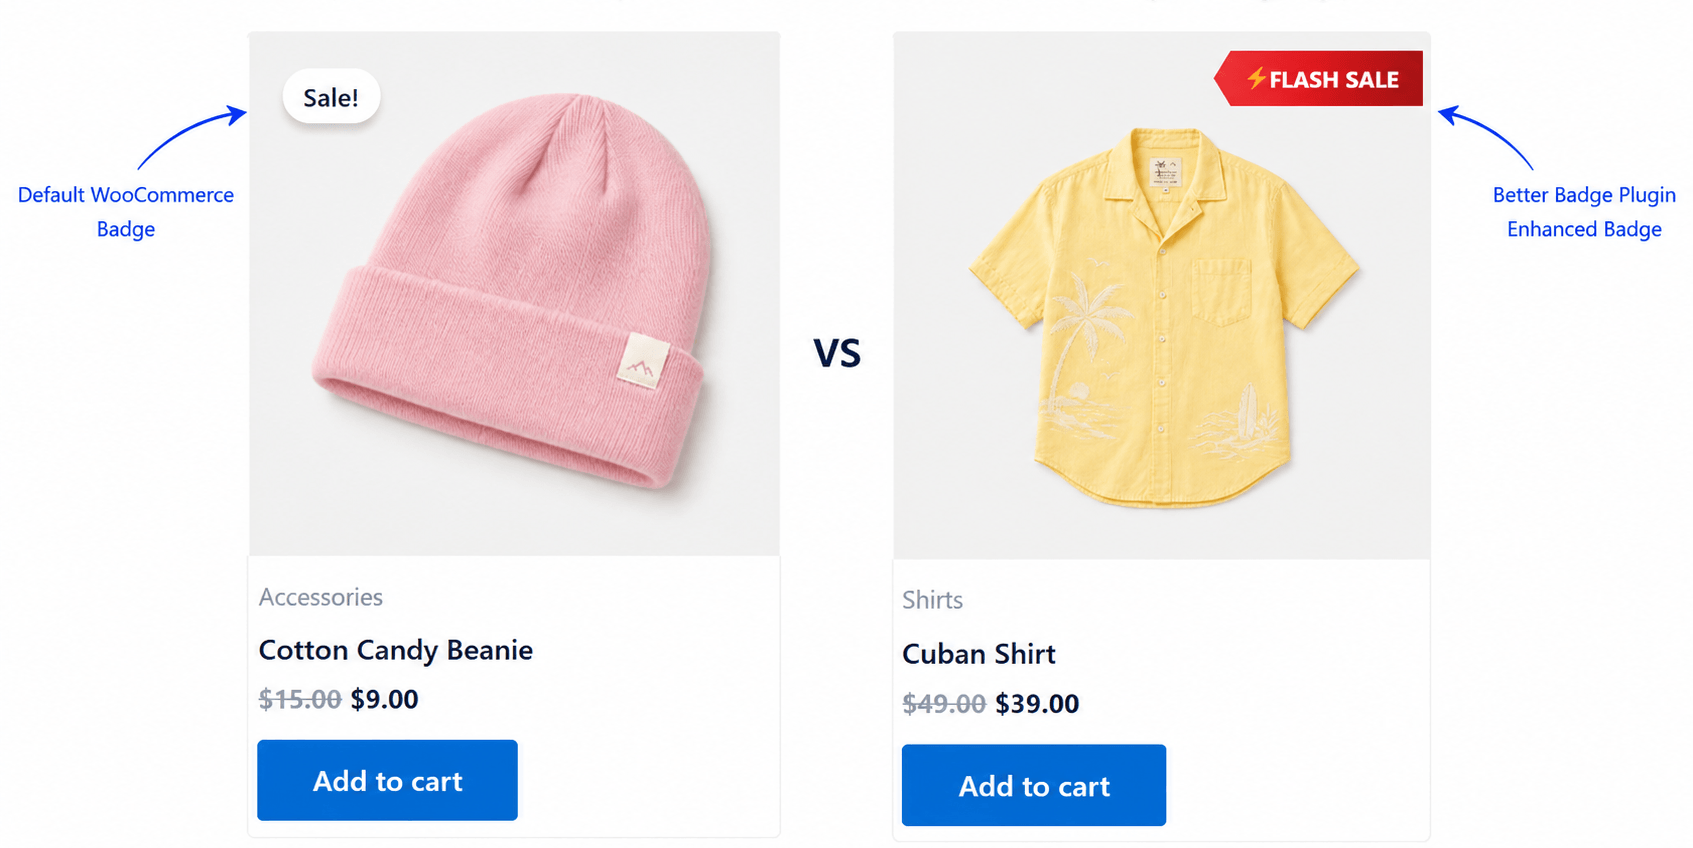
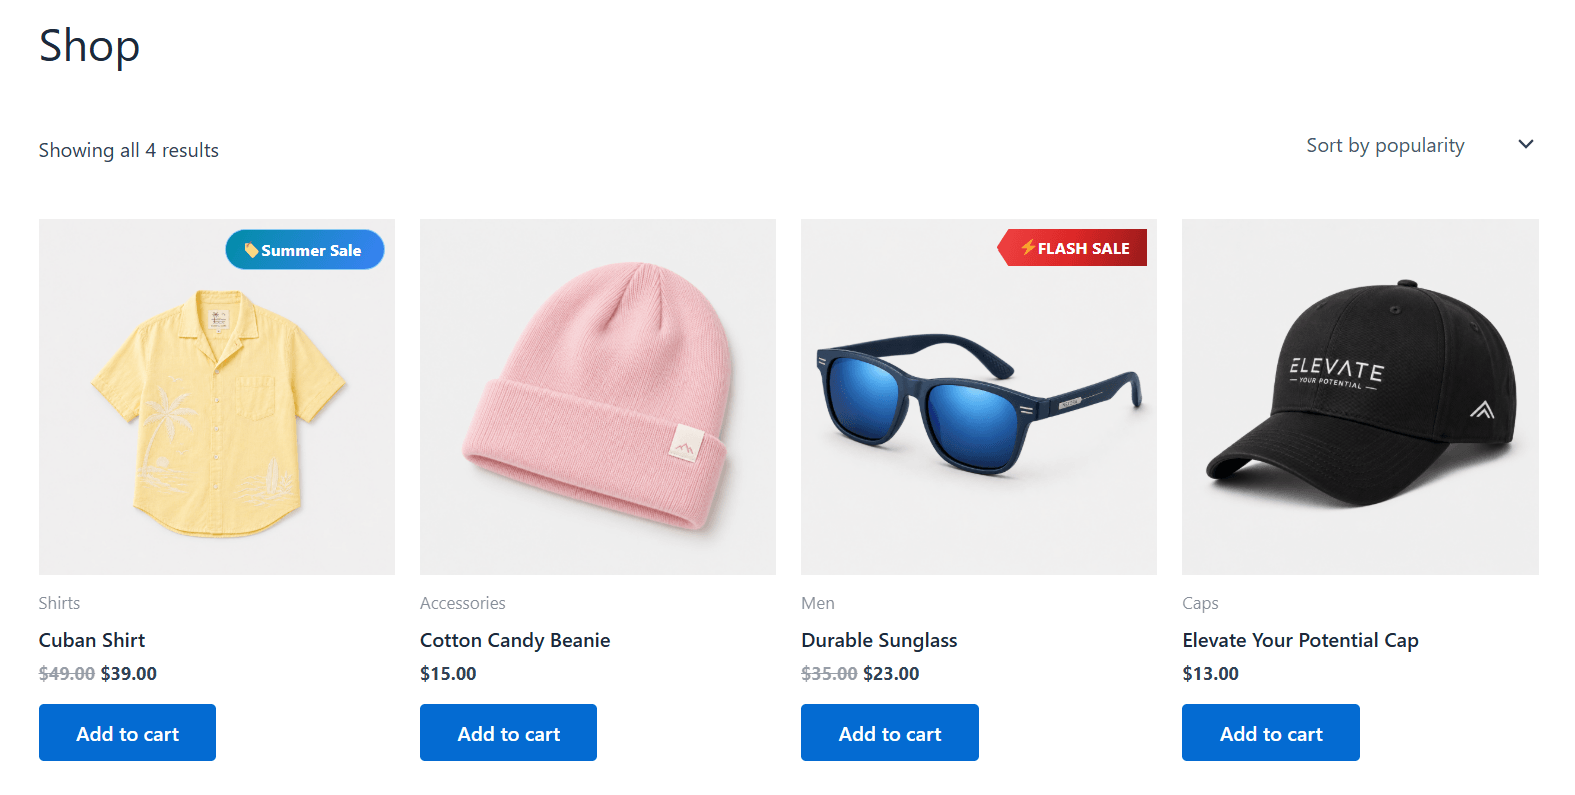
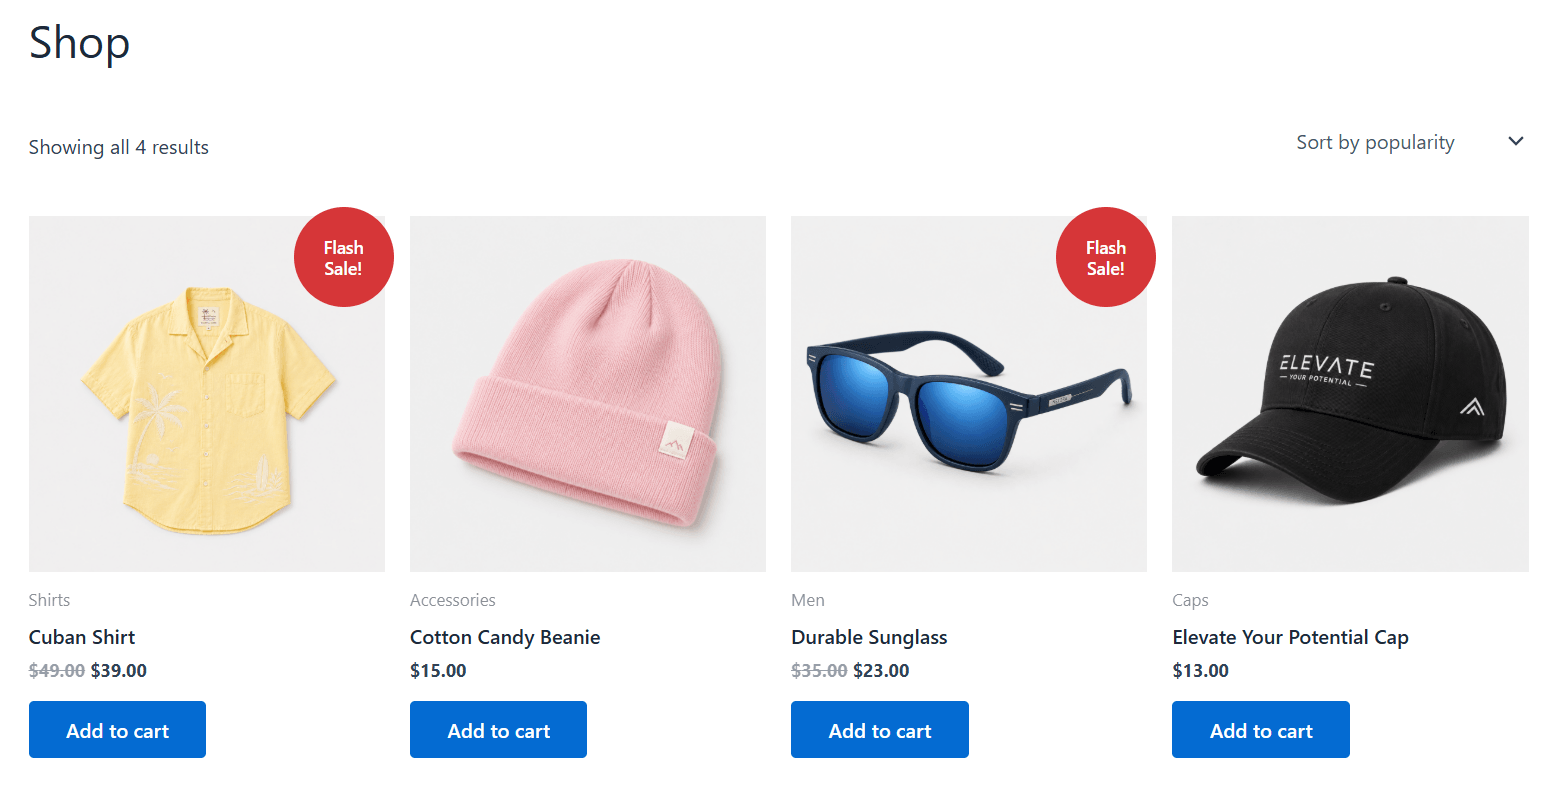
Here’s what that looks like next to a custom badge:
One says “Sale!” The other says exactly what’s happening, with a style that actually matches the brand around it. Same sale, different message, and that difference isn’t just cosmetic.
Product badges that say something specific instead of something generic can lift click-through and conversion rates by 10 to 50 percent, according to ecommerce badge studies.
Look at the image above again. The default badge barely catches your eye. The custom one makes you stop and actually read it.
The badge itself is small. The difference it creates is huge.
When to Customize Your WooCommerce Sale Badge Text
“Sale!” works, technically. It gets the point across: something’s cheaper right now. But “getting the point across” and “getting someone to act” aren’t the same thing, and that gap is where custom text earns its keep.
Value-focused text (“Save $15,” “30% OFF”). “Sale!” makes someone click through just to check the price. A number tells them before they click. That’s one less step between seeing the product and deciding to buy it.
Urgency-driven text (“Final Stock,” “Ends Tonight”). Clearance, flash sales, and bundle deals all look the same with a generic “Sale!” badge. Urgency-specific text tells the shopper what kind of window they’re working with.
Event-based text (“Eid Special,” “Black Friday”). Ties the discount to a moment that already feels timely, so the badge doesn’t have to manufacture urgency on its own.
Brand-voice text (anything that matches your store’s tone). A storefront with a distinct voice sitting next to a stock WooCommerce badge looks unfinished, like a template nobody bothered to customize.
A badge that says ‘Sale!’ gets noticed. A badge that says something is remembered.
How to Change Sale Badge Text in WooCommerce (Step-by-Step)
There are two ways to do this: a plugin, or a code snippet. I’ll walk you through both, then help you figure out which one actually fits your setup, plus a few mistakes I made along the way so you don’t have to repeat them.
Method 1: Change WooCommerce Sale Badge Text With a Plugin
This is the path I’d recommend for most store owners, especially if you don’t want to touch theme files or risk breaking something on a live site.
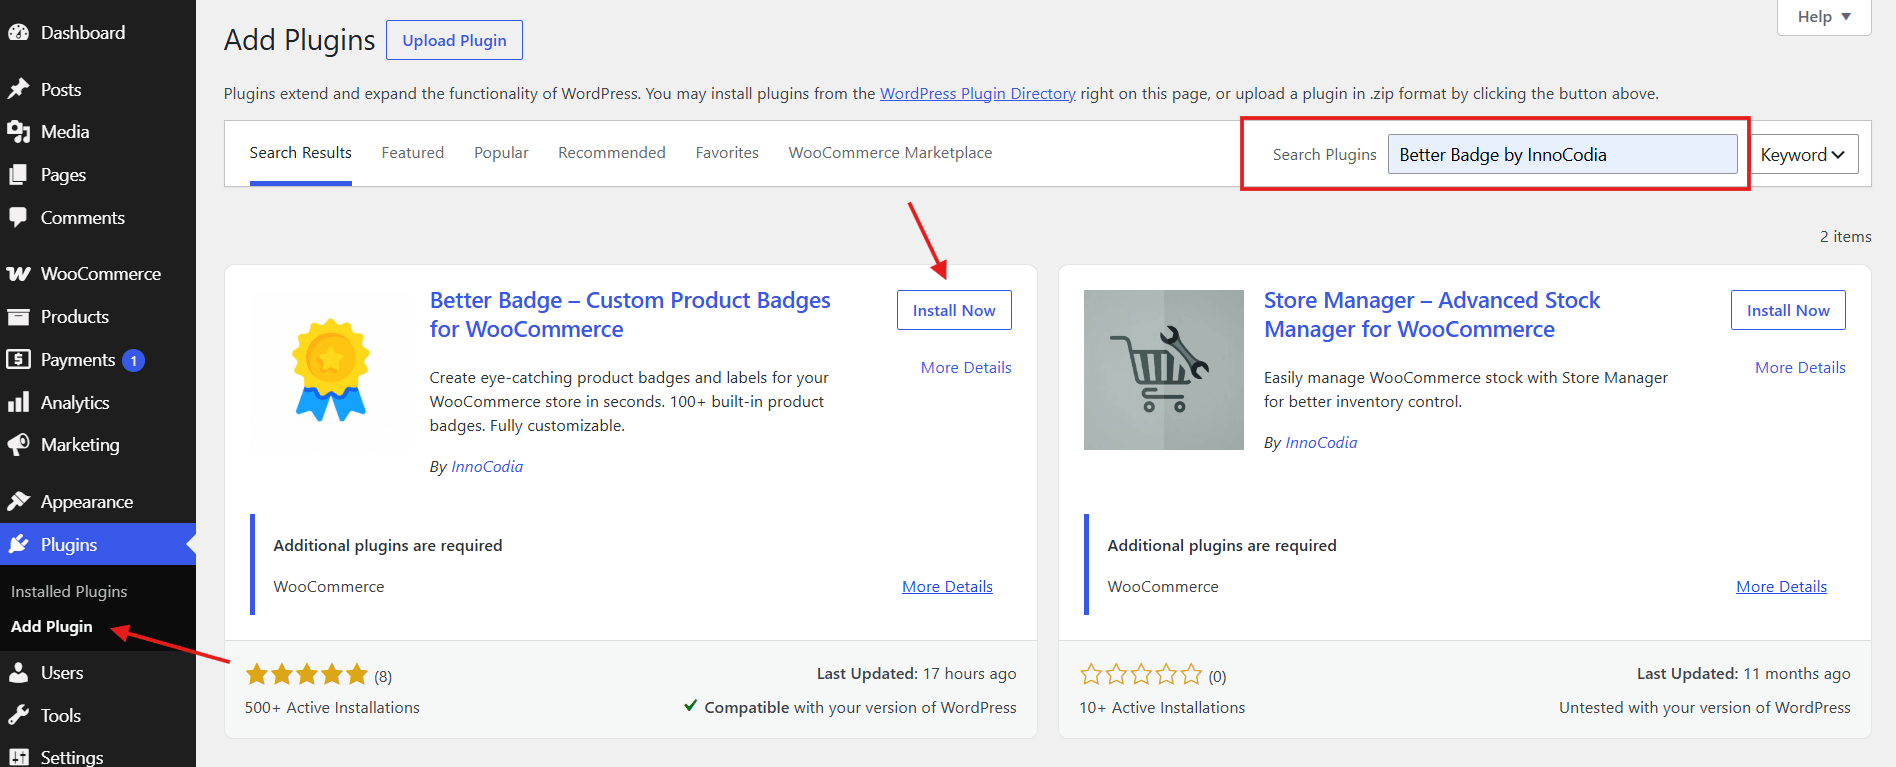
I used Better Badgefor this. Watch me change the sale badge text in just a few minutes:
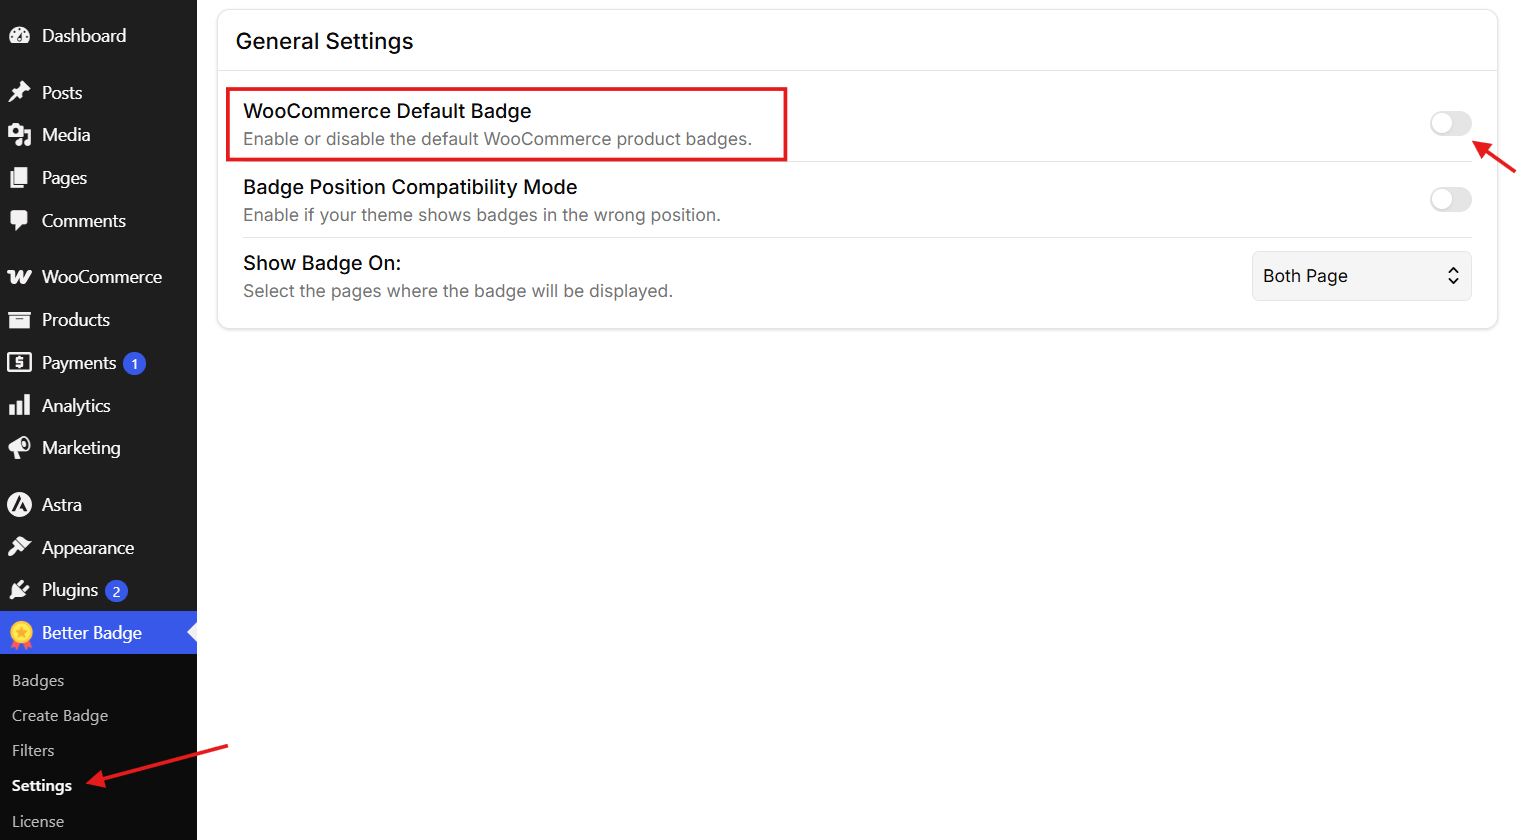
Go to Better Badge > Settings and toggle off “WooCommerce Default Badge.” This hides the default “Sale!” badge so your custom one doesn’t stack on top of it.
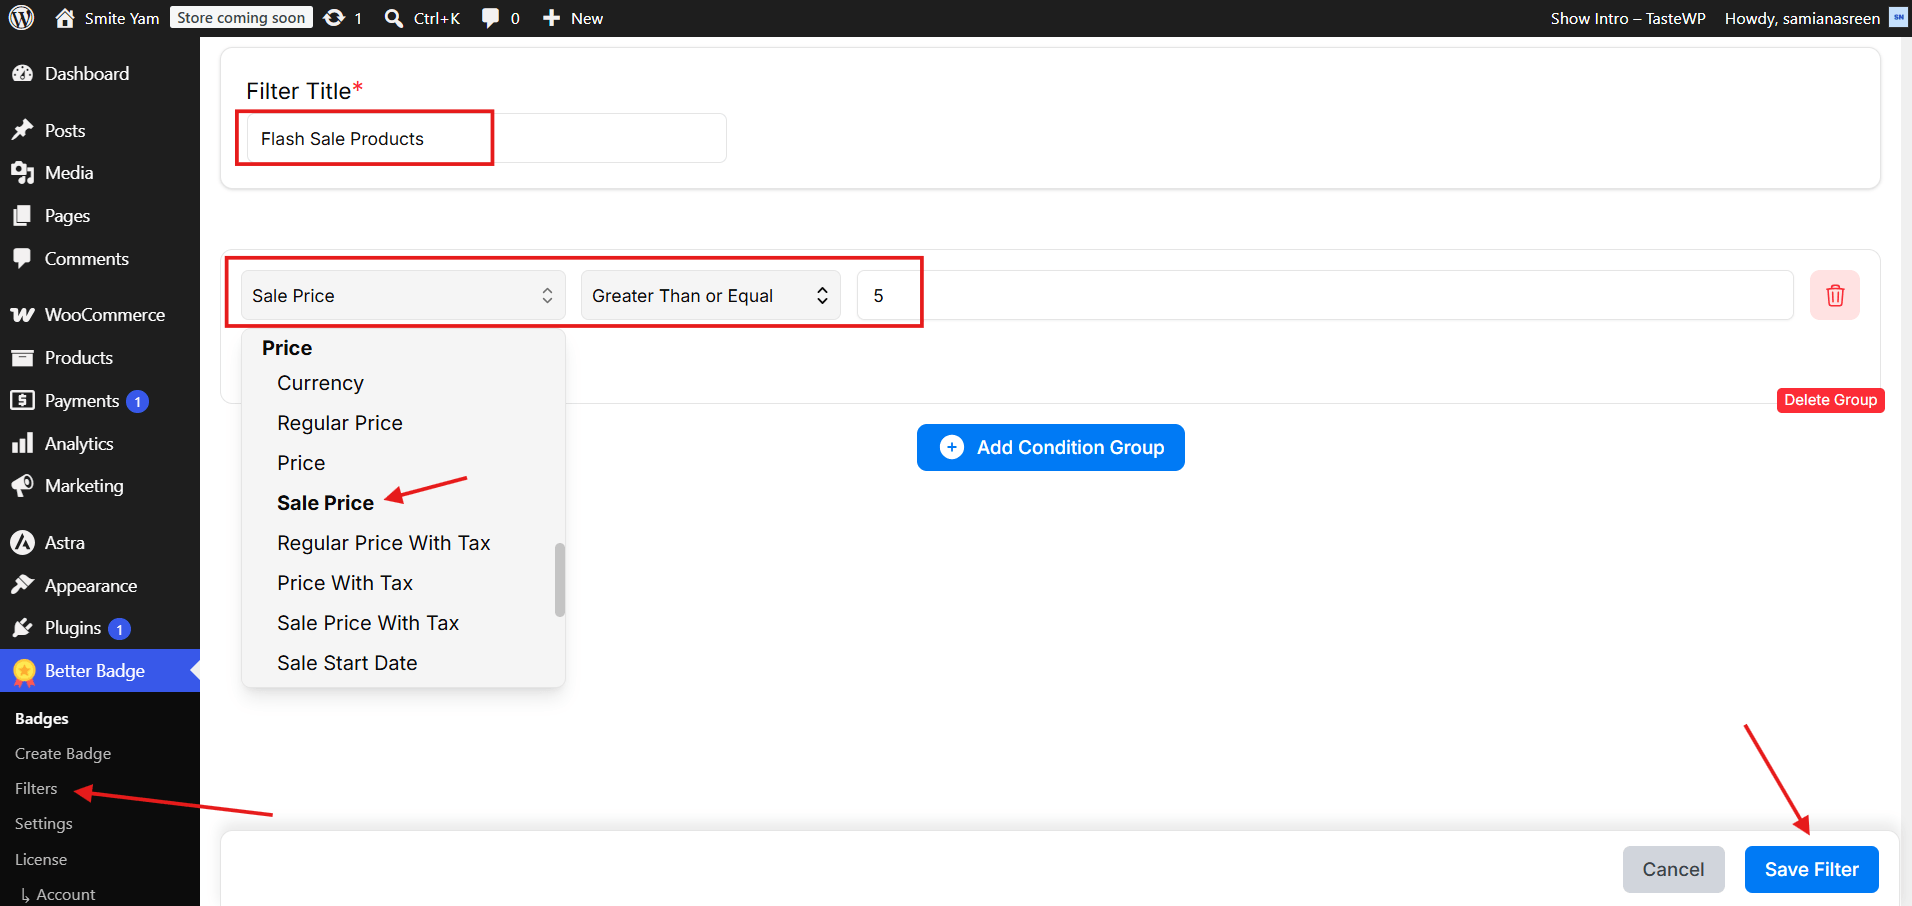
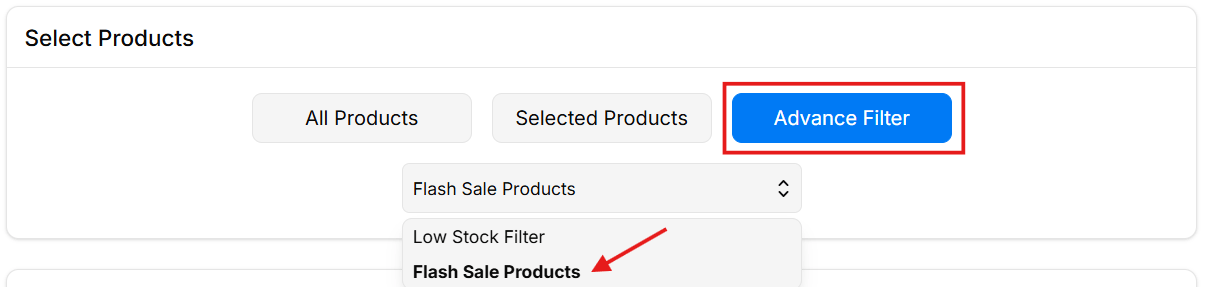
If you’re not on Pro, skip this step. If you are, create a filter. Click Filters in the Better Badge menu, name it something like “Flash Sale Products,” then add a condition group: select Sale Price from the dropdown, choose a comparison like “greater than or equal to,” and enter the price you want, then save the filter.
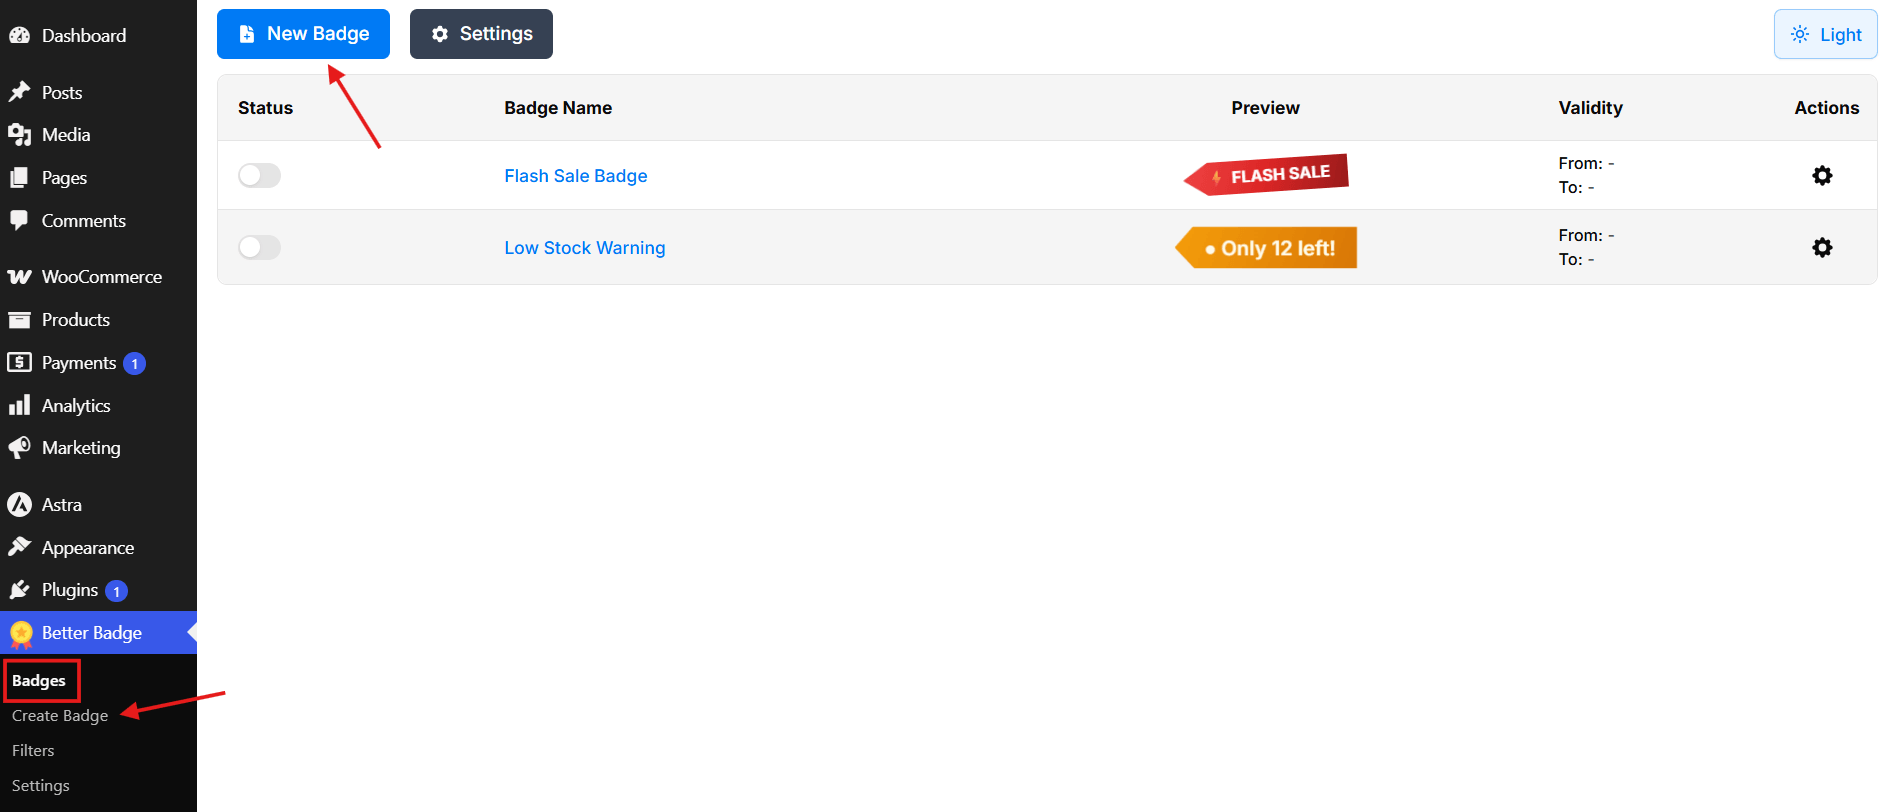
Go to Badges and click New Badge (or go to Create New Badge directly from the Better Badge menu).
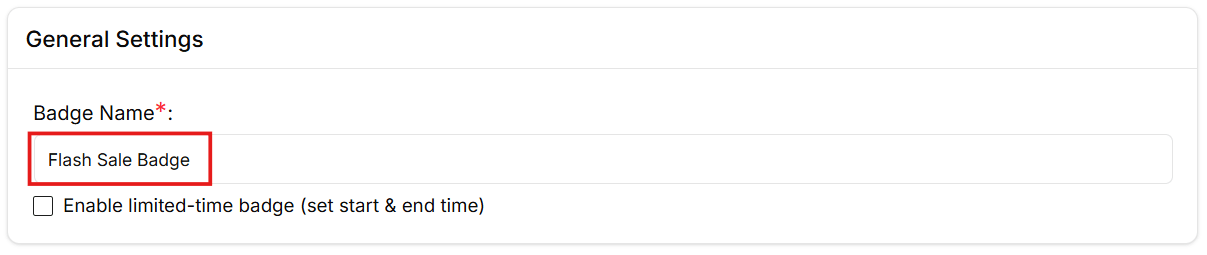
Give the badge a name, then choose who it applies to.
On the free version, you can apply it to all or selected products and select specific ones manually. On Pro, you can apply your saved filter instead, so the badge automatically shows on any product that matches it.
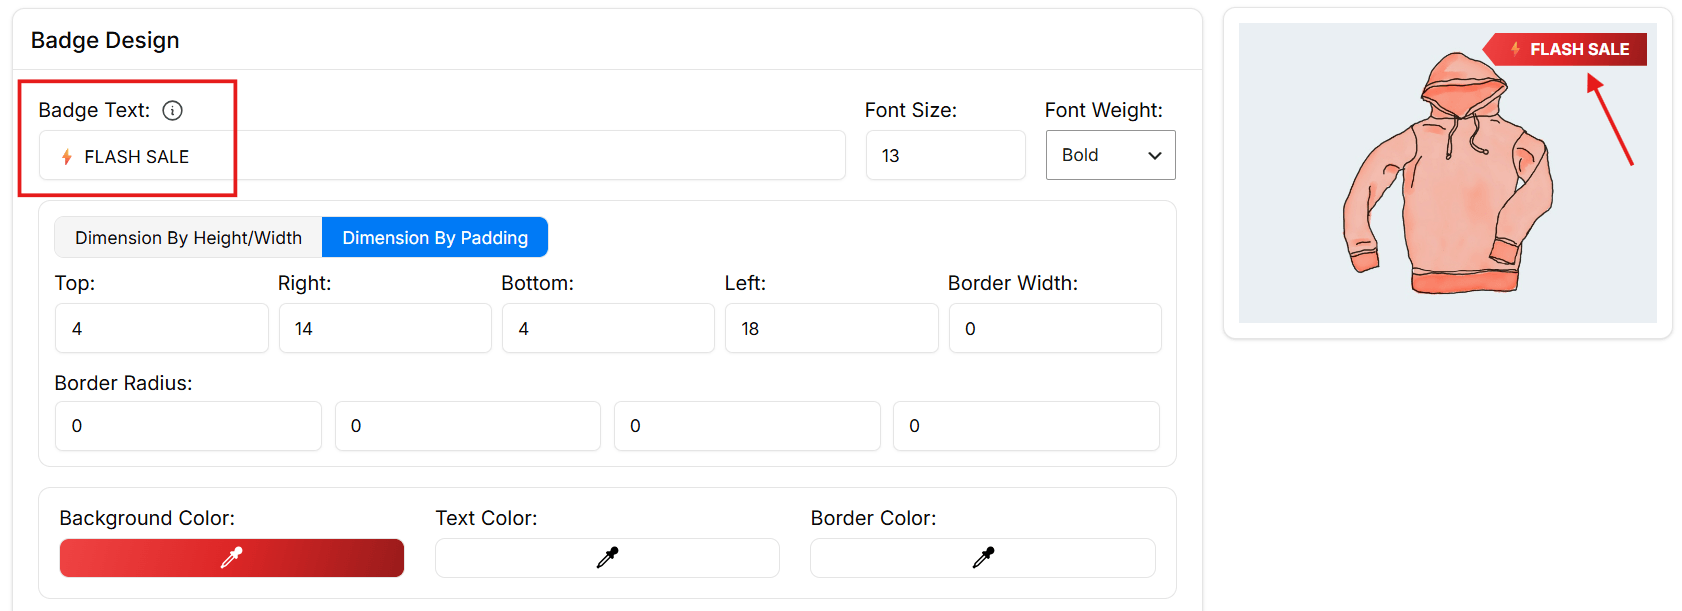
Set your badge text to whatever you want, or pick a template like “Sale,” “On Sale,” or “Flash Sale,” etc.
And then check a discounted product on the front end.
Better Badge also has a dynamic tag that pulls the discount percentage automatically, if you want to show “30% OFF” instead of static text.
You also get badge shape, color, animation, and position controls without writing CSS. Use as much or as little of that as you need.
Method 2: Change WooCommerce Sale Badge Text With Code
If you’d rather not add a plugin for one badge, or you want full control over the logic, WooCommerce gives you a filter hook for this: woocommerce_sale_flash.
A quick warning before you touch this: editing theme files can break your site if something goes wrong, a stray character or a missing semicolon can cause a white screen. Back up your site first, and use staging if you have it.
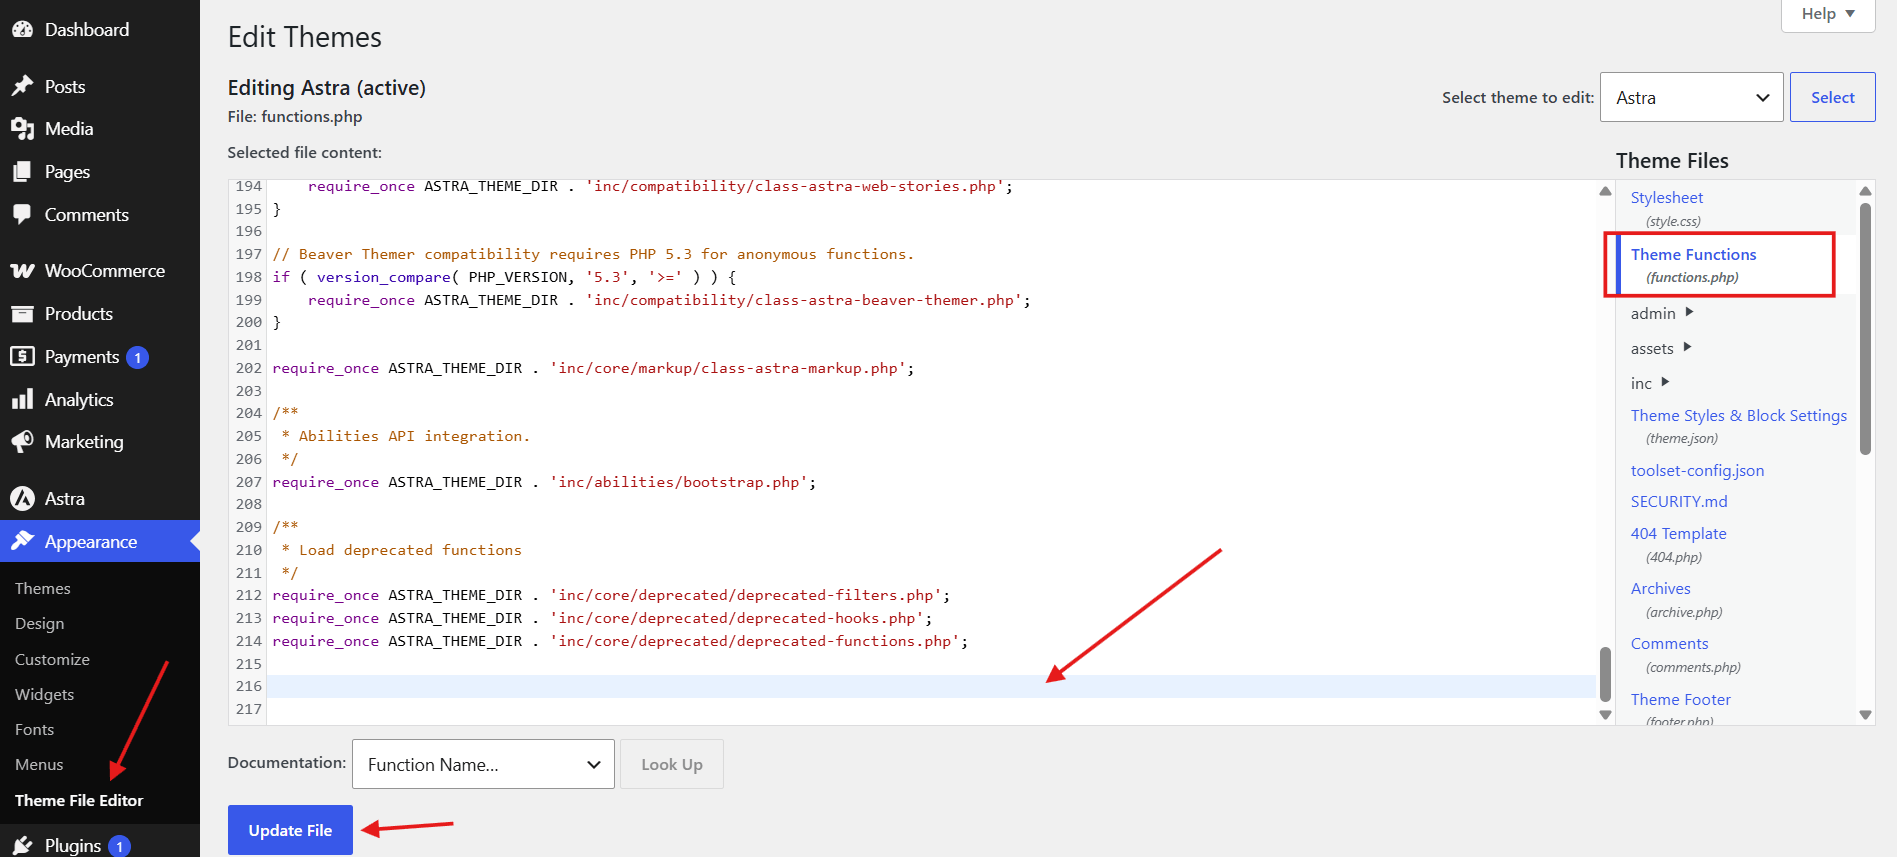
To find the right file: go to Appearance > Theme File Editor, then select your child theme from the dropdown if it isn’t already selected, and open Theme Functions (functions.php) from the file list on the right. Scroll to the bottom of the file to add new code.
Replace Flash Sale! with whatever text you want. And Update File. This changes the badge across your entire store, on every product that’s on sale.
You can also calculate and show the discount percentage instead of static text, but that’s its own function.
A few more things to know:
Edit your child theme, not the parent. A theme update will wipe changes to the parent theme’s functions.php.
If you don’t have Theme File Editor or FTP access, this method is closed to you. The plugin route doesn’t have that requirement.
One typo in the function and you risk a white screen. Test on staging first if you have it.
Styling Your WooCommerce Sale Badge With CSS
Text isn’t the only thing you can touch. The badge itself has a .onsale class, so once you’ve changed the text, you can go a step further and change how it looks too.
Add this to Appearance > Customize > Additional CSS:
This changes color and shape across the board. Padding and font size can be adjusted the same way, but at that point you’re maintaining custom CSS that may break with theme updates.
Plugin or Code: Which Method Should You Use?
Use the plugin if: you want custom WooCommerce sale badge text without touching code, and you want it done fast. It’s safer for non-developers, and it also gives you the dynamic percentage option (like “30% OFF”) without writing a single function.
Use the code snippet if: you’re already comfortable in functions.php and only need one specific change. It works fine, but I’d only recommend it if you’re already editing theme files for other reasons, since one plugin doing this one job is usually less maintenance than a snippet you’ll forget exists in six months.
If you’re not sure which camp you’re in: the plugin route covers almost every case, including yours if you’re still asking the question.
Common Mistakes to Avoid
A few things tripped me up when I tried this myself, worth knowing before you run into them too.
Editing the parent theme instead of a child theme. The badge text changes, works fine, looks done. Then the theme updates and the change is gone. Always make the functions.php edit in a child theme, or it won’t survive the next update.
Assuming the snippet applies everywhere. The woocommerce_sale_flash filter doesn’t reach every layout. Blocks like Handpicked Products run on a different system and may not pick up the change, even though the shop and category pages do. This looks like a bug in the code when it’s actually a hooks-versus-blocks gap.
Not clearing cache before troubleshooting. A change that looks like it failed is often just an old cached page. Clear cache first, then check, before assuming the code is wrong.
Checking desktop only. A badge that looks correct on a laptop can still show old text on mobile, usually due to a separate cache layer or a mobile-specific style override. Check both before calling it done.
The Bottom Line
The default “Sale!” badge isn’t a problem you need to fix. It’s just generic. Whether that matters comes down to how many sale types you run and how much your storefront’s design relies on consistent branding.
Custom text does more than look nicer, though. It grabs attention faster, reduces the friction between seeing a product and deciding to buy it, and tells the customer things “Sale!” never will, how good the deal is, or how long it’ll last. A summer sale ending in a week doesn’t say that anywhere. “Sale!” doesn’t know it’s summer, and it doesn’t know the sale is ending soon either.
I tried both methods myself, and honestly, the plugin won me over. It’s just clicks, no file editing, no risk of a typo breaking the site, and it covers the discount-percentage case without writing a single function. The code snippet works fine if you’re already comfortable in functions.php and don’t want another plugin running for one badge, but for most people I’d point straight at the plugin. You just needed to know it existed.
And now you know how it’s done, so next flash sale, summer sale, or clearance run, the badge can finally say so.
Frequently Asked Questions (FAQ)
Not with the code snippet, it applies one text store-wide. The plugin lets you do this through manual product selection or, on Pro, filters.
The woocommerce_sale_flash filter doesn’t reach block-based layouts like that one. The plugin doesn’t have this gap.
No. It’s a front-end display element, not part of your price or schema data.
Only if you’re hardcoding the text. With the plugin, you can set up a few badges once and switch between them without touching code.
The code snippet is gone, it lived in your old theme’s functions.php. The plugin’s settings stay, since they’re stored independently of your theme.
Install a plugin like Better Badge, disable the default badge, then create a new one with whatever text you want. No functions.php, no theme editing, and no risk of breaking your site with a typo.
Yes. If you’re using the code method, add a .onsale CSS rule to your theme’s Additional CSS. If you’re using a plugin, color is usually a built-in setting, no CSS required.
With a plugin, yes, you can create multiple badges and assign each to specific products or, on Pro versions, to a filtered group (like “products over $50”). With the code snippet, no, one function controls the text store-wide.e.
You put a product on sale. The old price gets crossed out, the new price appears, and the discount is technically right there. But shoppers don’t always stop to read the price. A sale badge gives them a quick visual cue that says, this product is on sale. And here’s the useful part: you don’t […]
Someone visits your store, finds a product they like, and thinks “I’ll grab it later.” Later never comes. The item sells out. They don’t come back. This is called purchase hesitation, and a well-placed low stock badge is one of the simplest ways to kill it. In ecommerce, hesitation is expensive. Even interested shoppers can […]
You’ve built a beautiful online store, sourced amazing products, and invested in marketing. But when you check your dashboard each morning, the sales numbers are… disappointing. Sound familiar? You’re not alone. In 2026, global ecommerce sales are projected to exceed $7.3 trillion, yet research shows that over 70% of online stores fail to scale profitably […]





 Samia Nasreen
20 min read
Samia Nasreen
20 min read